


BIM BCF panel - Custom login dialog box
The BIM BCF Custom Log In dialog box allows you to connect to a cloud service to start collaborating on issues in the drawings.
Source URL
It is generally easier to use cloud services to manage BCF issues. If you wish to connect to these services from within BricsCAD BIM, you will need an account of these services first. This allows you to create issues and manage them in real-time from anywhere.
To connect to a cloud service, insert in the Source URL field one of the following Cloud services:
| Cloud Service | Source URL |
|---|---|
| BIMcollab | <space name>.bimcollab.com * |
| BimSync | bcf.bimsync.com |
| BIMtrack | Bcfrestapi.bimtrackapp.co |
Log in
Connects you to the cloud service. You are asked to insert the e-mail address and the password to connect.
After you successfully log in, you can close the browser window and start collaboration on issues in BricsCAD.
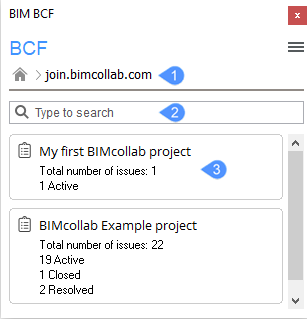
- Source URL
- Search
- Project list
- Source URL
- Displays the source URL.
- Search
- Displays only the projects filtered by the word you type in the search bar.
- Project list
- Displays the list of projects that you are involved in.
Project list
After you left-click the project will open it and show a list of the issues. When you left-click on an issue, this dialog box will open.
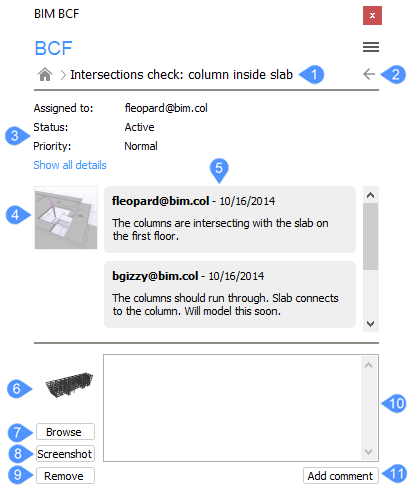
- Issue name
- Issue overview
- Details
- Thumbnail image
- Comments
- Preview
- Browse
- Screenshot
- Remove
- Comment
- Add comment
- Issue name
- Displays the name of the opened issue.
- Issue overview
- Returns you to the issue overview.
- Details
- Displays detailed information about the issue, such as status, author and creation date.
- Thumbnail image
-
If the comment has an associated camera position, then clicking the thumbnail image will take the camera in the current drawing to this position.
This is useful if you want to know where exactly the issue is, and you do not want to manually search through the model.
- Comments
- Displays the comments on the issue.
- Preview
- Displays a preview of the issue after you press the button no. 8.
- Browse
- Opens the Select a viewpoint for this comment dialog box.
- Screenshot
- Insert a screenshot from model space in the preview field (no. 6).
- Remove
- Removes the screenshot preview.
- Comment
- Allows you to insert a comment for an issue.
- Add comment
- Adds the comment you have inserted in field no. 10 to an existing issue.