


Compositions dialog box
The Compositions dialog box allows you to create, modify and delete compositions.
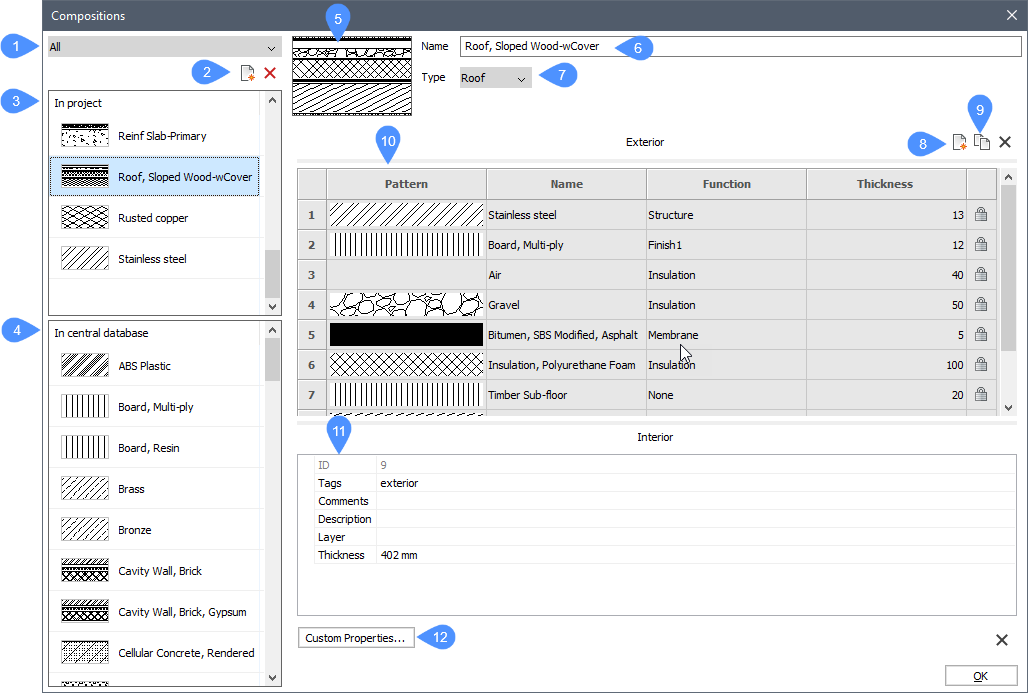
- Composition category selection
- New composition
- In project
- In central database
- Preview pane
- Name
- Type
- Add ply
- Duplicate ply
- Structure grid
- Properties grid
- Custom properties
Composition category selection
Composition categories are used to filter the list of the compositions.
Click the drop-down button and choose one of the available categories: All, Generic, Roof, Slab, and Wall.
New composition
Click this button to create a new composition.
In project
Displays the compositions of the selected category in the project database.
In central database
Displays the compositions of the selected category in the central database.
Right-click on a composition to add a new composition, duplicate, delete or copy to a project.
Preview pane
Displays the preview of the selected composition.
Name
Displays the selected composition name. You can change the default name.
Type
Displays the category for the selected composition. You can click the drop-down button and select a new category. The available categories are: Generic, Roof, Slab, and Wall.
Add ply
Opens the Physical materials dialog box which allows you to choose a material from the library or project database.
Duplicate ply
Inserts a copy of the selected ply.
Structure grid
Displays the material and thickness of the composition plies. The ply on top (exterior) is applied to the reference of the solid.
The plies of a composition are ordered from Exterior (top) to Interior (bottom). You can drag the ply number on the desired position to change the ply order.
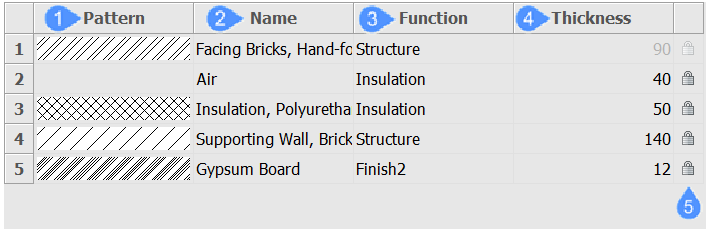
- Pattern
- Name
- Function
- Thickness
- Lock/Unlock thickness
- Pattern
- Displays a preview of the ply. Double click on the Pattern field to change the appearance in the Physical Materials dialog box.
- Name
- Displays the name of the ply. Double click on the Name field to change it in the Physical Materials dialog box.
- Function
- You can select a function from the drop-down list. The available functions are: None, Structure, Substrate, Insulation, Finish1, Finish2, and Membrane.
- Thickness
- Click on the Thickness field to modify the thickness of a ply.Note: You can only modify the ply thickness if the Variable Thickness property in the Physical Materials dialog box is set to Yes.
- Lock/Unlock thickness
- You can click the Lock/Unlock button to change its status.Note: Only one ply in a composition can have an unlocked thickness. As a result, the total thickness of a composition can be:
- Fixed: all plies have locked thicknesses.
- Minimal: the composition contains at least two plies and one ply has an unlocked thickness. The minimum thickness is equal to the sum of the thicknesses of the locked plies.
- Free: the composition contains a single ply that has an unlocked thickness.
Note: The thickness of a ply can only be unlocked if the Variable Thickness property in the Physical Materials dialog box is set to Yes.
Properties grid
Displays the properties of the selected composition like tags, comments, description, layer, thickness and custom.
- Tags
- Select the Tags field and type new tags, separated by commas. Tags are case sensitive.
Click the Browse button next to the Tags field to open the Tags dialog box.
- Comments
- Optionally, you can add comments to the selected composition.
- Description
- Optionally, you can add a description to the selected composition.
- Layer
- Optionally, you can assign a layer from the drop-down list to the selected composition.
- Thickness
- Displays the overall thickness of a composition, which is equal to the sum of the thicknesses of the composing plies.
Custom properties
Opens the Select/Create a Custom Property dialog box. You can add custom properties for compositions.