


Arraying entities
The ARRAY commands copy a selection set in a rectangular or polar (circular) pattern or along a linear entity. For a rectangular array, you must specify the number of rows and columns and also the spacing between subsequent rows and columns. To create a polar array, you will be prompted to specify the center point of the array, the rotation step and the number of items in the array or the angle to fill. You can choose to rotate the selection set around the center point or to keep its original orientation.
The ARRAYCLASSIC command creates a static polar or rectangular array of entities through a dialog box.
The -ARRAY command creates a static polar or rectangular array of entities.
The 3DARRAY command constructs static 3D rectangular arrays and rotated polar arrays.
The ARRAY command distributes entity copies in an evenly spaced associative rectangular array (ARRAYRECT command), a polar array (ARRAYPOLAR command) or a path array (ARRAYPATH command) array.
The ARRAYEDIT command allows you to edit associative arrays and their source entities.
Creating a static rectangular array
- Launch the ARRAYCLASSIC command.
The Array dialog box appears.
-
Under Array Type, choose Rectangular.
- Click the Select Entities button.
The Array dialog box closes temporarily to let you select entities.
- Select the entities, then right-click or press Enter.
The Array dialog box reopens.
- Fill out the Settings fields or press the Pick Points buttons to define the settings graphically.
The Array dialog box closes temporarily to let you pick a point in the drawing.
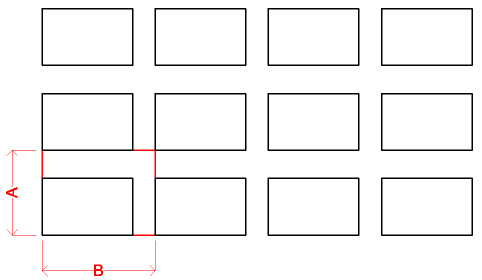
Row offset (A) and column offset (B) can be defined by the spacing rectangle (red).
- Click the OK button to create the array.
Creating a static polar array
- Launch the ARRAYCLASSIC command.
The Array dialog box appears.
-
Under Array Type, choose Polar.
- Click the Select Entities button.
The Array dialog box closes temporarily to let you select entities.
- Select the entities, then right-click or press Enter.
The Array dialog box reopens.
-
Choose a Calculate option: Angle between, Angle to fill or Number of items.
- Fill out the Settings fields or press the Pick Points buttons to define the settings graphically.
The Array dialog box closes temporarily to let you pick a point in the drawing.
- (option) Check the Rotate items as copied option.
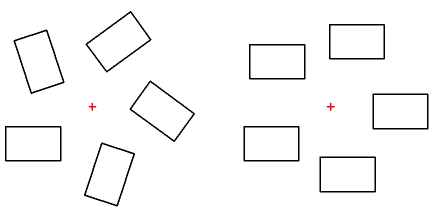
Entities rotated (left) or not (right) about the center point of the array.
- (option) Define an Entity base point.
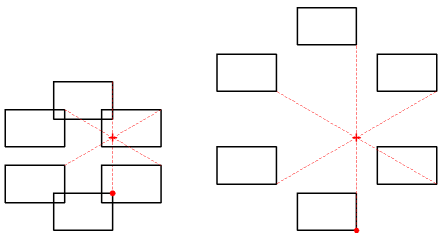
Polar array with base point (dot) and center point (cross).
- Click the OK button to create the array.
Creating a static 3D rectangular array
- Launch the 3DARRAY command.
You are prompted: Select entities to array [selection options (?)]:
- Select an entity.
Entities in set: 1
You are prompted: Select entities to array [selection options (?)]:
- Select more entities or press Enter to stop selecting.
You are prompted: Type of array [Polar/Rectangular] <Rectangular>:
- Choose the Rectangular option.
You are prompted: Number of rows in the array <1>:
- Specify the number or rows.
You are prompted: Number of columns <1>:
- Specify the number of columns.
You are prompted: Number of levels <1>:
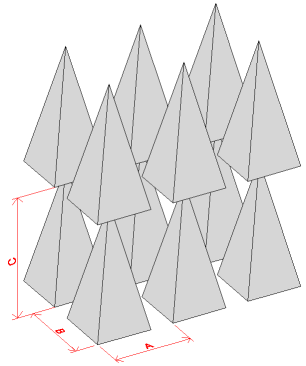
Rectangular 3D Array:
row spacing A, column spacing B, level spacing C
- Specify the number of levels.
You are prompted: Vertical distance between rows:
- Type a value or click two points.
You are prompted: Horizontal distance between columns:
- Type a value or click two points.
You are prompted: Depth between levels:
Type a value or click two points.
The array is created.
Creating a static 3D polar array
- Launch the 3DARRAY command.
You are prompted: Select entities to array [selection options (?)]:
- Select an entity.
Entities in set: 1
You are prompted: Select entities to array [selection options (?)]:
- Select more entities or press Enter to stop selecting.
You are prompted: Type of array [Polar/Rectangular] <Rectangular>:
- Choose the Polar option.
You are prompted: Number of items to array or [enter to specify Angle between items] <enter to specify Angle between items>:
- Specify the number of items.
You are prompted: Angle to fill (+ for ccw, - for cw <360>):
- Type a value or press Enter to accept the default.
You are prompted: Rotate entities around the array? [Yes/No] <Yes>:
- Choose Yes or No, or press Enter to accept the default.
You are prompted: Center point of array:
- Specify a point.
You are prompted: Specify second point along central axis of array:
- Specify a point.
The array is created.
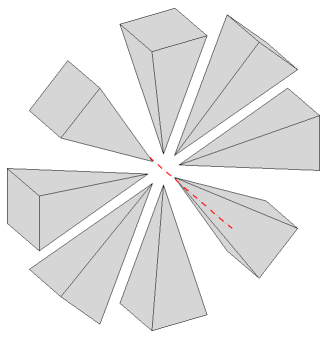
Polar 3D array around a horizontal axis (red).