


Propagate planar
Commands
BIMPROPAGATEPLANAR
Procedure: propagating a wall-slab connection
- Consider the following situation of four walls and one slab, created with
QuickDraw.
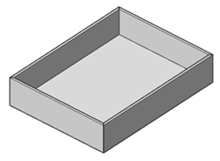
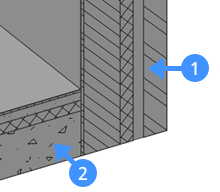
- The four walls were given a composition, as well as the floor slab. Without
any further editing or modeling, creating a vertical section through the
building will show the connection one of the walls (1) and the slab (2) to
be something similar to the following image.
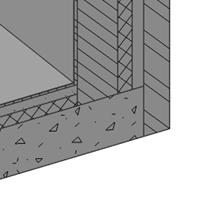
- While this section is active, we can Push/Pull the
different ply faces to obtain the desired connection between the wall and
the slab:
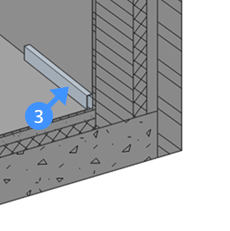
- We can detail this connection even further, for example by locally adding a
skirting board (3). This was done by simply drawing a box and classifying
this solid as a Building Element.
- Now that we have this detailed connection, we want it to be applied to every location where a wall and slab of this type come together. Let’s deactivate the section and launch BIMPROPAGATEPLANAR.
- You are prompted:
Select planar reference solids that form the connection. The connection detail will be copied to similar solids. [selection options (?)]:
Select the wall and slab, and press Enter.
- You are prompted:
Optional. Select detail objects to be copied as part of the connection. [selection options (?)]:
Select the skirting board solid, and press Enter.
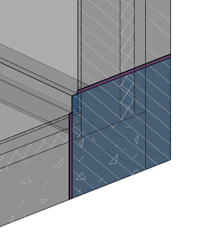
- You are prompted:The detail section varies too much along the
extrusion direction. In this particular case, BIMPROPAGATEPLANAR cannot find a solution: because the skirting board is not modeled along the entire length of the wall, BIMPROPAGATEPLANAR finds contradicting detail volumes. This problem can be solved easily by activating a section where the skirting board is present (e.g. the section we used earlier to create this detail) and trying again. If we now follow the same steps as before, BIMPROPAGATE finds a detail volume as shown in the image below.
- You are prompted:
Blue: detail area to be copied. Purple: reference contact area. Accept? [Yes/No/Inflate first/Save detail/save detail to Library] <Yes>:
Inflating the detail is not necessary in this case. For more information on inflating, read the article on Propagate. Choosing No will exit the command. Press Enter to accept.
- BimPropagatePlanar now scans the entire drawing for similar
locations. When this is done, all sections are deactivated and the view is
zoomed out to show all possible locations. Every suggestion is highlighted
and a widget is displayed:
You are prompted:
Accept or reject suggestions by clicking on the tick. Then [Apply/Cancel] <Apply>: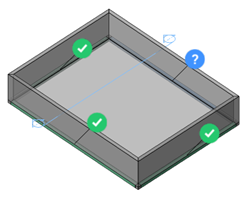
A green checkmark means that this suggestion will be applied when pressing Enter. A question mark means that it will not be applied due to one of several possible reasons. Hovering over the widget will reveal more information.
In this case, it says Location of original detail. Click to replace original detail by adapted extrusion. Because we modeled the skirting board only locally, we should replace the original detail by an adapted extrusion so that it covers the entire length of the wall. Clicking the widget will turn it into a green checkmark.
- Press Enter to complete the command.
Now, all four walls should have this particular connection with the floor slab, including the skirting board.