


Editing generated drawings
When a BIM Section is generated, a block containing the drawing generation result is added to the model space of the target drawing, as well as a paper space viewport looking onto this block. The block and the viewport initially are placed so they do not overlap with existing geometry contained in the drawing. You can move this block or viewport to a new location, which will be preserved on subsequent updates.
In the default template drawing which is used to create the generated drawings Viewlabel and NumberBubble blocks exist. You can place them associated to the selected sheet view. The Title block in this drawing contains attributes that will be filled in automatically when the associated Sheet Set properties are defined.
A sheet list table can be placed on any sheet of the sheet set. In the current implementation, the table content is not associative yet.
Inserting the title block
- Open the Drawing Explorer - Blocks dialog.
- Double click the Title block.
The Drawing Explorerdialog closes and the block is attached to the cursor.
In a metric units project the size of the Title block fits the A1 paper size (594 x 841 mm)
In an imperial units project the size of the Title block fits the Arch D paper size (24 x 36 inches)
- Click at the lower left corner of the paper sheet in the layout.
- Open the Sheet Sets panel (SHEETSET command) and define the Project and Custom Properties available in the context menu.
- Select the Title block, then click the Update Fields… tool button (
 ) in the Redraw/Regen toolbar.
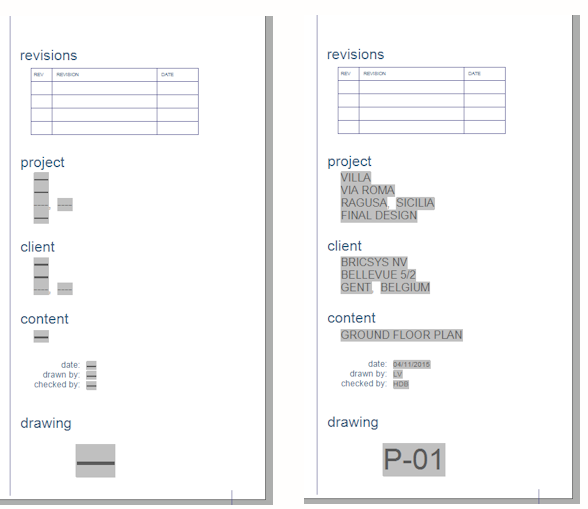
Inserting a view label for a sheet view
- Select the sheet view in the Sheet Sets panel.
- Right-click the sheet view for which you want to insert the view label block.
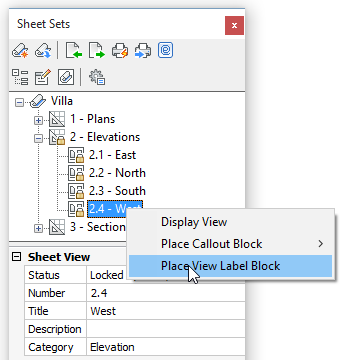
- Choose Place View Label Block in the context menu.
You are prompted: _VIEWLABEL
Units: Millimeters Conversion: 1
Insertion point for block:
- Specify the insertion point.
You are prompted: Scale factor for block <1.0>:
- Specify the scale factor or right-click to accept the current scale.
You are prompted: Rotation angle for block <0>:
- Specify the rotation angle or right-click to accept the current angle.
The View Label block is inserted.
The Sheet Number (1), Sheet View Number (2), Sheet View Title (3) and Viewport Scale (4) of the selected sheet view are filled in automatically.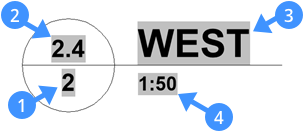
Inserting a number bubble block for a sheet view
- Select the sheet view in the Sheet Sets panel.
- Right-click the sheet view for which you want to insert the Number Bubble block.
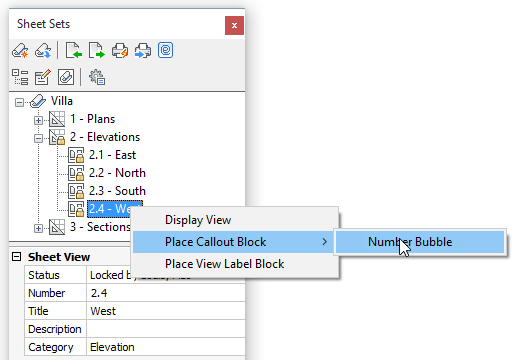
- Choose in the context menu.
You are prompted: _CALLOUT
Units: Millimeters Conversion: 1
Insertion point for block:
- Scale factor for block <1.0>:
- Rotation angle for block <0>:
- Specify the insertion point.
You are prompted: Scale factor for block <1.0>:
- Specify the scale factor or right-click to accept the current scale.
You are prompted: Rotation angle for block <0>:
- Specify the rotation angle or right-click to accept the current angle.
The Number Bubble block is inserted.
The Sheet Number (5) and Sheet View Number (6) of the selected sheet view are filled in automatically.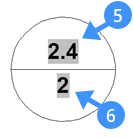
Inserting a sheet list table
A Sheet List table can be inserted on any sheet of the sheetset. In the current implementation, the table content is not yet associative and therefore will not be updated automatically when sheets are added, removed or renamed.
- Right-click the sheetset name in the Sheet Sets panel and choose Insert Sheet List Table in the context menu.
You are prompted: Select insertion point.
- Specify a point in the drawing.