BIM collaboration format (BCF)
O BCF
BIM Collaboration Format (BCF) to otwarty format pliku używany do wymiany komentarzy tekstowych, obrazów i innych elementów na modelu IFC. Pozwala to na lepszą komunikację między różnymi stronami procesu BIM.
BCF umożliwia powiązanie informacji takich jak komentarz, zrzut ekranu, lista zaangażowanych obiektów i punkt widzenia kamery ze sprawą. Problemem może być wszystko, od niewielkiej zmiany w projekcie po konflikty między różnymi dyscyplinami w modelu. Zagadnienia te można następnie zapisać jako pliki BCF lub zarządzać nimi w chmurze, korzystając z dowolnego systemu zarządzania chmurą BCF.
Zaletą BCF jest to, że umożliwia komunikację między różnymi pakietami oprogramowania (na przykład zagadnienie BCF utworzone w Solibri można otworzyć w BricsCAD® BIM), a także umożliwia łatwą nawigację po modelu opartym na zagadnieniach.
Pliki BCF
Problemy mogą być zapisywane w samodzielnych plikach. Jest to generalnie bardziej uciążliwy przepływ pracy niż praca z systemem w chmurze, ale może być przydatny w przypadku pracy w trybie offline. Plik BCF można następnie zaimportować do dowolnego menedżera BCF (na przykład BricsCAD® BIM), aby odczytać problemy i zobaczyć, gdzie w modelu mają one zastosowanie.
- Komentarze
- Zrzuty ekranu lub inne obrazy
- Listę zaangażowanych obiektów, opartą na identyfikatorach GUID (Global Unique ID) w celu ich jednoznacznego rozróżnienia.
- Pozycję kamery
Korzystanie z chmury
Ogólnie rzecz biorąc, łatwiej jest korzystać z usług w chmurze do zarządzania kwestiami BCF. Obecnie BricsCAD® BIM obsługuje automatyczne połączenie z kilkoma takimi usługami: Bricsys 247, Catenda, BIMcollab i BIM Track. Inne usługi można jednak wprowadzić ręcznie. Jeśli chcesz połączyć się z tymi usługami z poziomu BricsCAD® BIM, musisz najpierw założyć konto w tych usługach. Umożliwiają one tworzenie spraw i zarządzanie nimi w czasie rzeczywistym z dowolnego miejsca.
Podczas korzystania z usług w chmurze możliwa jest zmiana statusów istniejących spraw w ramach BricsCAD® BIM, a także tworzenie nowych spraw. Panel BIM BCF pozwala łączyć się z tymi usługami z poziomu strony BricsCAD® BIM, logować się na swoje konto i dodawać problemy, komentarze, zrzuty ekranu i punkty widzenia, które poprowadzą członków zespołu do dokładnej lokalizacji problemów.
Panel BCF
Panel BCF można otworzyć, klikając ikonę pinezki tablicy po lewej stronie ekranu (1). Jeśli ikony nie ma, kliknij prawym przyciskiem myszy puste miejsce na wstążce i w sekcji Panele włącz panel BIM BCF.
Panel wyświetla trzy najpopularniejsze usługi współpracy w chmurze (4), a także ostatnią używaną (3). Możesz bezpośrednio połączyć się z wybranym urządzeniem, klikając odpowiedni przycisk. Dostępne są również opcje połączenia z inną usługą (5) lub zaimportowania pliku BCF (6).
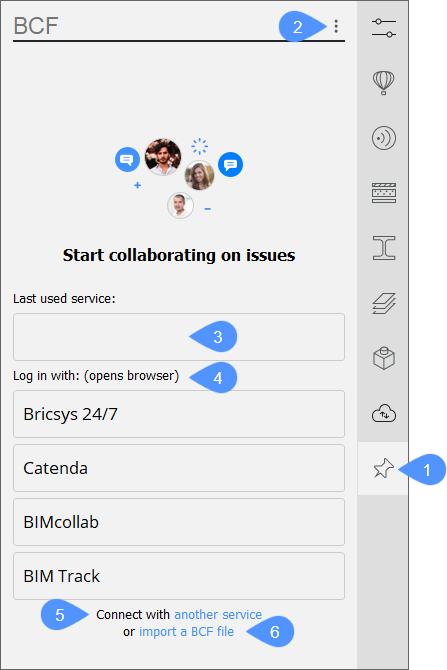
Menu u góry (2) oferuje te same opcje, a także odświeżanie panelu i czyszczenie źródeł. Odświeżanie panelu zapewnia wyświetlanie najnowszych aktualizacji w przypadku pracy w chmurze. Wyczyszczenie źródeł powoduje rozłączenie z usługą w chmurze, jeśli jesteś online, lub zamknięcie pliku BCF, jeśli pracujesz na zaimportowanym pliku BCF.
Procedura: praca z panelem BCF
Poniższy przykład zostanie pokazany wraz z załączonymi plikami na końcu tego artykułu. Jeśli chcesz kontynuować, otwórz West_str.dwg i zaimportuj Structural_node.bcf.
Podczas importowania pliku BCF:
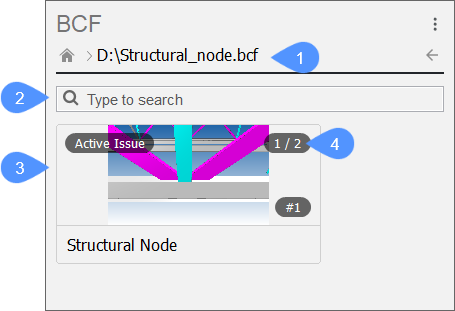
Zobaczysz ścieżkę do aktualnie otwartego pliku (1), pasek wyszukiwania, który może być użyty do filtrowania spraw (2) oraz listę spraw (3). W przypadku tego zaimportowanego pliku BCF istnieje tylko jeden problem z dwoma powiązanymi widokami (4).
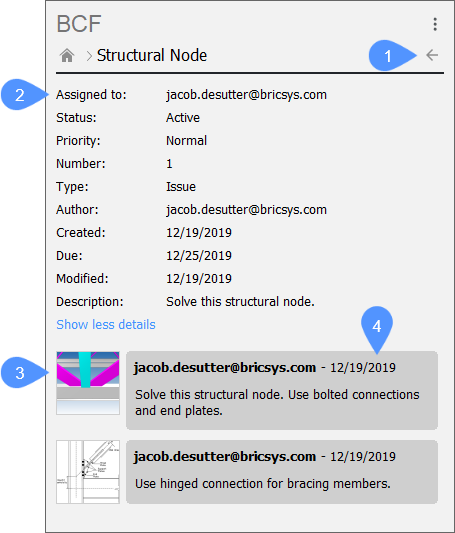
Kliknij problem, aby go otworzyć. Podczas otwierania problemu widoczny jest przycisk umożliwiający powrót do przeglądu problemu (1), bardziej szczegółowe informacje o problemie, takie jak status, data utworzenia itp. (2) oraz różne komentarze dotyczące tego problemu (4). Jeśli ten komentarz ma powiązaną pozycję kamery, kliknięcie miniatury obrazu (3) spowoduje przeniesienie kamery w bieżącym rysunku do tej pozycji. Jeśli do punktu widoku dołączone są elementy, są one podświetlane lub izolowane. Jest to przydatne, jeśli chcesz wiedzieć, gdzie dokładnie występuje problem i nie chcesz ręcznie przeszukiwać modelu.
Podczas korzystania z usługi w chmurze:
Dostępnych jest kilka dodatkowych opcji, takich jak ustawianie statusów oraz dodawanie komentarzy i zrzutów ekranu. Można również dodawać nowe problemy.
Aby połączyć się z usługą w chmurze, można kliknąć jeden z przycisków usług współpracy wymienionych na pierwszej karcie panelu lub połączyć się z inną usługą za pomocą okna dialogowego Niestandardowe logowanie. Aby połączyć się z usługą BIMcollab, należy wprowadzić odpowiednią przestrzeń nazw. Aby połączyć się z usługą Bricsys 247, Catenda lub BIM Track, zostaniesz automatycznie przekierowany na stronę logowania w przeglądarce. Aby połączyć się z inną usługą, należy ręcznie wprowadzić jej adres URL.
Poniższy przykład pokazano na wewnętrznej przestrzeni w chmurze, więc nie jest możliwe dokładne wykonanie tych kroków. Możliwe jest jednak utworzenie bezpłatnego konta na przykład na BIMcollab. Kliknięcie przycisku Zaloguj się spowoduje przejście do strony logowania wybranej usługi.
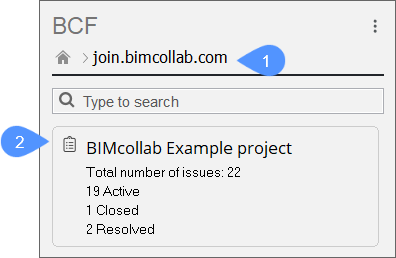
Po zalogowaniu powinien zostać wyświetlony źródłowy adres URL (1) wraz z listą projektów, w których bierzesz udział (2). W tym przykładzie pokazany jest tylko jeden projekt z 22 zgłoszeniami.
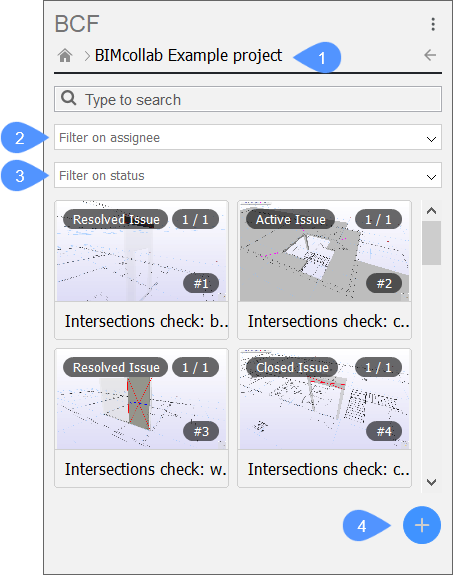
Kliknięcie projektu powoduje jego otwarcie i wyświetlenie listy problemów, podobnie jak miało to miejsce podczas importowania pliku BCF. W górnej części panelu wyświetlany jest bieżący projekt (1). Możliwe jest filtrowanie spraw według cesjonariusza (2) i statusu (3). Ułatwia to znalezienie odpowiednich kwestii. Możliwe jest również dodanie nowego numeru (4).
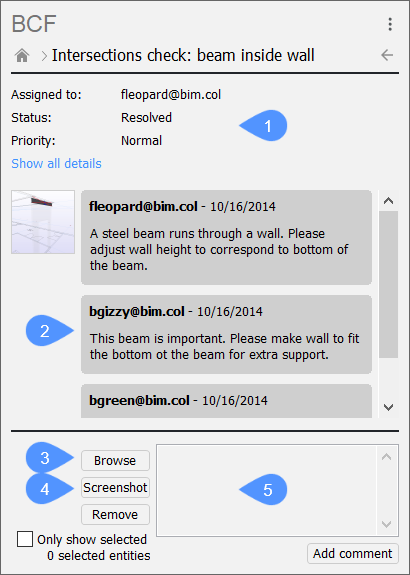
Kliknięcie sprawy powoduje jej otwarcie i wyświetlenie podobnych opcji jak poprzednio: szczegółowe informacje o sprawie (1) i komentarze dotyczące tej sprawy (2). Należy jednak pamiętać, że w dolnej części panelu można również dodać obrazy bitmapowe (3) lub zrzut ekranu z przestrzeni modelu (4). Można również dodać komentarze tekstowe (5).