BIM collaboration format (BCF) panel
About BCF
The BIM Collaboration Format (BCF) is an open file format used to exchange textual comments, images, and more on top of an IFC model. This allows better communication between different parties in the BIM process.
BCF makes it possible to link information such as a comment, a screenshot, a list of involved objects, and a camera viewpoint to an issue. An issue can be anything ranging from a small change in the design to clashes between different disciplines in the model. These issues can then either be saved as .bcf files or they can be managed on the cloud, using any sort of BCF cloud management system.
The advantage of BCF is that it allows communication over different software packages (e.g. a BCF issue created in Solibri can be opened in BricsCAD BIM), and that it enables easy navigation through a model based on issues.
BCF files
Issues can be saved in standalone files. This is generally a more cumbersome workflow than working with a cloud system but it can be useful in case you are working offline. A .bcf file can then be imported in any BCF manager (e.g. BricsCAD BIM) to read the issues and see where in the model it applies.
- Comments
- Screenshots or other images
- A list of involved objects, based on GUID (Global Unique IDs) to distinguish them unambiguously
- A camera position
Using the cloud
It is generally easier to use cloud services to manage BCF issues. Currently, BricsCAD BIM supports connection to several of such services: BIMcollab, Bimsyncand BIM Track are the most common ones. However, other services can be manually entered. If you wish to connect to these services from within BricsCAD BIM you will need an account of these services first. These allow you to create issues and manage them in real-time from anywhere.
When using cloud services, it is possible to change statuses of existing issues within BricsCAD BIM, as well as creating new issues. The BCF panel allows you to connect to these services from within BricsCAD BIM, log into your account and add issues, comments, screenshots and viewpoints, which will guide your team members to the exact location of the issues..
The BCF panel
The BCF panel can be opened by clicking the board pin icon on the left of your screen (1). If the icon is not there, right-click an empty space in the ribbon and under Panels, enable the BIM BCF panel.
The panel displays the three most popular collaboration cloud services (4) as well as the last one used (3). You can directly connect to the desired one by just clicking on the corresponding button. The options to connect with another service (5) or to import a BCF file (6) are also available.
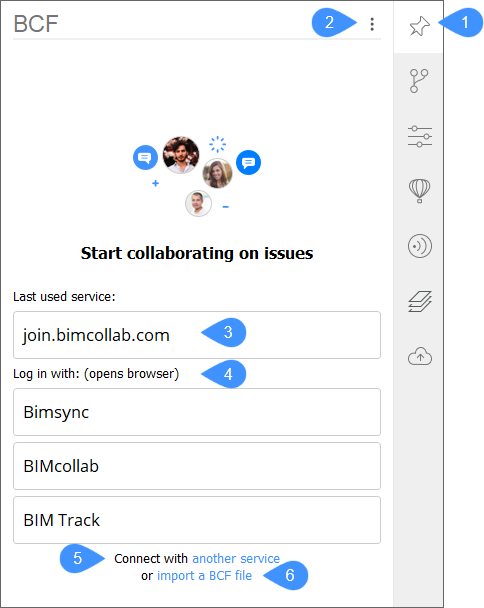
The menu at the top (2) gives you the same options, as well as refreshing the panel and clearing the sources. Refreshing the panel makes sure you see the latest updates in case you are working on the cloud. Clearing the sources disconnects you with the cloud service in case you are online or closes the .bcf file in case you are working on an imported .bcf file.
Procedure: working with the BCF panel
The following example will be shown with the files attached at the end of this article. If you want to follow along, open West_str.dwg and import Structural_node.bcf.
When importing a .bcf file:
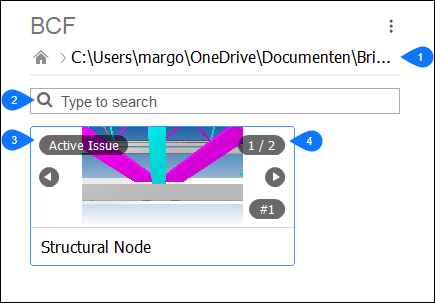
You will see the path of the currently opened file (1), a search bar that can be used to filter on issues (2) and a list of issues (3). In the case of this imported .bcf file, there is only one issue with two associated views (4).
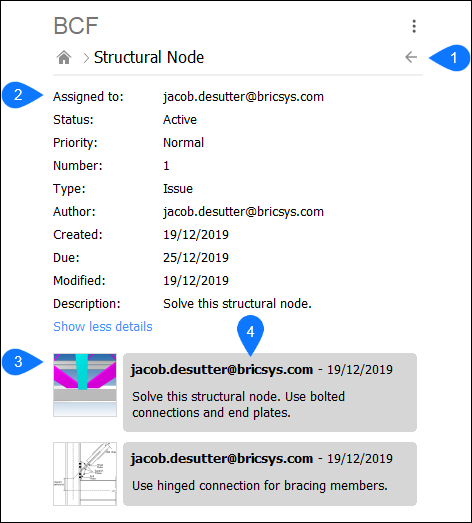
Click on the issue to open it. When opening an issue, you see a button to return to the issue overview (1), some more detailed information about the issue such as status, creation date etc. (2) and different comments on this issue (4). If this comment has an associated camera position, clicking the thumbnail image (3) brings the camera in the current drawing to this position. If there are entities attached to the viewpoint, they are highlighted or isolated. This is useful if you want to know where exactly the issue is and you don’t want to manually search through the model.
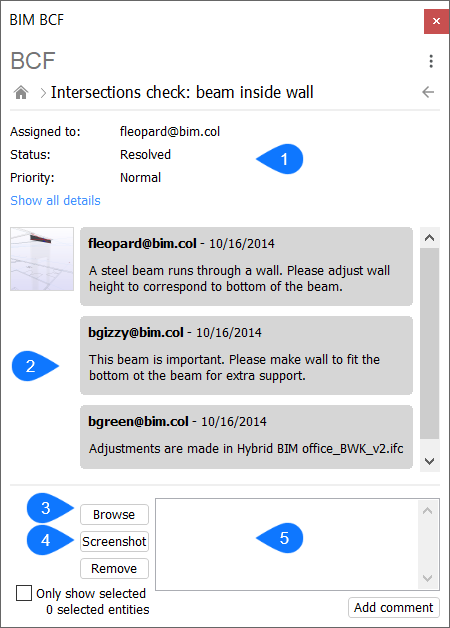
When using a cloud service:
You are presented with some more options, such as setting statuses and adding comments and screenshots. You can also add new issues.
To connect to a cloud service, you can click on one of the collaboration services buttons listed in the first panel tab or connect with another service via the Custom log in dialog box. To connect to a BIMcollab service, you are prompted to enter a corresponding name space. To connect to a BIM Track or a Bimsync service, you are automatically redirected to their login page in your browser. To connect to another service, you have to manually enter the service URL.
The following example is shown on an internal cloud space so it is not possible to follow these steps exactly. It is however possible to create a free account on for example BIMcollab. Clicking Log In takes you to a login page of the chosen service.
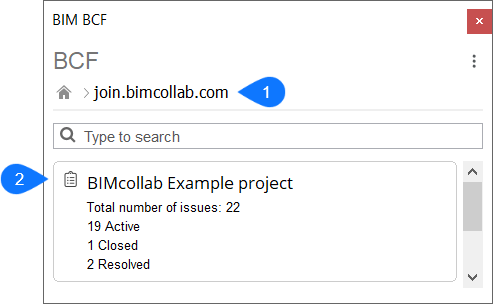
After logging in, the source URL should be shown (1), together with a list of projects that you are involved in (2). In this example, only one project is shown with 22 issues.
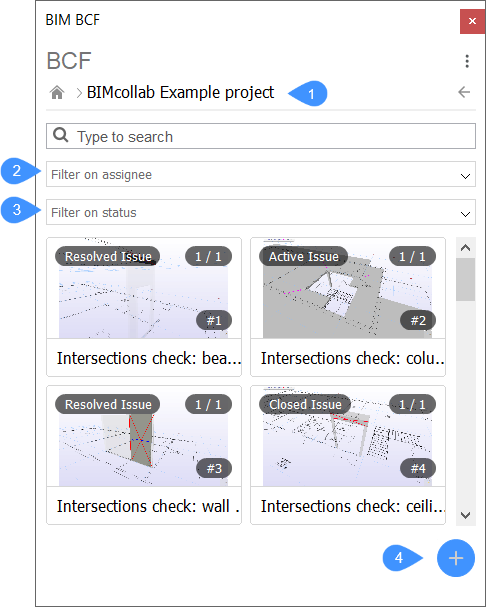
Clicking the project opens it and shows a list of the issues, similar to what happened when importing the .bcf file. At the top of the panel, the current project is displayed (1). It is possible to filter the issues on assignee (2) and status (3). This facilitates finding relevant issues. It is also possible to add a new issue (4).
Clicking an issue opens it and you see similar options as before: detailed information about the issue (1) and comments on this issue (2). However, note that at the bottom it is also possible to add bitmap images (3) or a screenshot from model space (4). You can add some textual comments as well (5).