


Importieren von Autodesk Revit Familien in BricsCAD
Befehle
IMPORT, BMEINFÜGE
Haftungsausschluss
Sofern nicht anders angegeben, bezieht sich das in diesem Artikel verwendete Wort Revit auf die Revit® Software von Autodesk® und ihre Peripheriegeräte.
Wichtiger Hinweis, bevor Sie loslegen
*Der RFA-Import ist zurzeit Work-in-progress. Siehe den Befehl BMEINFÜGE.
BricsCAD® V26 unterstützt derzeit nur den Import von Revit 2015-2025 Dateien. Die vorherigen BricsCAD®-Versionen unterstützen den Import von Revit®-Dateien, wie in der folgenden Tabelle gezeigt. Wenn Sie ein Modell importieren möchten, das in einer späteren Version von Revit® erstellt wurde, sollten Sie erwägen, das Modell als IFC-Datei in BricsCAD® zu importieren. Weitere Informationen finden Sie im Artikel IFC-Import und -Export in BricsCAD.
| BricsCAD BIM-Version | Unterstützte Revit®-Version |
|---|---|
| BricsCAD BIM V22 | Revit 2015-2022 |
| BricsCAD BIM V23 | Revit 2015-2023 |
| BricsCAD BIM V24.1 | Revit 2015-2023 |
| BricsCAD BIM V24.2 | Revit 2015-2024 |
| BricsCAD BIM V25.1 | Revit 2015-2024 |
| BricsCAD BIM V25.2 | Revit 2015-2025 |
| BricsCAD BIM V26.1 | Revit 2015-2025 |
Importieren von Dateien der RFA-Familien
- Starten Sie den Befehl IMPORT.
Der Dialog Importiere Datei wird angezeigt.
- Wählen Sie Revit Familiy (* .rfa) (1) in der Liste Dateityp aus.
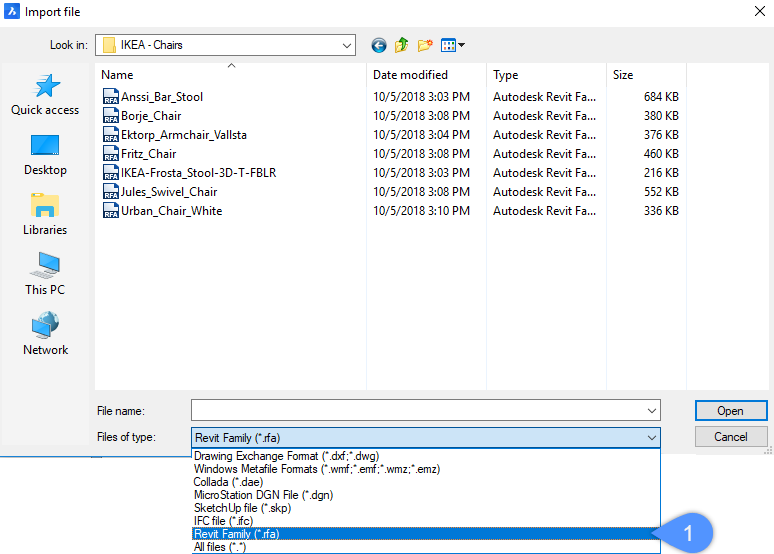
- Wählen Sie die RFA-Datei aus, die Sie importieren möchten.
- Klicken Sie auf Öffnen, um die Revit®-Familie zu importieren.
Wenn die Datei der RFA-Familie importiert wird, wird die Geometrie aus dieser Datei als separate 3D-Volumenkörper in BricsCAD® hinzugefügt.
Vorgehensweise: Einfügen von Dateien aus der RFA-Familie
- Wenn DBKS = EIN (Dynamisches BKS), wird das RFA-Objekt an der 3D-Volumenkörper-Fläche unter dem Cursor ausgerichtet.
- Wenn DYN = EIN (Dynamische Bemaßung), werden die Abstände von der nächsten parallelen Kante auf der Fläche des 3D-Volumenkörpers angezeigt.
Verwenden von BmEinfüge
- Starten Sie den Befehl BMEINFÜGE.
Ein Datei-Dialog wird angezeigt.
- Navigieren Sie zu dem Ordner, in dem Ihre RFA-Familiendateien gespeichert sind.
- Wählen Sie Revit Familiy (* .rfa) (2) in der Liste Dateityp aus.
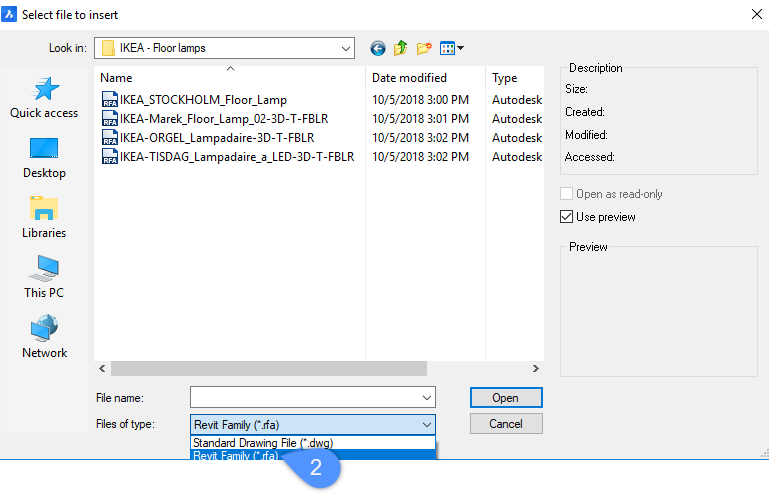
- Wählen Sie die RFA-Datei aus, die Sie importieren möchten.
Die ausgewählte Datei wird an den Cursor (3) angehängt.
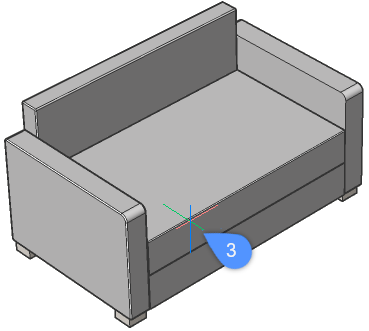
Die folgende Abbildung zeigt das Einfügen eines Sofas aus einer Revit®-Familie, wenn sowohl DYN als auch DBKS eingeschaltet sind.
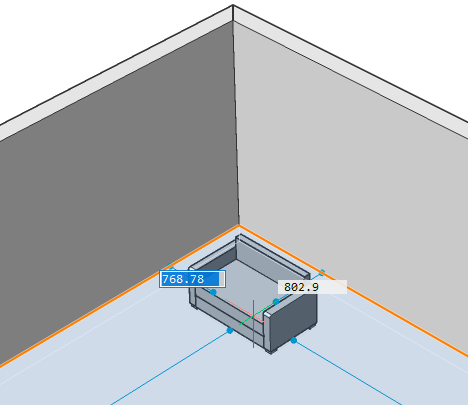
- Gehen Sie wie folgt vor, um die ausgewählte Datei aus der RFA-Familie mithilfe der dynamischen Bemaßungsfelder zu platzieren:
- Drücken Sie die TAB-Taste, um eines der dynamischen Bemaßungs Felder zu wählen, geben Sie dann einen Wert ein und drücken Sie die TAB-Taste, um die Bemaßung zu sperren. Die gesperrte Bemaßung wird in rot dargestellt.
- Wiederholen Sie den vorherigen Schritt, um ein anderes dynamisches Bemaßungsfeld zu sperren.
- Drücken Sie optional die TAB-Taste, um die dynamischen Bemaßungen anzupassen.
- Drücken Sie die Eingabetaste, um die aktuelle Position zu akzeptieren.
- Um einen Ordner der RFA-Familie in das Panel Bibliothek einzufügen, fügen Sie den Pfad des RFA-Stammordners zum 'Bibliothek Verzeichnis Pfad' in den Dialog Einstellungen hinzu. Der Inhalt des Stammordners und aller Unterordner wird im Panel Bibliothek verfügbar sein.
Das folgende animierte GIF zeigt, wie der RFA-Stammordnerpfad zum Komponentenverzeichnispfad hinzugefügt wird.
Die Dateien der RFA-Familie können jetzt in den Modelbereich eingefügt werden.
Wählen Sie bei Bedarf im Hamburger-Menü des Panels Bibliothek die Option Miniaturansichten generieren.
- Ziehen Sie die RFA-Datei per Drag & Drop aus dem Panel Bibliothek in Ihren Modelbereich.