


XRefs verwenden
Befehle
XREF, XZUORDNEN, XÖFFNEN, XZUSCHNEIDEN
Über
Durch die Verwendung externer Referenzen oder XRefs können Sie jedes beliebige Modell in das aktuelle BIM-Modell einfügen. Anstatt das Modell zu kopieren, wird im Mastermodell nur eine Referenz auf das Quellmodell gespeichert. Sie können mehrere Modelle an ein einziges Mastermodell anhängen, ohne die Größe des aktuellen Modells wesentlich zu erhöhen. Weitere Vorteile der Verwendung von XRefs bestehen darin, dass die Quellmodelle gleichzeitig von verschiedenen Mitgliedern des Designteams bearbeitet werden können und das Mastermodell immer aktualisiert werden kann, um die neueste Version jedes der Quellmodelle anzuzeigen.
Vorgehensweise: XRefs in der aktuellen Zeichnung verwalten
- Öffnen Sie den Dialog Zeichnungs Explorer und klicken Sie auf den Abschnitt Externe Referenzen.
Das XRef-Vorschaufenster wird angezeigt, in dem der Benutzer ein Modell anhängen oder die vorhandenen XRefs in der Liste verwalten kann. Die folgende Abbildung zeigt das XRef-Vorschaufenster.
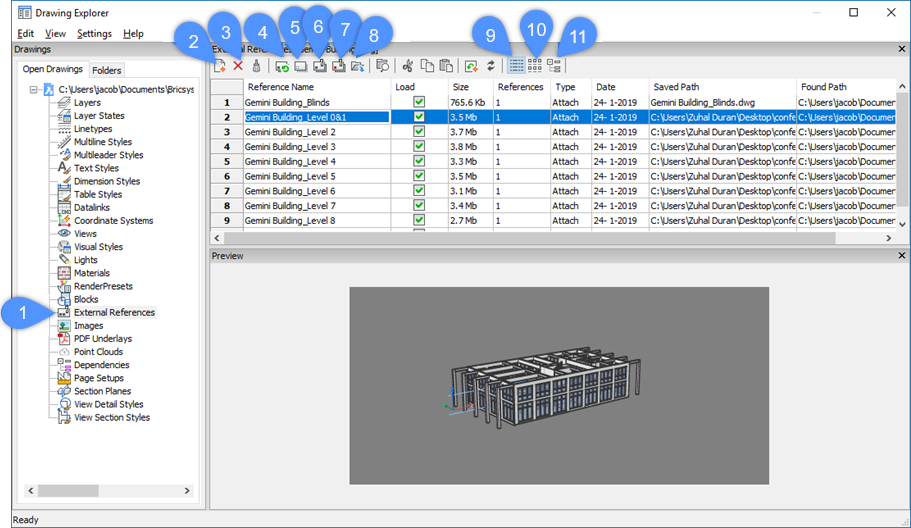
Externe Referenzen (1) Zeigt den Abschnitt Externe Referenzen an. XRef anhängen (2) Hängt ein Modell als externe Referenz an. XRef abhängen (3) Entfernt die ausgewählte XRef vollständig aus dem aktuellen Modell. XRef erneut laden (4) Lädt die ausgewählten Xref erneut. Dies ist hilfreich, wenn die Quellmodelle geändert wurden und Sie die aktualisierten Versionen im Mastermodell sehen möchten. Entlade XRef (5) Entlädt die ausgewählten XRef. Dadurch wird die XRef aus der Ansicht ausgeblendet. XRef binden (6) Führt die Quellmodelle dauerhaft mit der aktuellen Zeichnung zusammen. Bindet die XRef an die aktuelle Zeichnung, um die XRef zum Bestandteil der Zeichnung zu machen. Verweise auf die XRef verschwinden aus dem Zeichnungs Explorer. XRef einfügen (7) Konvertiert XRefs in Blöcke. XRef öffnen (8) Öffnet die referenzierte Zeichnung. Detailansicht (9) Zeigt die Details von XRefs an. Symbolansicht (10) Zeigt die Symbole der XRefs an. Baumansicht (11) Zeigt das Beziehung zwischen den XRefs in einer Baumansicht an. - Um extern referenzierte Modelle anzuhängen, klicken Sie im Dialog Zeichnungs Explorer auf die Werkzeugschaltfläche XRef anhängen.
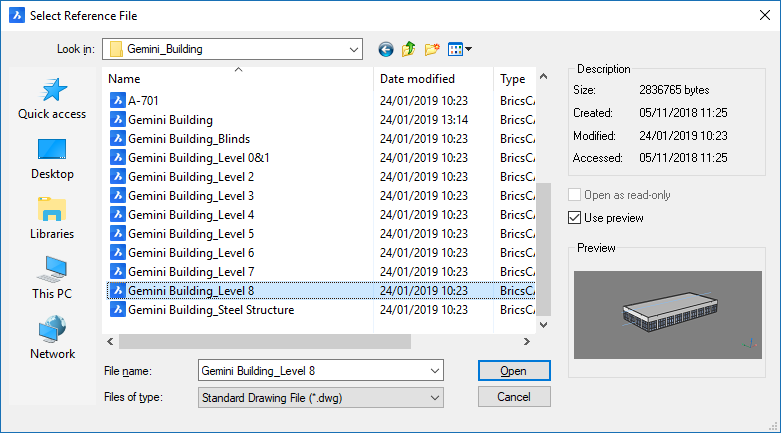
Der Dialog Referenzdatei wählen wird angezeigt.
Die folgende Abbildung zeigt den Dialog Referenzdatei wählen. Wählen Sie in diesem Dialog die DWG-Datei aus, die Sie Ihrem Hauptmodell hinzufügen möchten, und klicken Sie dann auf Öffnen.
Als Nächstes wird den Dialog Externe Referenz anhängen angezeigt.
Die folgende Abbildung zeigt den Dialog Externe Referenz anhängen. Die folgende Tabelle zeigt jede Option des Dialogs Externe Referenz anhängen. Wählen Sie in diesem Dialog die Optionen aus, die Sie anwenden möchten, und klicken Sie dann auf OK.
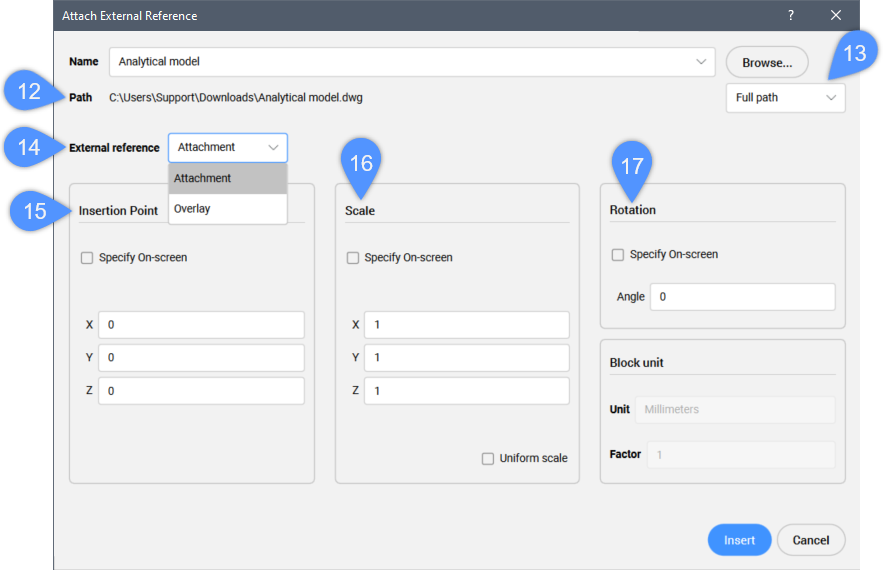
Feld Pfad (12) Zeigt den vollständigen Pfad der ausgewählten Zeichnung an. Pfadtyp (13) Enthält die Optionen Vollständiger Pfad, Relativer Pfad und Kein Pfad. Vollständiger Pfad: Wenn Sie Ihre Zeichnung, die eine XRef enthält, an einen anderen Speicherort verschieben, sucht BricsCAD immer noch am vorherigen Ort nach dem XRef und findet dieses XRef nicht.
Relativer Pfad: Wenn Sie Ihre Zeichnung, die eine XRef enthält, an einen anderen Speicherort verschieben, wird der neue Dateipfad am neuen Speicherort erstellt. Der Dateiordner wird korrekt eingerichtet und verwendet dieselbe Ordnerstruktur wie der erste.
Externe Referenztyp (14) Enthält die Referenztypen Anhang und Überlagerung. Anhang: Hängt alle XRefs an, einschließlich verschachtelter XRefs. Sie haben beispielsweise die erste Ebene von XRef „X“ und diese enthält verschachtelte XRefs „Y“ und „Z“. Wenn die Anhängeoption ausgewählt ist, werden die erste Ebene von XRef und die darin verschachtelten XRefs Y und Z an die Zeichnung angehängt.
Überlagerung: Hängt nur die erste Ebene von XRefs (X) an, verschachtelte XRefs (Y, Z) werden nicht geladen. Dies kann auch verwendet werden, um zirkuläre Referenzen zu verhindern.
Einfügepunkt (15) Wählen Sie aus, ob Sie den Einfügepunkt am Bildschirm, oder durch die Eingabe in die X-, Y-, Z-Felder bestimmen möchten. Skalieren (16) Ermöglicht dem Benutzer, die Skaleirung auf dem Bildschirm oder in den X-, Y-, Z-Feldern anzugeben. Aktivieren Sie die Option Einheitliche Skalierung, um die Skalierung im Feld X anzugeben. Drehung (17) Ermöglicht dem Benutzer, den Drehwinkel auf dem Bildschirm oder im Feld Winkel anzugeben. Beachten Sie, dass Sie mit der Option BIM XReference von BIM Klassifizierung das Modell als externe Referenz klassifizieren können. Die Identifizierung von Informationen wird im aktuellen Modell oder in der Projektdatenbank nicht explizit dargestellt. Diese Informationen werden angezeigt, nachdem das Modell einem anderen Projekt zugeordnet wurde. Befolgen Sie dazu den obigen Schritt.
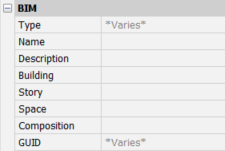
Die folgende Abbildung zeigt die BIM-Kategorie im Panel Eigenschaften nach dem Anhängen des Modells, das als XRef klassifiziert wurde.
- Um ein vorhandenes XRef zu abhängen, wählen Sie das XRef, das Sie abhängen möchten, in Ihrem Hauptmodell aus und klicken Sie dann im Dialog Zeichnungs Explorer auf die Werkzeugschaltfläche XRef abhängen.
Die ausgewählten Xrefs werden abgehängt.
Anmerkung: Halten Sie die STRG-Taste gedrückt, um mehrere XRefs auszuwählen oder um die Auswahl einer ausgewählten XRef aufzuheben. - Führen Sie einen der folgenden Schritte aus, um eine vorhandene XRef zu entladen und neu zu laden.
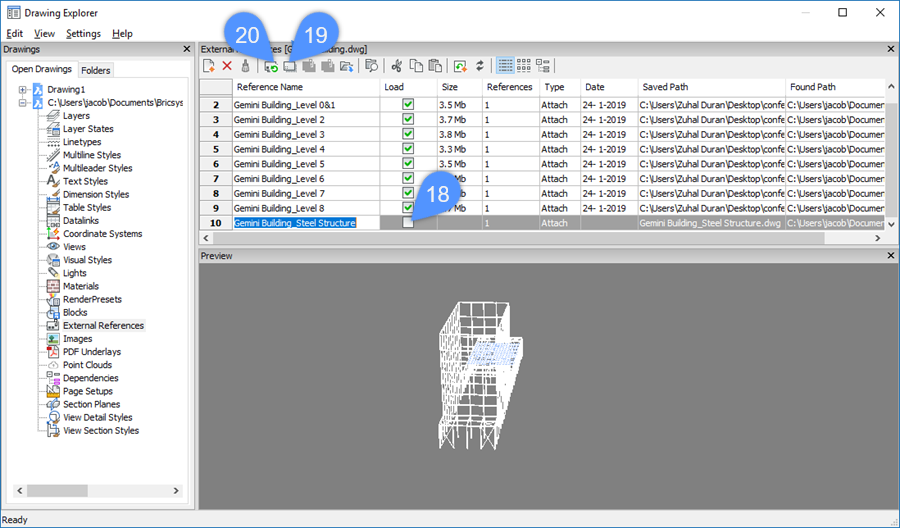
- Klicken Sie auf die Spalte Laden (18) einer geladenen XRef.
Dieses XRef wird in Ihrem Hauptmodell entladen.
Um die XRef neu zu laden, aktivieren Sie das Kontrollkästchen Laden dieser XRef.
- Wählen Sie die XRef aus und klicken Sie dann im Werkzeugkasten Details auf die Werkzeugschaltfläche XRef entladen (19).
Wählen Sie die entladene XRef aus und klicken Sie dann auf die Werkzeugschaltfläche XRef erneut laden (20).
Die folgende Abbildung zeigt die Spalte Laden (18), die Werkzeugschaltflächen XRef entladen (19) und XRef neu laden (20) im Zeichnungs Explorer.
- Klicken Sie auf die Spalte Laden (18) einer geladenen XRef.
- Um den Anhangstyp zu ändern, klicken Sie auf die Spalte Typ einer vorhandenen XRef und wechseln Sie von Anhängen zu Überlagerung oder umgekehrt. Der gleiche Vorgang kann zum Ändern des gespeicherten Pfads einer XRef und gefundenen Pfads einer Überlagerung durchgeführt werden.
- Klicken Sie auf X, um den Dialog zu schließen. Beachten Sie, dass die vorgenommenen Änderungen angezeigt werden, nachdem Sie den Zeichnungs Explorer geschlossen haben.