


Bill of Materials
Overview
You can use the BMBOM, BMBOMEDIT, BMBOMPANELOPEN and BMBOMPANELCLOSE commands.
An engineering Bill of Materials (BOM) is a list of unique mechanical components, mechanical blocks and mechanical entities used in an assembly. In BricsCAD, the list is represented as a table entity and can be placed anywhere in the drawing. Each entity has its own serial number (starting with 1), name, and number of occurrences.
You can view and configure Bills of Materials in the Bills of Materials Manager.
Bill of Materials types
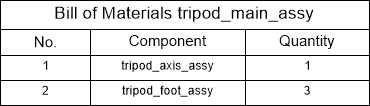
- Top levelContains top-level components only. Top-level components are components inserted directly into the main assembly. This type of BOM lists the main components only, without details of subcomponents.
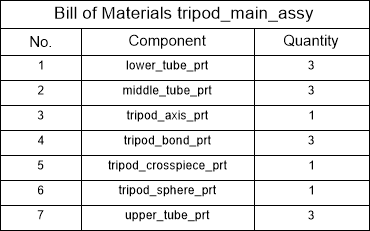
- Bottom levelContains bottom-level components (parts) only. Bottom-level components are parts that do not contain other parts or subassemblies. This type of BOM lists all parts in the main assembly, regardless of which component the parts belong to.
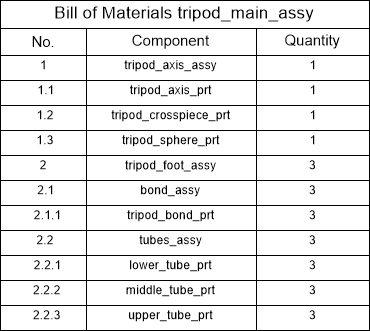
- HierarchicalContains all components with their subcomponents listed directly below. The serial numbers of subcomponents is a sequence of numbers separated by dots (for example, "1.2.3"). This BOM type shows the hierarchical structure of the assembly.
| Type | Bill of Material |
|---|---|
| Top level |
|
| Bottom level |
|
| Hierarchical |
|
Counting mode and maximal level
- Count all instancesThe total number of subassemblies and parts in the entire assembly.
- Count instances in parent componentThe total number of subassemblies and parts in the parent component. The parent component is considered as the root component.
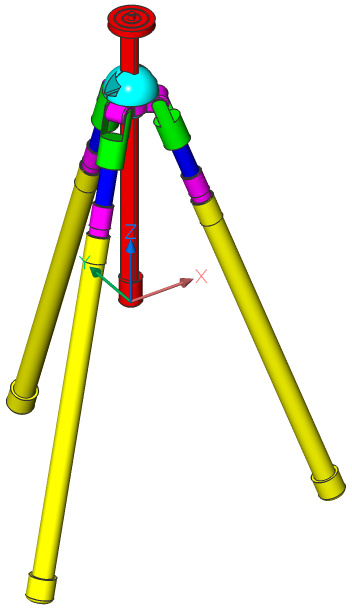
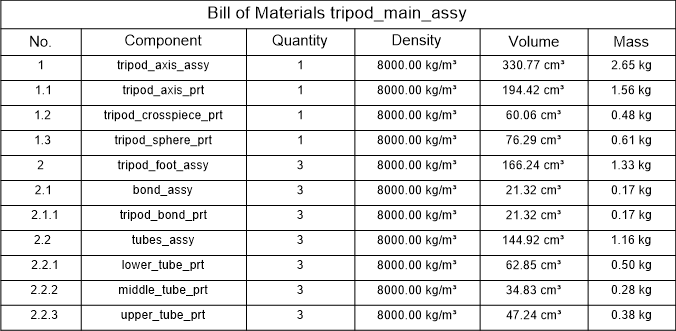
For example, the main Tripod assembly contains 3 Tripod foot assemblies. Each instance of a Tripod foot assembly contains 1 Bond assembly and 1 Tube assembly.
If the counting mode is set to Count all instances, the result is:
| # | Component | Quantity |
|---|---|---|
| 1 | Tripod assembly | 1 |
| 1.1 | Tripod foot assembly | 3 |
| 1.1.1 | Bond assembly | 3 |
| 1.1.2 | Tubes assembly | 3 |
If the counting mode is set to Count instances in parent component, the result is:
| # | Component | Quantity |
|---|---|---|
| 1 | Tripod assembly | 1 |
| 1.1 | Tripod foot assembly | 3 |
| 1.1.1 | Bond assembly | 1 |
| 1.1.2 | Tubes assembly | 1 |
The default value for the counting mode is Count instances in parent component. You can change the counting mode in the BOM Manager, or with the BMBOM command.
By default, hierarchical bills of materials show all levels in the model. It is possible to limit a hierarchical BOM to a certain level using Max level property. When the maximal level is set, only parts up to that level will be included. For example, if Max level = 2, only top level components and subcomponents directly included in top level components will be listed.
BOM columns
By default, the BOM table contains the Number, Name and Quantity columns, or the desired configuration, previously defined in a template .bom file stored in BOMTEMPLATE system variable.
Using the Configure option of the BMBOM command you can add more columns, such as Description, Density, Volume, Mass, Material, Thickness (for sheet metal parts), and Parameters (for parametric components).
You can add any built-in property of components, instances or block references to the BOM table. Custom evaluated columns are also supported, using the DataExtraction technology.
Grouping modes
BOM tables list unique components only; multiple inserts of the same components are grouped, according to the Grouping mode.
- Auto (default mode)Multiple inserts of the same components are grouped together with respect to their parameters and added properties. It means that multiple inserts of the same parametric component are always grouped in separate BOM rows with respect to their parameters, regardless if those parameters are added to BOM as columns.
Figure 6. BOM Bookshelf 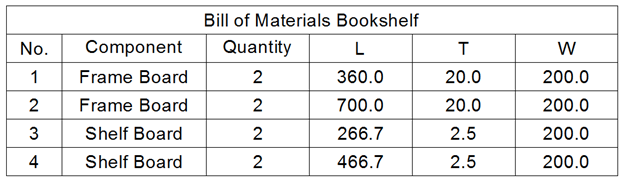
- By components and columnsIn this mode, multiple inserts of the same components are grouped together with respect to added properties only. It means that multiple inserts of the same parametric component could be grouped in the same row even if their parameters are different, depending on what columns are added to BOM. However, instances of different components are always grouped in different rows. This mode is useful, if some parameters correspond to different states of components but not result in being different parts.
- By columns onlyIn this mode, inserts of components are grouped with respect to their properties added to the BOM, regardless if they are inserts of the same component. This mode is useful to get a summary table, such as a list of all physical materials or a list of all sizes of pipes.
Visible and invisible columns
You can make any column in the BOM table invisible. Invisible columns do not appear in the table in the document. However, you can still use these columns in formulas. Invisible columns are also displayed in the BOM Manager.
Aggregated columns
- Sum: Sum the grouped values.
- Average: Find the average value of grouped values.
- Minimum: Find the minimal value of grouped values.
- Maximum: Find the maximal value of grouped values.
- Concatenate: Concatenate all unique values in the group in ascending order.
- Concatenate with counts: Concatenate all unique values with their number of counts in the group.
For example, take the following BOM table:
| Component | Width | Length | Height | Quantity |
|---|---|---|---|---|
| Beam | 16 | 250 | 10 | 1 |
| Beam | 16 | 200 | 10 | 2 |
| Beam | 16 | 220 | 20 | 1 |
| Beam | 20 | 215 | 20 | 3 |
| Beam | 20 | 225 | 20 | 1 |
Apply an aggregate function to the Length column. The results are combined in the following table:
| Component | Width | Height | Length (sum) | Length (average) | Length (minimal) | Length (maximal) | Length (concatenate) | Length (concatenate with counts) |
|---|---|---|---|---|---|---|---|---|
| Beam | 16 | 10 | 650 | 216.6667 | 200 | 250 | 200; 250 | 2x200; 250 |
| Beam | 16 | 20 | 220 | 220 | 220 | 220 | 220 | 220 |
| Beam | 20 | 20 | 870 | 217.5 | 215 | 225 | 215; 225 | 3x215; 225 |
- Adjust the position of the number of counts (in front or behind the value).
- Add the delimiter between values.
- Add the delimiter between values and their number of counts.
- Define the postfix and/or prefix for the number of counts.
If an aggregated column is used in an evaluated column, the final values are used by default. However, it is possible to apply an aggregate function to an evaluated column. In this case, the results for such an evaluated column is first computed for all original values (before aggregation), and then the resulted values are aggregated.
Number column and column roles
A number column is a special column to enumerate rows. It assigns numbers automatically for all rows in the BOM table, without skips and independently of other tables. Rows are numbered starting from 1.
- Prefix: A string that is added in front of any number. For example, you want all numbers to start with "A".
- Suffix: A string that is added after the number. For example, you want to add "-1" to all numbers.
- Number type: Specifies the number format:
- Full: Numbers are formatted as "1.2.3".
- Short: Only numbers for the current level show. It is used together with the Level column, which shows the level of the current part in the assembly.
- Continuous: All components are numbered continuously starting from 1, regardless of their level.
- Delimiter: Specifies the symbol to separate numbers for different levels when the number type is set to Full.
- Number: The column contains numbers for annotations.
- Name: The column contains part names for annotations.
- Quantity: The column contains quantities of parts for annotations.
- Regular: The column has no special role.
Only one column can have a Number, Name or Quantity role. If no column has one of these roles assigned, automatic annotations are not possible.
Column width
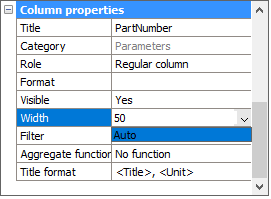
By default, the width of each column is set automatically, so its content fits without additional line breaks. However, it is possible to set a fixed column width.
- Select the required column in the BOM manager, then type a value for the Width property in layout units.
- Change the width of the required column in the associated table. Starting from BricsCAD V20.2, BOM tables automatically keep the width of columns that have been changed manually.
To restore the automatic width mode, select the column in the BOM manager and select Auto in the drop-down list for the Width property.
Column format

- Select the required column in the BOM manager.
- Choose the Format option in the context menu.
- Define the desired format in the Format dialog box.
Property sets
Because BOM tables use DataExtraction technology, you can list properties of mechanical components and entity properties, for example, block references in BOM tables.
- Mechanical only(default property set): Only properties of mechanical components are listed.
- All except coordinates: Lists all properties of components, except coordinate ones. Coordinate properties are typically used only for component instances.
- All properties: Lists all possible properties of components and component instances.
You may change the property set for a BOM table in the BOM Manager or use BMBOM when you add a new table.
Filter a BOM table
You can filter parts that will form the Bill of Material. Starting with BricsCAD V21, there are 2 filter types: main and column.
Main filter
A Main filter works in the same way as the DATAEXTRACTION command. First, all parts in the assembly, at the required level (top, bottom or hierarchical), are matched against the filter expression. Then, only the parts that have passed the filter are included in the BOM.
The filter expression may not refer to BOM columns because filtering is done before the BOM is generated. For example, it is possible to create a filter for all standard parts because Is standard is a normal property of the component. However, it is not possible to set the main filter to filter out all parts with a quantity greater than 1. You must use Column filters for that.
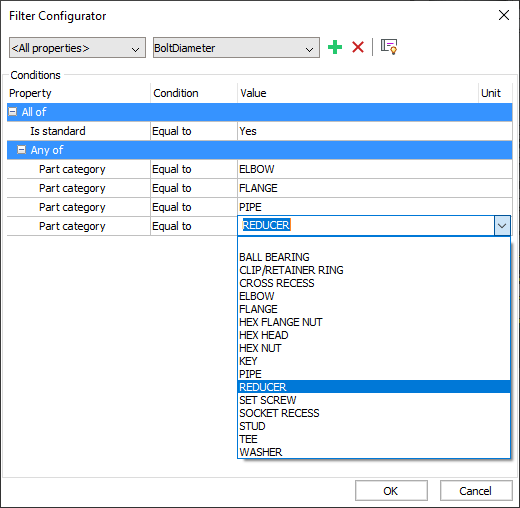
Filter configurator
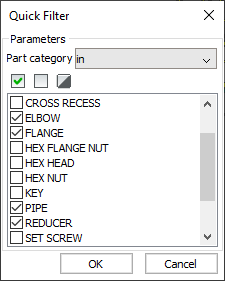
The easiest way to configure the main filter is to use the Filter Configurator in the BOM manager.
- Equal to
- Not equal to
- Less than
- Greater than
- Less than or equal to
- Greater than or equal to
- All of group: is "true" if all conditions in that group are "true". This is the same as the "and" operator.
- Any of group: is "true" if at least one condition in that group results in "true". This is the same as the "or" operator.
A group can contain an arbitrary number of conditions. It can also contain nested groups, thus making complex filters possible.
- Select a property from the list of properties.
- Select a required relation operator and specify the target value.For text values, a target value can be selected from the list of all possible values also. For numerical values, their target unit can be specified also in order to automatically convert the value with respect to the default unit of the document.
For text values, "Equal to" and "Not equal to" relations support wild cards.
The Filter Configurator automatically converts the set of conditions into a filter
expression, which can be made visible by clicking  :
:

This expression is fully editable and two-way associative with the set of conditions.
Syntax description:
| Operator | Meaning |
|---|---|
| == | equal to |
| != | not equal to |
| < | less than |
| > | greater than |
| <= | less than or equal to |
| >= | greater than or equal to |
- Property names must be enclosed in quotes.
- Relational operators can be combined using "and" and "or" operators. Operator "and" results in "true" if both sides of the operator are true. Operator "or" results in "false" if either left or right side of the operator is true.
- Logical operators "and" and "or" are case sensitive.
- Use "(" and ")" to combine two operators into one.
- String values are enclosed in double quotation marks "".
- Relational operators for strings are case sensitive.
- "==" and "!=" operators support wild cards.
For example, to get a BOM of all standard parts, use the following expression:
"Is standard"=="Yes"To get a BOM of all ISO standard parts, use the following expression:
"Is standard"=="Yes" and "Part
                standard"=="ISO"
To get a BOM of all ISO or DIN standard parts, use the following expression:
"Is standard"=="Yes" and ("Part standard"=="ISO" or
                        "Part standard"=="DIN")
Wild cards
Wild cards allow you to match property values against a specific template. For
example, if you want to find all components containing "nozzle" in their names, the
following expression could be used: "Component
name"=="*nozzle*".
Wild cards can also be used as target values in the Filter Configurator.
Only "Equal to" and "Not equal to" relational operators support wild cards.
The following special symbols are supported:
| Name | Character | Description |
|---|---|---|
| Back quote | ` | Escape the next character (takes it literally). |
| Comma | , | Separate patterns. |
| Asterisk | * | Match any character sequence, including a null sequence, anywhere. |
| Question mark | ? | Match a single character. |
| Period | . | Match a single non-alphanumeric character. |
| At sign | @ | Match a single alphabetic character. |
| Hash tag | # | Match a single numeric character. |
| Tilde | ~ | If the first character in a pattern matches anything but the pattern. |
| Brackets | [...] | Match a single enclosed character. |
| Tilde brackets | [~...] | Match a single non-enclosed character. |
| Hyphen | - | In brackets, match a single character in the specified range. |
Column filter
Column filters allows you to quickly set the conditions which rows display, depending on the column content (somewhat similar to filters in some spreadsheet processors). Unlike the main filter, they are applied after the BOM table has been generated. Therefore, it is possible to use column filters for columns with aggregated content, such as quantities.
Each column can have one filter only. However, you can add column filters to as many columns as you need. Only rows that pass all column filters display in the final BOM.
You can configure column filters using the Column Filter dialog box in the BOM manager:
In this dialog box, you can select the type of filter from the list and configure it accordingly. The list of possible filters depends on the column content type, as shown in the table:
| Filter type | Column type | Description |
|---|---|---|
| always accepted | any | all column values are accepted |
| equal to | numerical | value should be equal to the target one |
| not equal to | numerical | value should be not equal to the target one |
| less than | numerical | value should be less than the target one |
| greater than | numerical | value should be greater than the target one |
| less than or equal to | numerical | value should be less than or equal to the target one |
| greater than or equal to | numerical | value should be greater than or equal to the target one |
| between | numerical | value should be in the given range, both ends included |
| not in range | numerical | value should not be in the given range, both ends excluded |
| exactly matches | text | value should exactly match the target one |
| does not match | text | value should be different from the target one |
| starts with | text | value should start with the given text |
| does not start with | text | value should not start with the given text |
| ends with | text | value should end with the given text |
| does not end with | text | value should not end with the given text |
| contains | text | value should contain the given text |
| does not contain | text | value should not contain the given text |
| matches pattern | text | value should match the given wild card template |
| does not match pattern | text | value should not match the given wild card template |
| in | text and numerical | value should be in the given set of values |
| not in | text and numerical | value should not be in the given set of values |
For all text filters, you can also specify whether they should be case-sensitive or case-insensitive.
Selection set
In addition to main and column filters, it is possible to specify a selection set for a bill of materials. When a selection set is specified, the corresponding BOM table will show only parts from that selection set. Following types of selection sets are supported:
- Entire model – default selection set, all parts and subassemblies in the current model will be included.
- Subassembly – allows to select a subassembly, which will act as a root component for the bill of materials.
- Drawing view – allows to link a BOM table with a certain drawing view, so only parts included in that view will be shown in BOM. Note that even if a part is not visible in a particular drawing view, but has been included into this view, then it will be included in the corresponding BOM table.
- Layout viewport – allows to link a BOM table with a layout viewport (including a drawing view), so only parts visible in this viewport will be shown in BOM. The difference with the previous mode is that only visible parts will be included; parts, completely hidden or not in the viewport will be not shown in the BOM table.
- Custom selection – allows to select a subset of top-level components, which will be shown in a BOM table.
To set a selection set for a table, use BOM manager or a corresponding option of BMBOM. It is also possible to change a selection set for an existing BOM table using either Edit selection command of BOM manager or BMBOMEDIT command.
Sort a BOM table
- Automatic orderThe table content is sorted as follows: component name, physical material name, thickness (if applicable), parameters (in alphabetic order), and quantity.
- Natural orderThe table content is not sorted. Instead, all components are in the order of their appearance in the document. In most cases, parts added earlier will precede parts added later.
- Custom orderThe table content is sorted according to the columns you select. If no columns are specified, the natural order is used.
Starting from BricsCAD V21, BOM tables use so-called "natural sorting" of text. It means that if text contains a mix of letters and numbers, it will be sorted with respect to those numbers. For example, strings "N1", "M2", "N11", "N2", "AA1" will be sorted as "M2", "N1", "N2", "N11", "AA1." Therefore, it is possible to assign custom numbers with various prefixes to components using custom parameters, and then sort the BOM tables by those numbers in the correct order.
Thumbnails
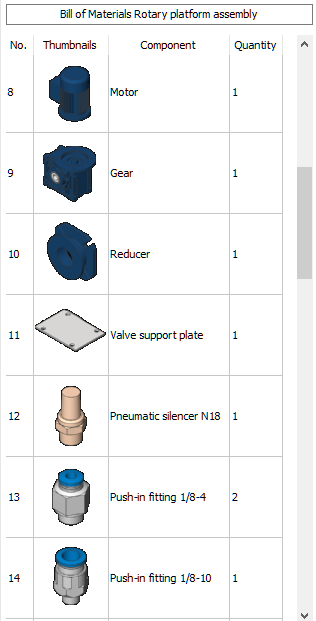
Thumbnails are preview images of parts included in the BOM table, generated from 3d geometry of corresponding parts. When a BOM table with thumbnails is added to a layout or to a model space, those images are stored as attachments, so they can be manipulated using Attachments panel. Note that unless the document is saved, those images will be in a temporary folder. They will be moved to a specified folder (usually named bom_thumbnails in the drawing’s folder) only when the document is saved.
To add thumbnails to your BOM, simply add Thumbnails column and adjust thumbnail properties if necessary. Following properties can be adjusted:
- Path – folder where images will be stored after the document is saved.
- View type – orientation of the camera. Options correspond to Look from widget options.
- Visual style – visual style applied to parts. By default, current visual styles in the document are used, but it is possible to select any visual style available in the document. In addition, a special visual style BM_tangent is available, which imitates a draft quality black and white drawing views.
- Background color – color used for images background. You can select any color as a background, or a transparent background. Note that generation of thumbnails with transparent background usually takes longer time.
- Size (width and height) - thumbnail image size in pixels. Default size could be set in Default thumbnail width and Default thumbnail height global settings.
One BOM table can contain multiple thumbnail columns with different parameters.
In case of large assemblies, thumbnail generation may take a considerable time. By default, thumbnails are updated automatically when the model is changed. However, it is possible to force bill of materials to reuse existing thumbnails with specified parameters, even if they are no longer match the part geometry. To do that, uncheck Automatically update thumbnails in Bill of materials defaults setting. In addition, you may temporarily disable thumbnail columns, so they will not generate thumbnails. When enabled, missing thumbnails will be generated automatically. To disable a thumbnail column, change its Enabled property to No in the BOM manager.
Evaluated columns
Evaluated columns are special columns, of which results are depending on other columns using user-defined expressions. Starting from BricsCAD V21, 2 types of evaluated columns are supported: formula and template columns.
Formula columns
A Bill of Materials supports formula fields. The same syntax is used in the DATAEXTRACTION command. FormulaExpression is the expression in the format of \AcExpr formula fields. This can contain constants such as PI or functions such as SIN. An operand in an expression can be a ColumnTitle enclosed in arrow brackets (<>).
For example, formula =<Mass>/<Volume> calculates the average density of the component.
If a row does not contain a value, a default value will be used instead. It is possible to specify the default value for an operand using the following syntax: <"ColumnTitle",DefaultValue> where ColumnTitle is the title of the required column, and DefaultValue is the default value. ColumnTitle must be between double quotes ("). If no default value is specified, an empty value is used, which in most cases results in an empty output.
A formula column can contain multiple expressions. Each expression must be enclosed by sum brackets ({}). These expressions are evaluated from first to last, and the first one yielding a non-empty output is used.
Starting from BricsCAD V21, a formula can refer to other formula columns, provided that they do not form a loop. In a hierarchical BOM, a formula can also refer to values of the parent row by adding Parent: before the column name. It also can refer to properties that are not explicitly added to the table, but all other formula columns referred to in the formula must exist in the table. You can still use such columns displayed as invisible in the BOM table in formula expressions.
For distance, area, volume and mass properties, the values will be converted to the user-defined unit before using them in the formula expression. If the user-defined unit is not set, the document unit is used. For the mass property, kilogram is used in metric documents and lbs (pound) in imperial documents.
Template columns
Template columns allow you to combine several properties, as well as a custom text, into a single column. A special syntax, based on Diesel expressions, is used to define template columns. Expressions for template columns must start with the $ sign. An operand in an expression can be a ColumnTitle enclosed in arrow brackets (<>). It is also possible to use special functions:
| Function | Description |
|---|---|
| $(+, arg1, arg2[, ... , arg9]) | Add the provided arguments to the first one. |
| $(-, arg1, arg2[, ... , arg9]) | Subtract the provided arguments from the first one. |
| $(*, arg1 , arg2[, ... , arg9]) | Multiply the first argument by the provided arguments. |
| $(/, arg1, arg2[, ..., arg9]) | Divides the first argument by the provided arguments. |
| $(=, arg1, arg2) | Return 1 if arg1 is equal to arg2; otherwise, return 0. Both arg1 and arg2 must be numbers. |
| $(<, arg1, arg2) | Return 1 if arg1 is less than arg2; otherwise, return 0. Both arg1 and arg2 must be numbers. |
| $(>, arg1, arg2) | Return 1 if arg1 is greater than arg2; otherwise, return 0. Both arg1 and arg2 must be numbers. |
| $(!=, arg1, arg2) | Return 1 if arg1 is not equal to arg2; otherwise, return 0. Both arg1 and arg2 must be numbers. |
| $(<=, arg1, arg2) | Return 1 if arg1 is less than or equal to arg2; otherwise, return 0. Both arg1 and arg2 must be numbers. |
| $(>=, arg1, arg2) | Return 1 if arg1 is greater than or equal to arg2; otherwise, return 0. Both arg1 and arg2 must be numbers. |
| $(and, arg1, arg2[, ... , arg9]) | Apply bitwise AND operation to arguments. |
| $(angtos, angle[, mode, precision]) | Convert the angle to string with respect to given mode (0 - degrees, 1 - d/m/s, 2 - grads, 3 - radians) and precision. |
| $(delim, delimiter_string) | Insert a smart delimiter. The delimiter string is added to the output only if the output before and after this delimiter is not empty. |
| $(edtime, time, format) | Format the date according to the given format string. |
| $(eq, arg1, arg2) | Return 1 if arg1 is equal to arg2; otherwise, return 0. Both arg1 and arg2 must be text. |
| $(eval, expression) | Evaluate the given expression as a Diesel expression. |
| $(fix, value) | Truncate the real value to the integer one. |
| $(getvar, variable) | Return the value of the given system variable. |
| $(if, arg, then[, else]) | Return 'then' if 'arg' is not 0; otherwise, return 'else' or empty string if 'else' is not provided. |
| $(index, position, comma_separated_string) | Return the substring at the given position in the given comma-separated string. |
| $(nth, position, arg1[, arg2, ... , arg9]) | Return the argument at the given position. |
| $(or, arg1, arg2[, ..., arg9]) | Apply bitwise OR operation to arguments. |
| $(rtos, value[, mode, precision]) | Format the given value with respect to the required mode and precision. |
| $(strlen, string) | Return the length of the given string. |
| $(substr, string, start[, length]) | Return the substring of the 'string' from 'start' of the given 'length'. Numeration starts from 1. |
| $(upper, string) | Convert 'string' to uppercase. |
| $(xor, arg1, arg2[, ... , arg9]) | Apply bitwise XOR to all arguments. |
Starting from BricsCAD V21, a template column can refer to other evaluated columns, provided that they do not form a loop. In a hierarchical BOM, a template column can also refer to values in the parent row by adding Parent: before the column name. It can also refer to properties that are not explicitly added to the table, but all other evaluated columns referred to in any of the expressions must be present in the table. You can still use columns displayed as invisible in the BOM table in template expressions.
You can use "\n" string to add a line break.
For example, the following expression combines PartNumber, Width, Height and Length properties:
${<PartNumber>$(delim," X ")<Width>$(delim," X
                        ")<Height>$(delim," X
                    ")<Lenght>}
Expression configurator
You can use the Expression configurator to configure an evaluated column. This dialog box is available in Bill of Materials Manager.
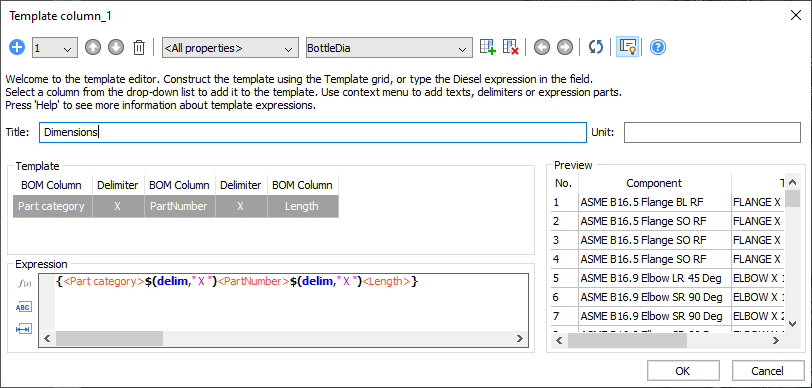
This dialog box allows you to set the title and unit for the column, edit the expression using an editor with syntax highlight and autocompletion, and see a preview of the BOM table with the evaluated column. For a template column, the Template section allows you to easily insert, move and delete properties, as well as delimiters and custom texts.
Column units
- Don't show unitsThe BOM table does not display units for this column.
- In column titleif all values in the table use the same unit or can be converted to a common unit, all values are converted to that common unit. The unit name is added to the column title. You can configure the position of the title and the unit using the Title format property. Use <Title> to denote the title, and <Unit> to denote the unit. For example, the default title format is "<Title>, <Unit>." You can use "\n" to add a line break.The common unit is picked in the following order:
- A unit set by you.
- If the property is a distance, an area, a volume or a mass, and the unit mode is Best for all values, the best representation for the majority of the values is used.
- If all values have the same unit, this will be used.
- In cellThe unit name is added to the value. Value and unit display in the same cell.
- In additional columnThe unit name is placed in a separate column.
You can set the Unit mode for distance, area, volume and mass values to define the units used to display a particular value. For example, if there are masses going from 1 gram to several tons, choose Best for each value to display each mass converted to the most suitable mass unit. To see all masses in kilograms, set kilograms as the user-defined unit for the column. Best for all values is the default.
- Don't show unitsUnits are not displayed.
- Best for all valuesThe unit with the best representation for the majority of the values is displayed. Only dimensions, area, volume and mass properties are supported.
- User-definedYou choose the unit to display. In addition to dimensions, area, volume, and mass properties, it is also possible to select a required unit for material properties, such as density, thermal conductivity and specific heat.
- Best for each valueThe unit that is most suitable for each value is used. The In column title mode of the Unit placement automatically switches to the In additional column mode. Only dimensions, area, volume, and mass properties are supported.
Footer
- No footerThe column ID will not be included in the footer row.
- SumThe sum of all values for each individual component instance displays in the footer.Note: This is not the equivalent of the sum of all values displayed in the table, because the number of each component is used. For formula fields, the sum of values for Quantity=1 is used.
- AverageThe average value, of all values, for each individual component, displays in the footer. For formula fields, the sum of values for Quantity=1 is used.
- MinimalThe smallest value for each individual component displays in the footer. For formula fields, the sum of values for Quantity=1 is used.
- MaximalThe largest value for each individual component is displayed in the footer. For formula fields, the sum of values for Quantity=1 is used.
Templates
You can save a BOM configuration as a template and use it to create new BOM tables. The default template to create a new BOM table is stored in BOMTEMPLATE system variable. The template file contains all necessary data. It includes table type, title, filter, and set of columns with all the associated properties. You can use <NAME> in the title as a placeholder for the actual name of the assembly. For example, if your assembly name is 'My Assembly' and the title of the BOM is specified as Bill of Materials for <NAME>, the BOM title will be 'Bill of Materials for My Assembly', because 'My Assembly' replaces <NAME>.
By default, BOM template files have a .bom extension.
A BOM template file is an extension of the Data Extraction Definition file (.dxd). However, you cannot use a .dxd file as a BOM template, because some BOM-specific data will be missing. You cannot use a .bom file to define a DataExtraction template.
You can edit template files in any text editor. However, Bricsys recommends to use the BMBOM command or the BOM manager to create and edit template files.
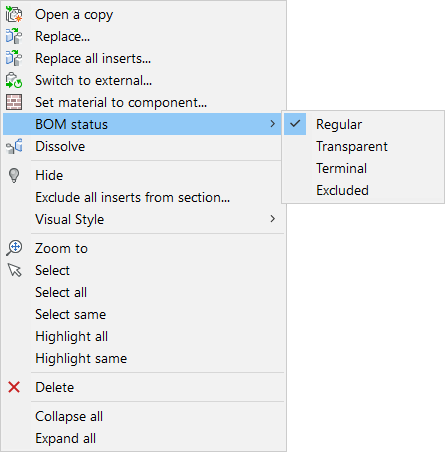
BOM status
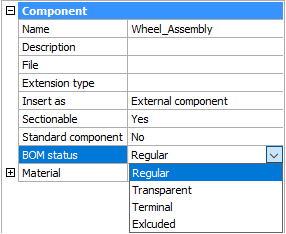
- RegularThe component appears in a Bill of Materials at the same position as the assembly structure and the default value of the selected mode for a Bill of Materials.
- TransparentThe component acts as a transparent container for its subcomponents. The component does not appear in the Bill of Material, but subcomponents can appear in the BOM, depending on their BOM status, position in the assembly structure, and the mode of the BOM table.
- TerminalThe component is treated as a leaf component (has no subcomponents). This is useful for complex parts or standard components.
- ExcludedThe component and its subcomponents do not appear in the Bill of Materials.
To set the BOM Status of an external or root component
- Open the file that contains the component.
- Select the root component in the Mechanical Browser.
- Set the BOM status property.
To set the BOM Status of a local component
- Select the component in the Mechanical Browser.
- Right-click on the selected node to open the context menu.
- Select a BOM status from the BOM status submenu.
Fixed corners
Starting from BricsCAD V21, you can set any corner of the table as fixed. The fixed corner will always keep its initial position during BOM update. When the table has been moved manually, the new position of this corner will be kept. Fixed corners allow to align BOM tables with other objects.You may choose which corner to fix during the table placement by either the BMBOM command or the BOM manager; use the Tab key to cycle the corners. You can change the fixed corner of a BOM table in the BOM manager.