


Multi-parametric 3D animations
Overview
With the Animation Editor panel you can animate several parameters and program camera movements. Once the animation is programmed, you can play it in BricsCAD or render it as a 2D video.
Each parameter animation has its own timeline. You can add as many animation sequences to a parameter as you like, as long as these sequences do not overlap.
There is also a special timeline for camera movements. You can add as many camera sequences as you like. You can set both the point of focus and the position of the camera with either a polyline or a point. This is similar to the ANIPATH command.
Timeline
Scenes, Timelines and Animation Sequences
Scenes
A scene consists of one or more timelines and each of these timelines has one or more animation sequences. When the editor is launched for the first time, it automatically creates a scene. A scene sets the duration of the animation, the current time moment, and the current frame, which are editable. Together, they define the animation schedule used for playback and render. Currently, you can only render the current scene with the Animation Editor. However, you can have multiple scenes in the same document and you can switch between them.
Animation sequences
- ParameterAn animation sequence represents the continuous change of a parameter from a start value to an end value. For example, a distance constraint between two faces: the animation will move one face to a maximum and minimum distance value.
- CameraAn animation sequence corresponds to a continuous camera movement on a path. You can adjust various camera movements with the camera timeline.
- Exploded viewAn animation sequence represents the exploded view assembling or disassembling process from the first step to the last step.
Timelines
A timeline is a visual representation of an animation sequence for an object. The timeline displays how and when the parameters will animate. Each parameter has its own timeline in a scene. Animation sequences cannot overlap. A timeline can be temporarily disabled to exclude it from an animation, or can be locked in order to disable all the possible changes of it. All timelines are independent. This means that you can animate multiple parameters at the same time and see their combined effects.
Opening the Animation Editor
- Place the cursor on a toolbar, right-click, and choose Animation Editor from the Panels context menu.
-
Click the Animation Editor tool (
 ) on the View section of the ribbon.
 -
Choose Animation Editor from the View menu.
-
Enter ANIMATIONEDITOROPEN in the Command line.
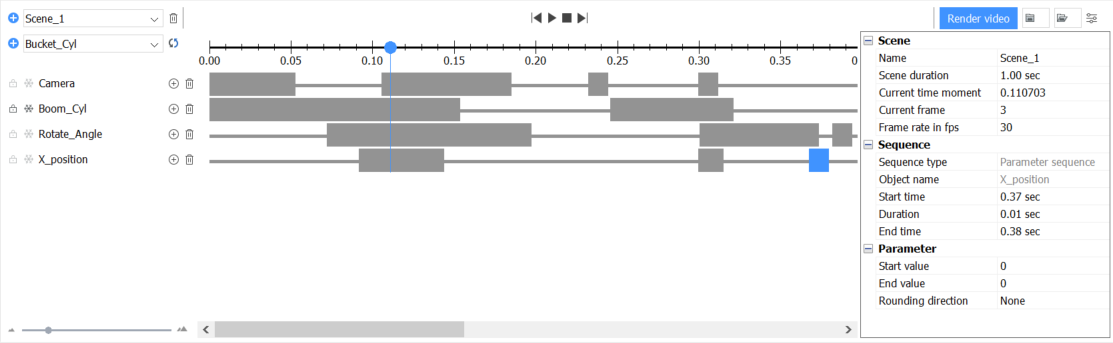
The Animation Editor interface
- Toolbar: contains tools to select a scene, adjust an animation and render a video.
- Timelines area: add and edit the timelines and animation sequences.
- Configurator: configure the parameters of the current scene and the selected animation sequence.
Toolbar

- Add and remove scenes.
- Control the playback of the animation.
- Set the duration of the current scene.
- Add a camera timeline.
- Start a render.
- Record animation graphics and save it to a zip-archive or folder.
- Load the saved graphics and playback it in the special mode.
| Tool | Name | Description |
|---|---|---|
 |
Add Scene | Adds an empty scene with a default duration. |
 |
Scene Selector | Selects the current scene. |
 |
Remove Scene | Removes the current scene from the document. |
 |
To previous sequence | Jumps to the start of the previous animation sequence. |
 |
Play | Starts the animation. Toggles to the pause button after pressing. |
 |
Pause | Pauses the animation. Toggles to the play button after pressing. |
 |
Stop | Stops the animation and return the cursor to the start position. |
 |
To next sequence | Jumps to the start of the next animation sequence. |
 |
Render video | Opens a dialog box to start the render of a 2D video. |
 |
Record animation graphics | Records animation graphics and saves it to a zip-archive. |
 |
Record animation graphics | Records animation graphics and saves it to a folder of your choice. |
 |
Load animation graphics | Loads animation graphics data from zip-archive and opens the special mode for playing this graphics. |
 |
Load animation graphics | Loads animation graphics data from a folder of your choice and opens the special mode for playing this graphics. |
 |
Unload animation graphics | Unloads the animation graphics which was loaded before. The button is available in the special mode for playing animation graphics only. |
 |
Toggle configurator | Toggles the configurator panel. |
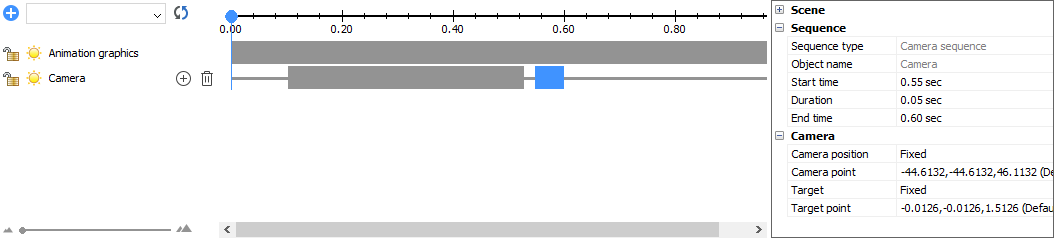
Timelines Area
Use the Timelines Area to add and remove timelines and animation sequences, and to display the animation schedule. Click on an animation sequence to select it, or drag the start or end of the bar to adjust the duration. The selected animation sequence displays in blue, other sequences display in gray. Each timeline in the timelines area can be temporarily disabled to exclude it from the animation.

The Timelines Area has a cursor that represents the current position in the animation. When the animation is played, the cursor represents the current playback position. You can also manually move the cursor to a new position at any time, or edit the Current time moment or Current frame parameter. When the cursor is moved, all parameters change to match the current frame. The camera position is also updated.
To make sure that the model state corresponds to the current animation position, click  .
.
Time Scale

| Tool | Name | Description |
|---|---|---|
|
Add Timeline | Adds the selected parameter to the timeline. |
 |
Object Selector | Selects the object to add to the timeline. |
|
Update model | Updates the model state with respect to the current cursor position. |
 |
Time Scale | Displays the time marks along the timeline. |
 |
Cursor | Displays the current position of the playback. |
Timeline

| Tool | Name | Description |
|---|---|---|

|
Timeline UnLocked | Indicates that the timeline is opened for changes. Click to lock the timeline. |

|
Timeline Locked | Indicates that the timeline is locked for changes. Click to unlock the timeline. |
 |
Timeline Enabled | Indicates that the timeline is enabled. Click to disable the timeline. |
 |
Timeline Disabled | Indicates that the timeline is disabled. Click to enable the timeline. |
 |
Timeline Object | Displays the name of the associated object. |
 |
Add Sequence | Adds a new animation sequence, at the cursor position. |
|
Remove Timeline | Removes a timeline from the animation. |
 |
Animation Sequence | Represents the duration and position of an animation sequence. Left-click to select the sequence. |
 |
Selected Animation Sequence | Represents the duration and position of the selected animation sequence. You can see and change the properties in the Configurator. Move the mouse to the end of the sequence, until the cursor changes to a double-sided arrow. Then left-click and drag to change the start time, end time and duration. Left-click at the middle of the sequence and drag to a new position at the timeline, without changing the duration. Note: Moving and dragging sequences supports three types of snapping that are displayed with an yellow line:
|
Configurator
Access all the properties of the animation scene and the selected sequence via the Configurator. All properties are grouped by object.
- Scene: properties of the current scene.
- Name: name of the scene.
- Scene duration: duration of the scene, in seconds.
- Current time moment: displays the current animation position.
- Current frame: displays the current animation frame.
- Frame rate in fps: frame rate of the scene, in frames per second.
- Sequence: properties of the selected sequence.
- Sequence type (read only): the type of the sequence.
- Object name (read only): the name of the object controlled by that sequence.
- Start time: start time of the sequence in seconds. The duration will be adjusted, the end time will remain unchanged.
- Duration: duration of the sequence in seconds. When changed, the end time will be adjusted with respect to the start time and duration.
- End time: end time of the sequence in seconds. When changed, the duration will be adjusted, the start time will remain unchanged
- Parameter (for parametric sequences)
- Start value: start value of the parameter.
- End value: end value of the parameter.
- Rounding direction: defines the rounding direction type.
- Precision: sets the tolerance for rounding precision.
- Camera (for camera sequences)
- Camera position: camera path entity type. Values:
- Fixed: the camera is fixed in the given point.
- Dynamic: the camera moves along the given path.
- Camera point (when the Camera position is set to Fixed). The following controls are displayed:

List of previously used points. Select the point from the drop-down list to use one. 
Click to select the point in the model. When the point is selected, a dialog box displays: 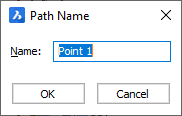
- Name: enter the point name.
- OK: click to accept the point selection.
- Cancel: click to cancel the point selection.

Click to remove the point from the list. - Camera path (when the Camera position is set to Dynamic). The following controls are displayed:

List of previously used paths. Select the point from the drop-down list to use one. Click to select the path in the model. When the path is selected, a dialog box displays: 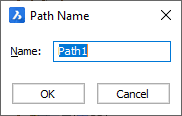
- Name: enter the path name.
- OK: click to accept the point selection.
- Cancel: click to cancel the point selection.
Click to remove the path from the list.
- Camera position: camera path entity type. Values:
- Target: The target defines the point the camera will look at the given moment.
- Values:
- Fixed: The target is fixed to a given point.
- Dynamic: The target moves along a given path.
- Target point (when the Target is set to Fixed). The following controls display:
List of previously used points. Select the point from the drop-down list to use one. Click to select the point in the model. When the point is selected, a dialog box displays:
- Name: enter the point name.
- OK: click to accept the point selection.
- Cancel: click to cancel the point selection.
Click to remove the point from the list. - Target path (when the Target is set to Dynamic). The following controls display:
List of previously used paths. Select the point from the drop-down list to use one. Click to select the path in the model. When the path is selected, a dialog box displays:
- Name: enter the path name.
- OK: click to accept the point selection.
- Cancel: click to cancel the point selection.
Click to remove the path from the list.
- Values:
Animation Playback
Use the animation playback controls to preview an animation.
- To start an animation, click the Play button. The playback starts from the cursor position. The button will switch to the Pause button.
- To pause the animation, click the Pause button. The button will switch to the Play button.
- To stop the animation and move the cursor to the start of the animation, click the Stop button.
You can jump to the next or to the previous animation sequence (in chronological order) using the Jump to Next Sequence and Jump to Previous Sequence tools respectively.
- During playback, the parameters involved in the scene and the camera position are changed directly in the drawing. For complex models, the recalculation of the model may take a significant amount of time. You can use the cursor to check the key moments of the animation instead.
- During playback, the camera will move with any set camera sequences. If no camera sequences are present, the current view is used. The output video is the same as the current viewport.
- After the playback finishes, the model will automatically revert to the state before the animation was started. In some cases, it may cause the model to be in a different state than the cursor position would dictate. To update the model with respect to the current cursor position, click .
Render
- Click the Render video button to render the animation as a 2D video.The Render video dialog box displays:
Render video
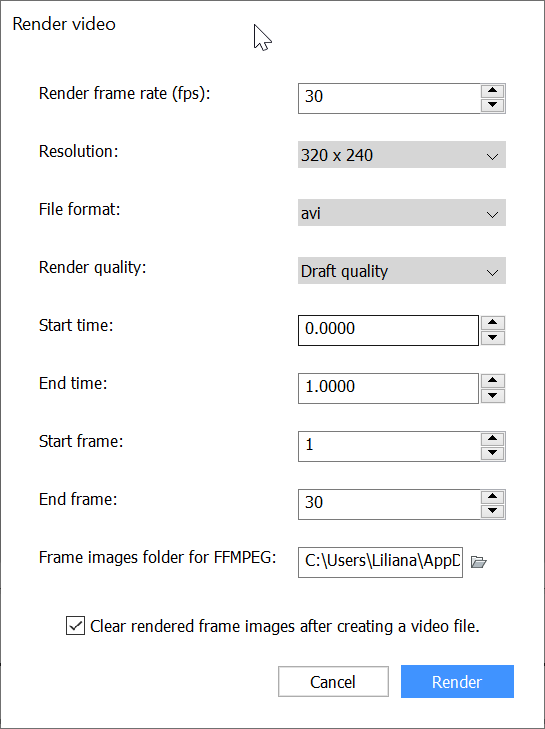
- Adjust the render parameters:
- Render frame rate (fps): the frame rate.
- Resolution: the resolution of the video.
- File format: the format of the video (AVI, MPG and WMV formats are supported).
- Render quality: the quality of the render (draft and full quality).
- Start time: the time position the render will start.
- End time: the time position the render will end.
- Start frame: the frame position the render will start.
- End frame: the frame position the render will end.
- Frame images folder for FFMPEG: the folder where the frame images will be stored.
- Clear rendered frame images after creating a video file: toggles the resetting of the frame images after creating a video file.
- Click the Render button to start the render. A dialog box displays.
- Specify the location and the name of the output file.
- Click Save to start the render.A preview shows the progress.
Adding a new scene
- Click the Add Scene button.The Add scene dialog box displays:
Add scene
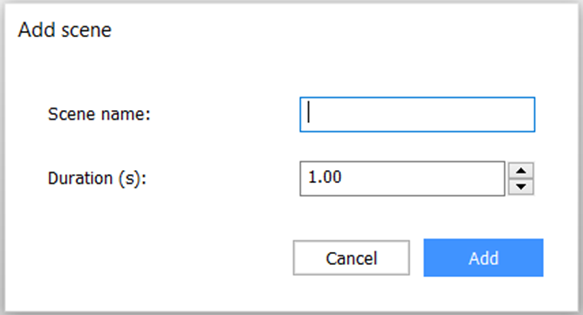
- Enter the scene name.
- Enter the scene duration in seconds.
- Click Add to add the scene.
Removing a scene
- Select the scene with the Scene Selector.
- Use the Remove Scene tool.
Adding an animation of a parameter
- Add the desired parameter to the timeline:
- Select the parameter with the Parameter Selector.
- Use the Add Timeline tool to add a new timeline.
- Place the cursor at the desired start position on the Time Scale.
- Use the Add Sequence tool to add a new animation sequence, or double-click at the timeline where you want to add a new sequence.
- Drag to adjust the desired duration of the sequence, or use the Configurator to set the desired start time, end time or duration, in seconds.
For convenience, use the three snappings in case of dragging:
- Snapping by scale
- Snapping by cursor
- Snapping by sequence intervals of other timelines
- Use the Configurator to set the desired start and end values for the parameter.
Adding a camera movement
- If applicable, add a camera timeline by selecting Camera from the Object selector.
- Place the cursor at the desired start position on the Time Scale.
- Use the Add Sequence tool on the camera timeline to add a new camera sequence, or double-click at the timeline where you want to add a new camera sequence.
- Click and drag to adjust the desired duration of the sequence, or use the Configurator to set the desired start time, end time or duration, in seconds.
- Use the Configurator to set the camera path:
- Choose the Camera position:
- Fixed: the camera position will be fixed.
- Dynamic: the camera will move along the given path.
- Use the Camera point property to select the point or the Camera path to select the path.
- Select the property for editing, then click to select the path or the point on the model, or select one of the previous points or paths from the drop-down list.
- Choose the Camera position:
- Use the Configurator to set the target path. The target is the point where the camera will focus on.Choose the Target:
- Fixed: the target will be fixed.
- Dynamic: the target will move along the given path.
Use the Target point property to select the point or the Target path to select the path:Select the property for editing, then click to select the path or the point on the model, or select one of the previous points or paths from the drop-down list.
Removing an animation sequence
- Right-click the sequence.
- Select Delete from the context menu.
As an alternative you can:
- Left-click the sequence.
- Press the Delete key.
Disabling or enabling a timeline
-
Check the timeline status icon. If the icon is
, the timeline is disabled. If the icon is , the timeline is enabled. -
Click the timeline status icon to toggle the status.
Animation sequences on disabled timelines are not included in the animation.
Locked or Unlocked a timeline
-
Check the lock timeline icon. If the icon is
 , the timeline is locked. If the icon is , the timeline is opened for changes.
 -
Click the lock timeline icon to toggle the status.
When a timeline is locked, it will not be possible to toggle the timeline effects, to add a new effect to the timeline, to delete this timeline, to add/move/delete effects and the properties related to the timeline animated object will be disabled in the Configurator panel. This can be useful to avoid accidental changes to an already configured timeline.
Animating an exploded view
As the Animation Editor is not supported in Block editor or reference editing modes, only exploded views inserted in the model space can be animated.
-
Insert the exploded view in model space.
-
If applicable, suppress the exploded view and the model, if you want to hide or show them during the animation.
-
Select the exploded view object in the Object selector.
-
Click
to add a timeline. -
Use the Add Sequence tool on the exploded view timeline to add a new exploded view sequence, or double-click at the timeline where you want to add a new sequence.
-
Click and drag to adjust the desired duration of the sequence, or use the Configurator to set the desired start time, end time or duration in seconds.
-
If applicable, use the Configurator to set the start step and the end step of the exploded view, or to enable the auto-hide option.
Rendering a video
See the section Render.
Saving animation graphics
Calculating of animation frames for large models with difficult parametrization can take a long time. In this case, you can record the graphics for all the frames to a zip-archive or a folder, in order to load it afterward and already playback calculated graphics again. Such a playback should work significantly faster than a simple recalculation for big models. Unlike 2D video, you can zoom, rotate the model in BricsCAD and change the visual style. Also, you will be able to render videos by the recorded graphics.
- Click on the toolbar.
- The drop-down menu with two options will appear:
- Export graphics to zip-fileIn this case, the recorded data will be compressed. But for large models, it can be long. Therefore, this option is convenient if you want to obtain a smaller file, for example, to send it to someone. However, for large models, even compressed files can take up several gigabytes.
After clicking this option, a file browser appears. Enter the new name and click Save to continue. If you click Cancel, the process will be interrupted, and graphics will not be recorded.
- Save graphics in folderIn this case, you obtain uncompressed data, without wasting time on compressing data (and decompressing this folder while loading). This is useful if you work with the model yourself on the same machine and you need to replay the animation scene for a large model several times. This option can save time on playback and rendering video compared to recalculating frames in the original Animation Editor mode.After clicking this option, a file browser appears.
Create the new folder and click Select Folder button to continue. If you click Cancel, the process will be interrupted, and graphics won’t be recorded.
If you select a folder which is not empty, a dialog box appears asking you to confirm to clean and overwrite.
You can choose in which state the graphics will be saved.
- Export graphics to zip-file
- The progress bar will be displayed while recording.
- After the end of the process, the animation graphics will be recorded to the selected zip-archive or folder.
Loading the recorded animation graphics and play it
You can load the graphics data recorded by the previous instruction for further playing it in the special mode of Animation Editor.
- Click on the toolbar.
- The drop-down menu with two options will appear:
- Load zip-file with graphicsSelect this option to load the zip-archive with animation graphics, click the first option. After selecting the option, a file browser will open. Select the zip-archive or enter its name and click Open to continue. If you click Cancel, the process will be interrupted and Animation Editor will remain in the original mode.
- Load graphics from folderSelect this option to load the folder with animation graphics. After clicking this option, a file browser will appear. Select the folder or enter its name and click Select to continue. If you click Cancel, the process will be interrupted and Animation Editor will remain in the original mode.
- Load zip-file with graphics
- If you have chosen a zip archive, wait until the data is prepared. After loading, the special mode of Animation Editor is opened. This mode displays options that are identical to the existing options of the original mode.
- Use the playback buttons to control playback. Click the Play button to start playing from the current cursor position. Click the Pause button to pause on the current position. Click the Stop button to stop playback and move cursor to the start position.
- You can move the cursor along the scale to jump to the necessary frame. In this case, the nearest recorded frame will be displayed.
You can render video by pressing the Render video button like in the original mode. (See the Render section.)
Note:-
The frame rate in the render dialog is disabled because the graphics were recorded at a fixed frame rate, and you couldn't change it.
-
Use the
button to reload animation graphics according to the current cursor position if something was wrong. -
You should load animation graphics while the original document (from which the graphics was recorded) is active. Otherwise, the result may differ from the original.
-
- Also, there is the possibility to change camera effects for Animation graphics by adding a new Camera timeline with new effects. In this case recorded camera effects will be replaced by the new ones.
- Press the button to close this mode and clear cache of animation graphics.