


BIM BCF panel
The BIM BCF panel allows you to link information, such as a comment, a screenshot, a list of involved objects and a camera viewpoint to an issue and add new issues.
Login tab
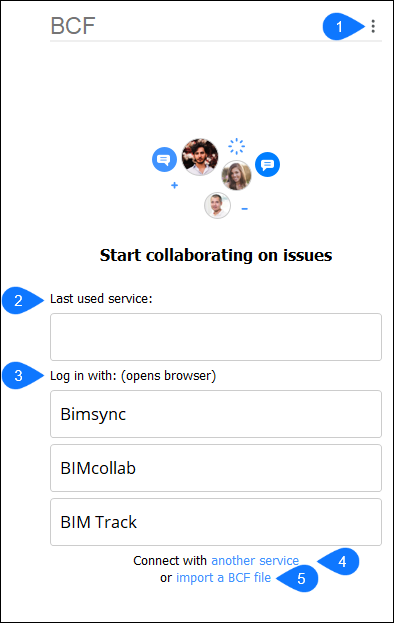
- Menu
- Last used service
- Log in with
- Connect with another service
- Import a BCF file
- Menu
- Opens the main menu of the BIM BCF panel.
- Last used service
- Displays the last used collaboration service.
- Log in with
- Displays the three most popular collaboration services. Click the desired button to directly connect with that service.
- Connect with another service
- Opens the Custom log in dialog box.
- Import a BCF file
-
Displays the Select a BIM Collaboration Format file to import dialog box.Note: This option only allows to read an imported BCF file. Edits cannot be saved.
Cloud service tab
Once you enter the desired service, you are connected to the selected cloud service. Insert the e-mail address and the password to connect.
After logging in, close the browser window and start collaboration on issues in BricsCAD.
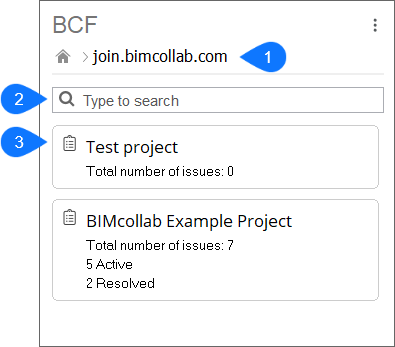
- Source URL
- Search
- Project list
- Source URL
- Displays the source URL of the BCF collaboration service.
- Search
- Displays only the projects filtered by the word you type in the search bar.
- Project list
- Displays the list of projects that you are involved in.
Issue Overview tab
Displays the issues available for the selected project.
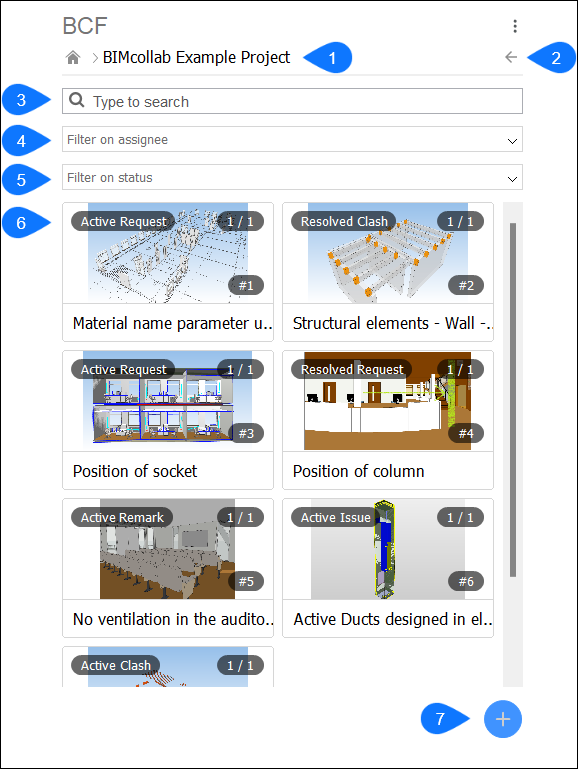
- Project name
- Project list
- Search
- Filter on assignee
- Filter on status
- Search report
- Add issue
- Project name
- Displays the name of the opened project.
- Project list
- Returns to the project list.
- Search
- Allows you to specify a search in the issues list.
- Filter on assignee
- Allows you to filter issues on the assignee. All assignees in the project are listed in a drop-down menu.
- Filter on status
- Allows you to filter issues on the status. Different statuses can be accessed through a drop-down menu.
- Search report
- Lists all issues that comply with the entered search.
- Add issue
- Allows to add and define a new issue.Note: This option is only available when logged in with a BIM collaboration cloud service.
New issue tab
- Issue name
- Issue list
- Issue title
- Description
- Assign to
- Type
- Status
- Priority
- Due
- Browse
- Screenshot
- Remove
- Only show selected
- Issue name
- Displays the name of the new issue.
- Issue list
- Returns to the issues list of the project.
- Issue title
- Defines the title of the issue to add.
- Description
- Defines a specific description of the issue.
- Assign to
- Defines the assignee of the issue.
- Type
- Defines the type of the issue. Several options can be accessed through a drop-down menu.
- Status
- Defines the status of the issue. Several options can be accessed through a drop-down menu.
- Priority
- Defines the importance of the issue. Several options can be accessed through a drop-down menu.
- Due
- Defines whether this issue has a due date to solve or not. If checked, a date can be specified.
- Browse
- Opens the Select a viewpoint for this comment dialog box to add a viewpoint.
- Screenshot
- Insert a screenshot from model space. The screenshot image is based on the current visibility in model space.
- Remove
- Removes the screenshot preview.
- Only show selected
- When unchecked, entities that are selected during the screenshot creation are highlighted when activating the viewpoint later on. When checked, only the selected entities are set to be visible in the viewpoint of the issue comment, allowing you to isolate the selected entities when activating the viewpoint.
Issue information
When you click an issue, the issue information is displayed.
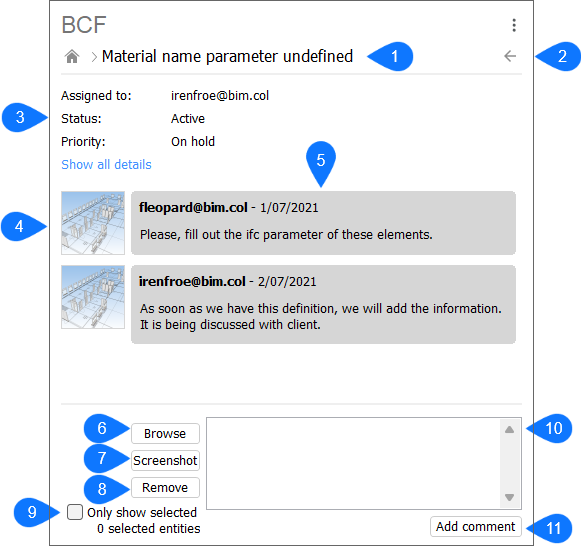
- Issue name
- Issue overview
- Details
- Thumbnail image
- Comments
- Browse
- Screenshot
- Remove
- Only show selected
- Comment
- Add comment
- Issue name
- Displays the name of the opened issue.
- Issue overview
- Returns you to the issue overview.
- Details
- Displays detailed information about the issue, such as status, author and creation date.
- Thumbnail image
- If the comment has an associated camera position, clicking the thumbnail image brings the camera in the current drawing to this position.
- Comments
- Displays the comments on the issue.
- Browse
- Opens the Select a viewpoint for this comment dialog box.
- Screenshot
- Inserts a screenshot from model space.
- Remove
- Removes the screenshot preview.
- Only show selected
- When unchecked, entities that are selected during the screenshot creation are highlighted when activating the viewpoint later on. When checked, only the selected entities will be set to be visible in the viewpoint of the issue comment, allowing you to isolate the selected entities based on the viewpoint.
- Comment
- Allows you to insert a comment for the selected issue.
- Add comment
- Adds the comment you have inserted to the selected issue.
Note: Comments can only be added if a BCF cloud service was selected. They
cannot be saved to BCF files since this options allows you to read a BCF file.