Working with parameters and constraints
Parametric modeling
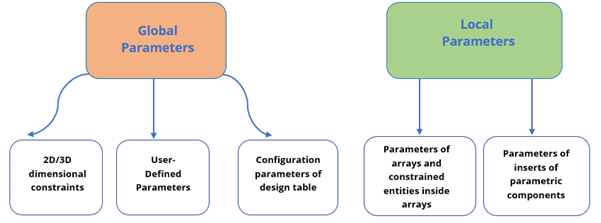
There are two types of parameters: Local parameters are attached to a particular entity. Global parameters are not attached to a particular entity.
Working with constraints
If you create some components (e.g. windows, doors,…) in your BIM model, you can parametrize them by applying 3D constraints. Defining constraints allows you to control the shape and size of the elements. Together with constraints, parameters determine the positions of entities through an expression.
There are two types of 3D constraints in BricsCAD: one specifies the size of the entities, the other locate their positions.
Geometrical constraints
Geometric constraints allow you to control the position of 3D entities with respect to each other.

Toolbar:
Quad: Constraints
| Fix | Keeps solids, edges or faces of solids in-place in the drawing. |
| Coincident | Applies a coincident constraint between two edges, two faces or an edge and a face of two different solids. |
| Concentric | Keeps two cylindrical, spherical or conical surfaces centered. |
| Parallel | Keeps the two faces of a solid or of different solids parallel. |
| Perpendicular | Keeps the two faces of a solid or of different solids perpendicular. |
| Tangent | Keeps a face and a curved surface of different solids tangent. |
| Rigid set | Makes a set of entities or sub-entities a rigid body. |
Dimensional constraints
Dimensional constraints allow you to control the sizes of 3D entities in drawings and the distances between them.

Toolbar:
Quad: Constraints
Ribbon:
| Distance | Creates a distance between two sub-entities. |
| Radius | Creates a radius to cylindrical surfaces or circular edges. |
| Angle | Creates an angle between two faces of a solid or of different solids. |
Setting an expression to a parameter
In BricsCAD®, you can set an expression to any parameter, be it global or local. As an example, you can create a simple expression that only contains a number or a name of a global parameter and apply it to the related geometry in the drawing. You can also use more complex formulas that include the use of standard operators and functions.
- Local parameters cannot be referenced by names in expressions.
- The constants Pi=3.14... and e=2.72... can be used in expressions. The constants names are not allowed to be used as parameter name and name of 3D constraint.
The following table shows the operators that can be used in expressions.
| Addition (+) | Produces the sum of numeric values. |
| Subtraction or Negative (-) | Subtracts the two numeric values. |
| Multiplication (*) | Multiplies the numeric values. |
| Division (/) | Divides two numeric values. |
| Exponentiation (^) | Calculates the exponential value of the given numbers. |
| Modulo or Remainder operator (%) |
Gives the remainder after the division of one numeric value to another e.g. The expression "5 % 2" would evaluate to 1, because 5 divided by 2 leaves a quotient of 2 and a remainder of 1. |
The following table shows the functions and the syntax which can be used in expressions.
| Cosine | cos(expression) |
| Sine | sin(expression) |
| Tangent | tan(expression) |
| Arc cosine | acos(expression) |
| Arc sine | asin(expression) |
| Arc tangent | atan(expression) |
| Hyperbolic cosine | cosh(expression) |
| Hyperbolic sine | sinh(expression) |
| Hyperbolic tangent | tanh(expression) |
| Arc hyperbolic cosine | acosh(expression) |
| Arc hyperbolic sine | asinh(expression) |
| Arc hyperbolic tangent | atanh(expression) |
| Square root | sqrt(expression) |
| Signum function (-1,0,1) | sign(expression) |
| Round to nearest integer | round(expression) |
| Truncate decimal | trunc(expression) |
| Round down | floor(expression) |
|
Round up |
ceil(expression) |
| Absolute value | abs(expression) |
| Largest element in array | max(expression1;expression2) * |
| Smallest element in array | min(expression1;expression2) * |
| Degrees to radians | d2r(expression) |
| Radians to degrees | r2d(expression) |
| Logarithm, base e | ln(expression) |
| Logarithm, base | 10 log(expression) |
| Exponent, base e | exp(expression) |
| Exponent, base 10 | exp10(expression) |
| Power function | pow |
| Random decimal, 0-1 | Random(expression1;expression2) * |
Parametric blocks
Parametric Blocks refer to blocks that have parameters that determine the size and shape of the 3D geometry. Once the parametric block is created, it can be inserted as a block reference in the drawing. The parameters of your block can be changed after you insert it in your model. Thus, no need to modify the parametric block file individually. The parametric blocks also enable you to use the same block in different sizes and in different shapes in your model.
Parametrizing a custom component
The window that was created in the previous lesson is used to demonstrate how the parametric design works. This window consists of three solids: subtractor, fixed frame, and glass pane.
- Open the Mechanical Browser with the MECHANICALBROWSEROPEN command, to control and manage the values of 3D constraints and parameters.Note: The Mechanical Browser allows to navigate through all the constraints and parameters in the drawing and to edit dimensional constraints.
- Make sure that the Enable selection of 3D solid faces (
 ) is toggled on in the Selection Modes To easily follow the steps, make sure Boundary Detection is toggled off.
Step 2: Applying fix constraints
- Turn on the BIM_Subtract layer.
- Select the entities (1) you want to add a fixation to.
- (Optional) Press the TAB key to select obscured geometry.
- Choose Add Fixation (2) in the 3D constraints command group in the Quad.
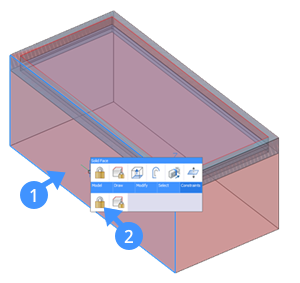
The fixation appears in Mechanical Browser as Fix_1.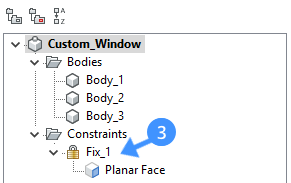
Step 3: Applying rigid constraints
- Select the entities to apply the Rigid Set constraints.
The entities remain in the same position with respect to each other when they are in a Rigid Set.
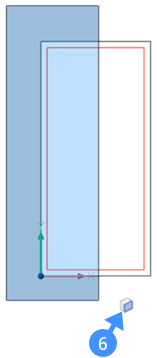
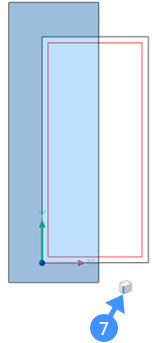
To select more than one sub-entity of the same type at a time, take the following steps:- Use Look From Widget (4), by default it is at the top right of your screen, to change the view from 3D to TOP.
- Select the entities using the selection box (5). While drawing a selection box, press CTRL key to change the type of sub-entity selection. Every time you press CTRL key the type of the sub-entity selection will change. The type of the sub-entity can be seen under your mouse cursor, for instance, faces (6) or edges (7).
Note: By default, the selection boxes see and select solids.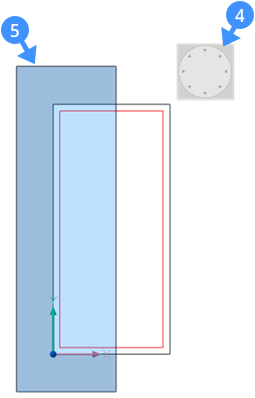
- Choose Add Rigid Set (
 ) in the 3D constraints command group in the Quad.
 - Repeat the same process for the other sides: top, bottom, and right side.
Step 4: Applying distance constraints
Command: DMDISTANCE3D
- Turn off the BIM_Subtract layer.
- Select the first face.
The face highlights.
- Hover over the second face.
Hit the TAB key to highlight an obscured face.
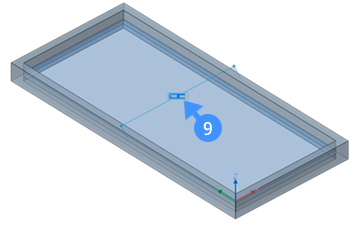
- When the second face highlights, choose Add Distance (8) in the 3D Constraints command group in the Quad.

You are prompted: Specify distance value or [Geometry-driven] <xxx.xx>:
- Do one of the following:
- Press Enter key or right-click to accept the current value.
The current value displays in the dynamic dimension field (9) when the Dynamic Dimensions (DYN) is active.
- Type a value in the Command line.
- Press Enter key or right-click to accept the current value.
- The distance value between the two surfaces appears in the Mechanical Browser.Note: To remove any constraint in your model, select the constraint in the Mechanical Browser, e.g. fix, rigid set…, and press the Delete key or right-click and select the Delete option.
Step 5: Applying parameters
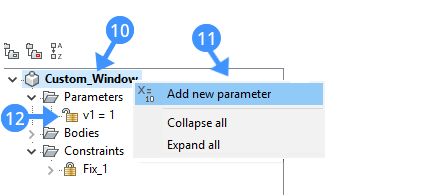
- Right-click the file name (10) in the Mechanical Browser.
- Select Add New Parameter (11) in the context menu.
The parameter settings grid is created and the parameter is added in Mechanical Browser as v1 = 1 (12).
- Select the parameter, then edit its properties in the settings grid.
The following illustration shows the properties of a Width parameter of the custom window. The table below demonstrates each property.
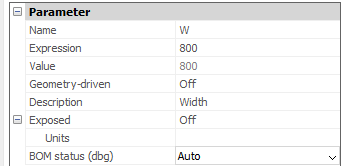
Name Type a parameter name. Expression Type a value or formula. Value Shows the current value of the parameter. Geometry-driven If On, makes the parameter geometry-driven. Description Define an optional description of the parameter. Exposed Controls whether the parameter is available in the properties panel when the component is inserted into a model. Units Specifies whether the parameter is linear, areal or volumetric. BOM status (dbg) Specifies if the parameter will be included into BOM. -
Similarly, also by using Parameters Manager panel, we can add parameters which will create upper and lower limits for window width by combining max(expression), and min(expression) expressions.
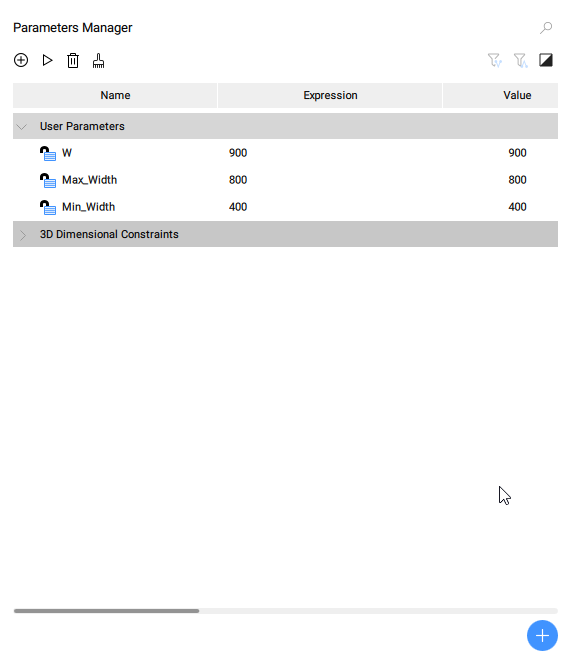
- To link the parameters you just created with the dimensional constraint, select the distance constraint in the Mechanical Browser panel and use the parameters to formulate an expression in the Expression field in the settings grid of the constraint.
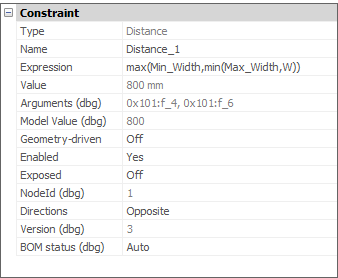
For example, when W=900mm, the Distance_1 value will be 800mm:
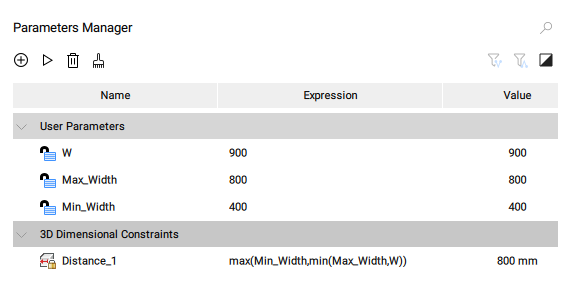
- (Optional) Change the expression value of the parameter and press Enter. The assigned distance constraint is changed accordingly.
*In your drawing, you can design as many constraints as possible. Note that the software will keep you away from applying more constraints than are necessary.

