
Complete guide for Network licensing
1. About Network licenses
A network license allows multiple users on the same LAN (Local Area Network) to access BricsCAD via TCP/IP.
To make the network license available for the client machines, the administrator installs the Bricsys Network License Server on the server, activates the license, and then the server distributes the license seats.
The client computer requests a seat when BricsCAD launches and returns it when BricsCAD closes.
System Requirements
The Bricsys Network License Server is available for Windows and Linux. It is not available for macOS. When you have the Bricsys Network License Server running on Windows or Linux, it can distribute licenses to client computers running Windows/Linux/macOS.
Supported platforms
| Platform | Version |
|---|---|
|
Windows |
10* |
|
Windows |
11 |
|
Windows Server |
2019 |
|
Windows Server |
2022 |
|
Windows Server |
2025 |
|
Ubuntu Linux |
22.04 LTS and higher** |
|
openSUSE Linux |
later than April 2022 |
|
Fedora Linux |
later than April 2022 |
*Windows 10 Operating System reached end-of-support on 14 October 2025.
**Ubuntu 22.04 LTS and newer Ubuntu versions that are still supported by Canonical (for a more stable experience, LTS is recommended).
2. Overview of licensing options
2.1. License levels
There are 5 license levels for BricsCAD:
- BricsCAD Lite
- BricsCAD Pro
- BricsCAD BIM
- BricsCAD Mechanical
- BricsCAD Ultimate
To see a detailed comparison for each license level go to Compare BricsCAD product levels.
2.2. License types
There are 2 license types for BricsCAD:
- Perpetual license.
- Subscription license.
Perpetual license
When you purchase a perpetual license, you own the software. BricsCAD editions run on Microsoft Windows, macOS and Linux.
If you want to keep your software up to date, there are two options:
- The BricsCAD Maintenance that includes automatic upgrades and support.
- Purchasing upgrades at your own discretion.
Subscription license
When you choose the subscription option, you have access to the latest version of BricsCAD for 1 year. It includes Priority Support and access to all new versions that are released during the time your subscription is active.
3. Setting up a Network License Server
It is recommended that a network/system administrator be responsible for downloading, deploying and configuring the Bricsys Network License Server. The server then distributes the license seats.
3.1. On Windows
Downloading Bricsys Network License Server
The Bricsys Network License Server contains a custom RLM server and the Bricsys Network License Manager. See more information in the Bricsys Network License Server - Release Notes.
Download the Bricsys Network License Server (Windows) from here.
Installing Bricsys Network License Server
In the Bricsys Network License Server Setup dialog box, make sure to select all the checkboxes.
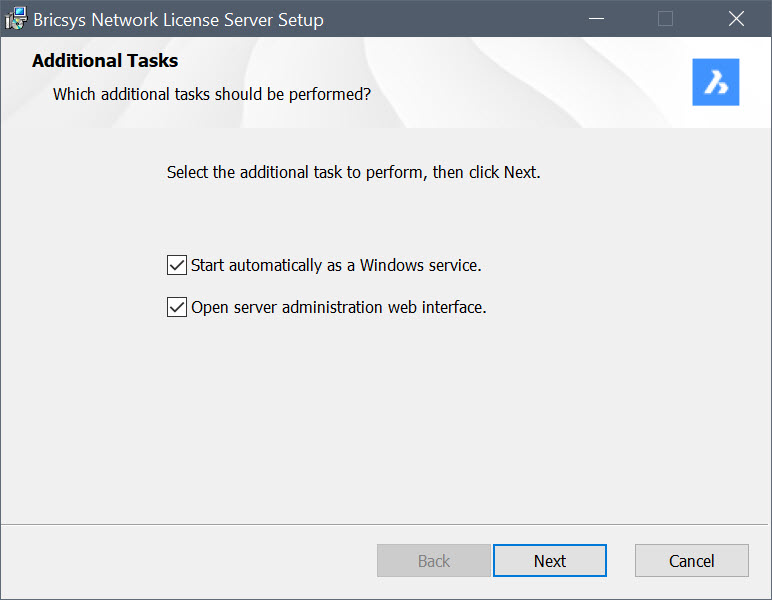
After the installation:
- The Bricsys Network License Manager dialog box opens and you can enter your network license to activate it. For more information, see the Online activation (Network license) article.
- The Reprise License Server Administration web interface opens.Important: You must change the default password after logging in using the default credentials (username: admin and password: admin), otherwise the license server will automatically shut down in 10 minutes.
To change the default password:
- Go to the RLM web UI (localhost:5054).
- Log in with the default credentials.
- Click the Change Password button in the left-side menu and create a new password.
- Restart the computer or restart the RLM service from OS Services.
Example: msiexec /qb /i "<FullPath>\Bricsys-NetworkLicenseServer-V1.1.0-1.msi" INSTALLSERVICE=1 OPENWEBINTERFACE=1
- Replace
<FullPath>with the path where Bricsys-NetworkLicenseServer-V1.1.0-1.msi was downloaded. INSTALLSERVICE=1sets the RLM automatically as a Windows service.OPENWEBINTERFACE=1opens the server administration web interface (localhost:5054).
The Bricsys Network License Server is installed by default in C:\Program Files\Bricsys\Bricsys Network License Server.
3.2. On Linux
Downloading and installing Bricsys Network License Server
- Download Bricsys Network License Server (Linux) from here.
The Bricsys Network License Server contains a custom RLM server and the Bricsys Network License Manager. See more information in the Bricsys Network License Server - Release Notes.
Important: A default user with the username admin and password admin is created. You must change the default password, otherwise the license server will automatically shut down in 10 minutes. See also the Setup RLM login article. - Extract Bricsys-NetworkLicenseServer-V1.1.0-1.tgz to any folder (Terminal:
tar xvzf Bricsys-NetworkLicenseServer-V1.1.0-1.tgz -c <path>). - Go to that folder and start the Reprise License Manager (RLM) application (Terminal:
./rlm).Note: If the./rlmexecution fails due to permissions, try runningsudo chmod u+x rlmto give execution permissions to the RLM file. - Change the default password of the RLM login (username: admin and password: admin), otherwise the license server will automatically shut down in 10 minutes.
- Go to the RLM web UI (localhost:5054).
- Log in with the default credentials.
- Click the Change Password button in the left-side menu and create a new password.
- Create the RLM system service using the steps outlined in the Readme.txt file in the installation folder.
- Run the launcher (Terminal:
./NetworkLicenseManager.sh). The Bricsys Network License Manager opens, and you can activate or update your network license key.Troubleshooting: If you encounter an error on Ubuntu 22.04 when starting the Bricsys Network License Manager, install the extra package libxcb-cursor0 (Terminal:
sudo apt install libxcb-cursor0).
4. Working with Network licenses
4.1. Activate
Steps for Online activation
- Open the Bricsys Network License Manager (click the shortcut on the desktop or in the operating system Start menu).
- The Activate New Network License dialog box opens.
Enter the network license in the Enter Activation key field and click Activate. Use the license key from your Bricsys account. See also the Where can I find my licenses? article.
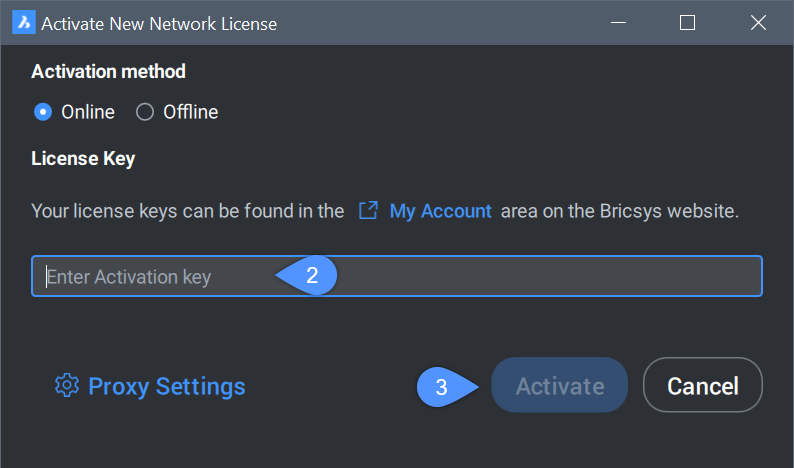 Note: If an active license is detected on your system, the Bricsys Network License Manager dialog box opens.
Click the Add License button to open the Activate New Network License dialog box.
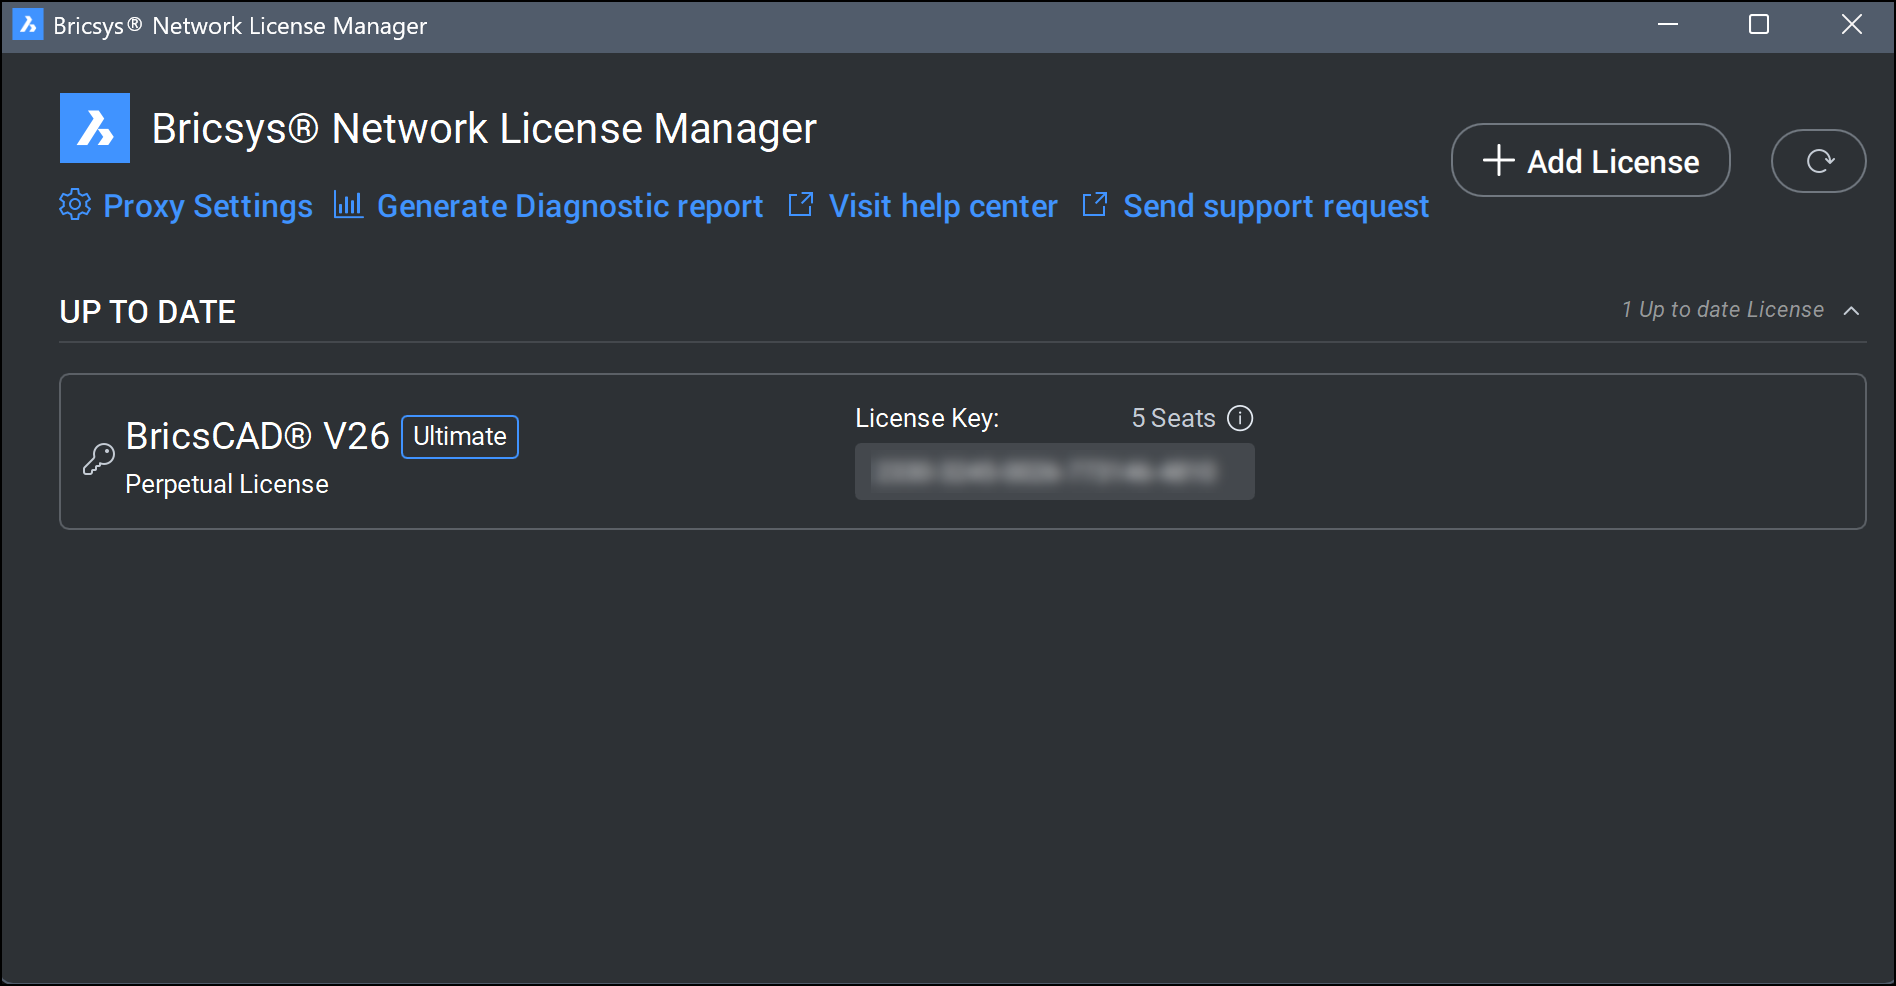
Steps for Offline/manual activation
- Open the Bricsys Network License Manager (click the shortcut on the desktop or in the operating system Start menu).
- The Activate New Network License dialog box opens. Select the Offline option.
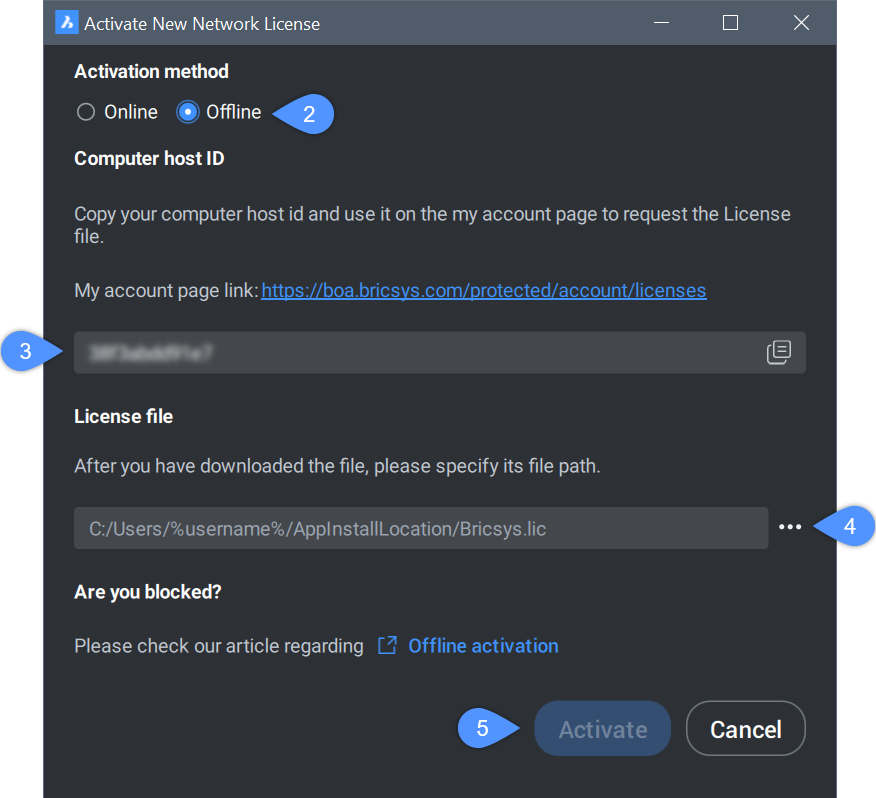 Note: If an active license is detected on your system, the Bricsys Network License Manager dialog box opens.
Click the Add License button to open the Activate New Network License dialog box.
- Copy the full content of the Computer Hostid field and use it to generate the license file.Note: To generate the license file:
- Log in to the Bricsys website with a computer connected to internet.
- Click your name in the upper right corner and select Manage licenses from the menu.
Make sure you log in with the Bricsys account of your company which contains the network license. Contact your Bricsys account manager if needed.
- Click the pencil icon (
 ). The License details page displays.
 - Click Manual activation.
- In the Host ID field, paste the host ID of the computer you installed the Bricsys Network License Server on.
- Click the Activate button.
A license file is generated and available for download.
- Click the Download License File button.
The license file BricsCAD.lic is downloaded to your default download folder.
- In the Activate New Network License dialog box specify the downloaded license file path. Click the browse button to open the Select BricsCAD license dialog box, select the LIC file and click Open.
- Click the Activate button to activate the license offline.
4.2. Upgrading your license or extending your subscription
BricsCAD license upgrades no longer generate new license keys. Your current license key remains valid for future upgrades.
To upgrade the network license, you must have the Bricsys Network License Server installed. For the installation procedure, see the Setting up a Network License Server article dedicated to your operating system.
- Open the Bricsys Network License Manager (click the shortcut on the desktop or in the operating system Start menu).
- Check the UPDATE AVAILABLE section in the Bricsys Network License Manager dialog box.
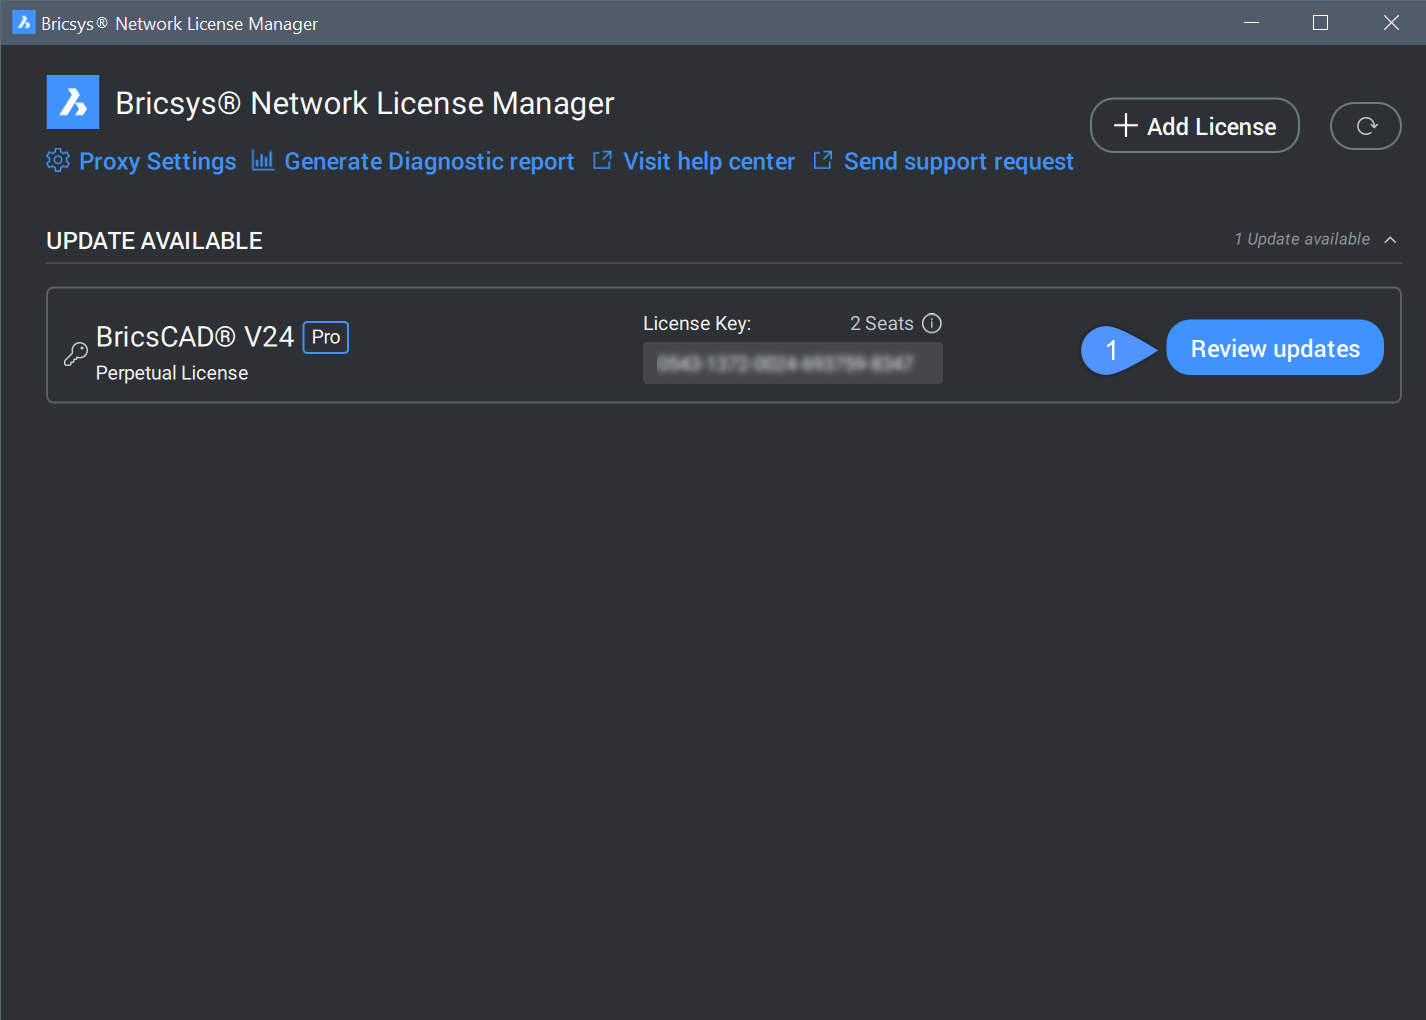
- Click the Review updates button. The Review Updates dialog box displays a preview of the license updates.
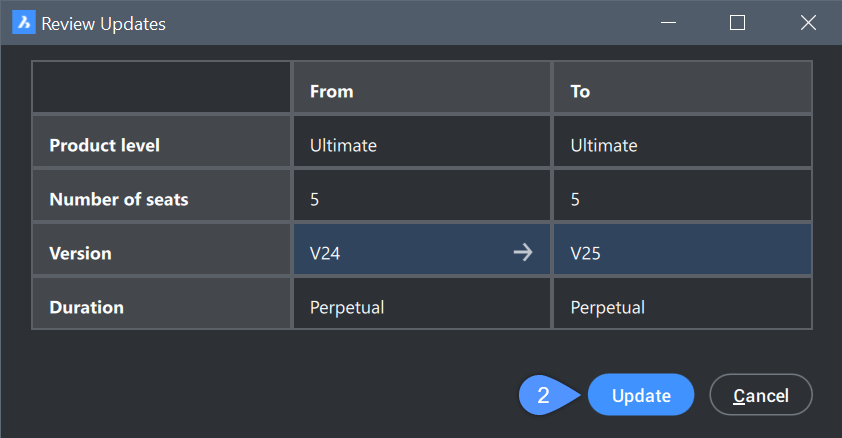
- Click the Update button to update the license on your Network License Server.
4.3. Using the Bricsys Network License Manager in terminal mode
- Open a terminal with administrator rights.
- Navigate to the Bricsys Network License Server installation directory.
- Input:
- On Windows:
NetworkLicenseManager.com <option> - On Linux:
./NetworkLicenseManager.sh <option>
- On Windows:
Available options and arguments:
-hdisplays the available options.-iddisplays the host ID of this machine.-llists the available network license keys.-a <licensekey>activates a specific network license key.-u <licensekey>updates a specific network license key.-r <licensekey>reviews the update options for a specific network license key.-p <hostname><portnumber><username><password>sets the proxy settings (use""for empty argument values).
5. Network license administration
Once the Network License Server is running, you can perform status and administration functions on the RLM server. To open the Reprise License Server Administration web interface, do one of the following:
- Browse to localhost:5054 web interface.
- (Windows only) Go to License Server Administration from the Windows search bar.
- Do not use the Activate License button, as it does not apply to BricsCAD licenses.
- For an overview of all options, click the RLM Manual... button on the left or go to the RLM License Administration Manual.
Checking the license and server status
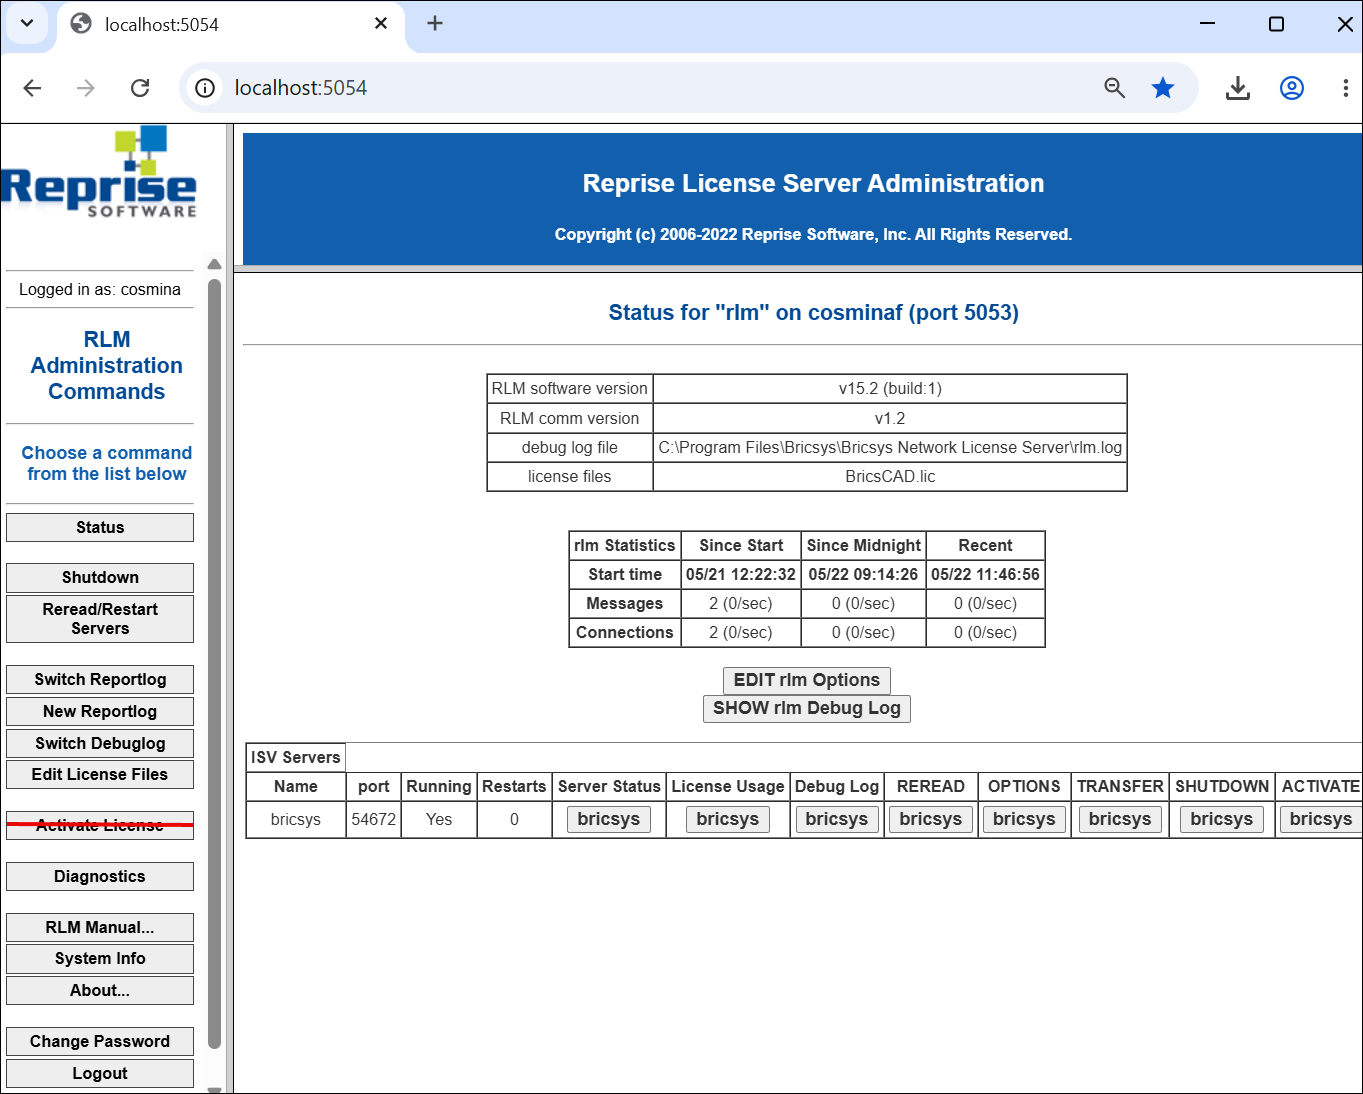
- Click the Status button on the left-side menu to display the Status for "rlm" page.
- Click the bricsys button in the Server Status column of the ISV Servers table to view the status of the network licenses.
Rereading / Restarting the server
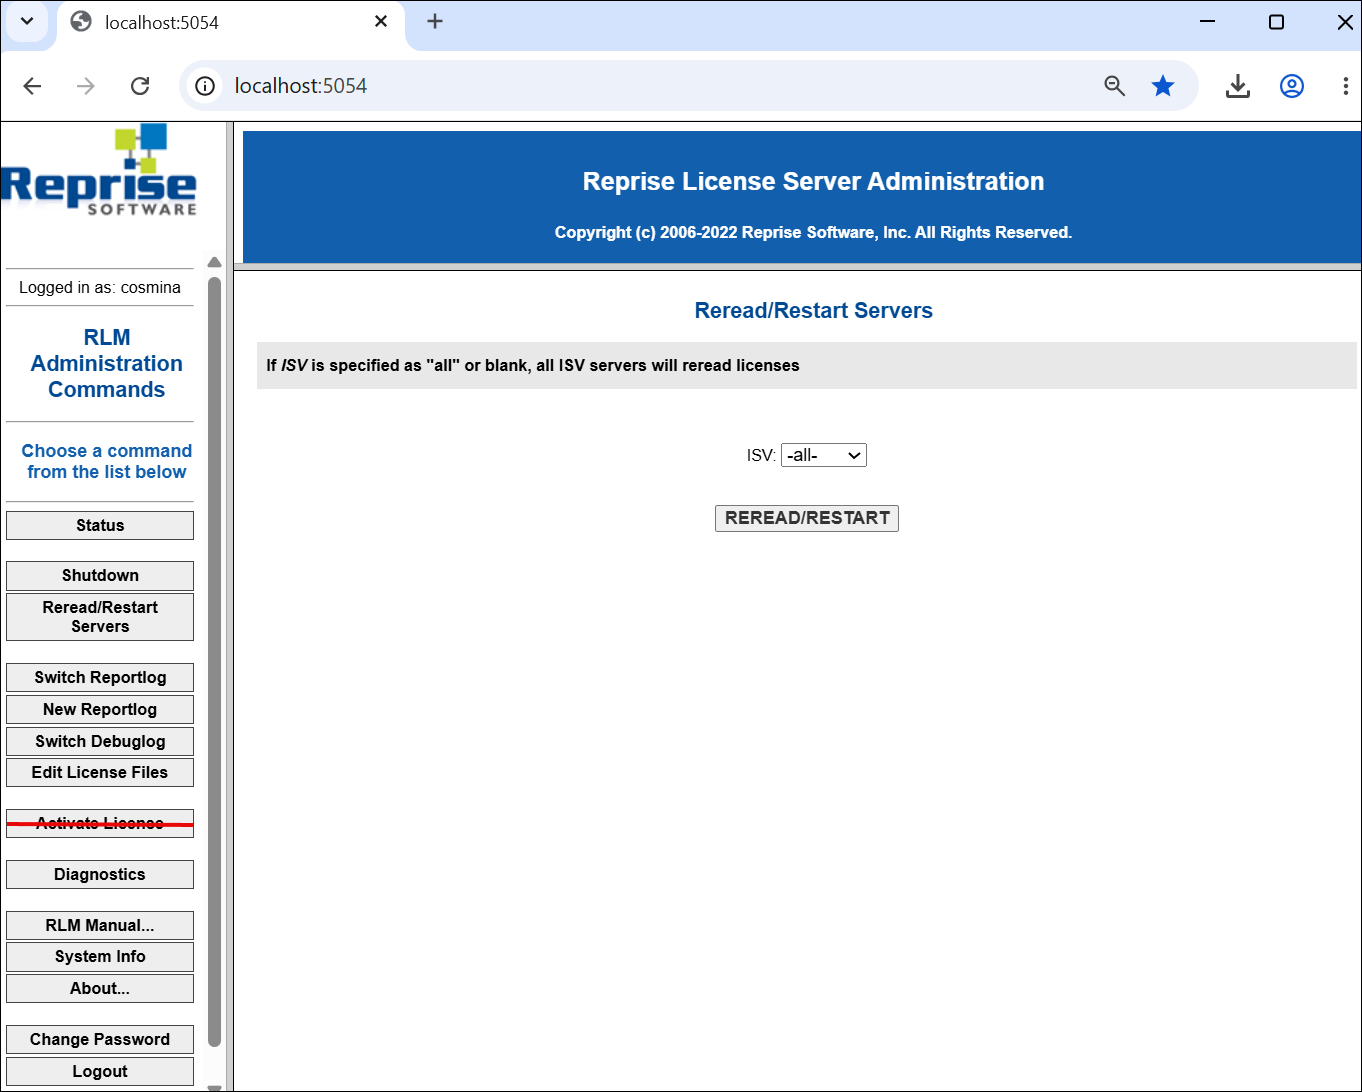
- Click the Reread/Restart Servers button on the left-side menu to display the Reread/Restart Servers page.
- Click the REREAD/RESTART button to restart the server and reread the modified files.
5.1. Advanced configurations
The Network License Server uses the following ports:
- 5053 - Default for the license seats broadcasting
- 5054 - Default for the RLM web UI (localhost:5054)
- ISV port - Dynamically assigned at startup
Firewalls, proxy servers, anti-virus software and other security measures can block these ports, preventing the server from operating correctly. After the Network License Server installation, ensure the required ports are open and available, and the license server application (rlm.exe on Windows or rlm on Linux) is not blocked by any security software.
How to set a fixed value for the ISV port
The ISV port value changes dynamically at startup. To prevent this, set a fixed value in the license file. For multiple licenses, assign a fixed ISV port in each file.
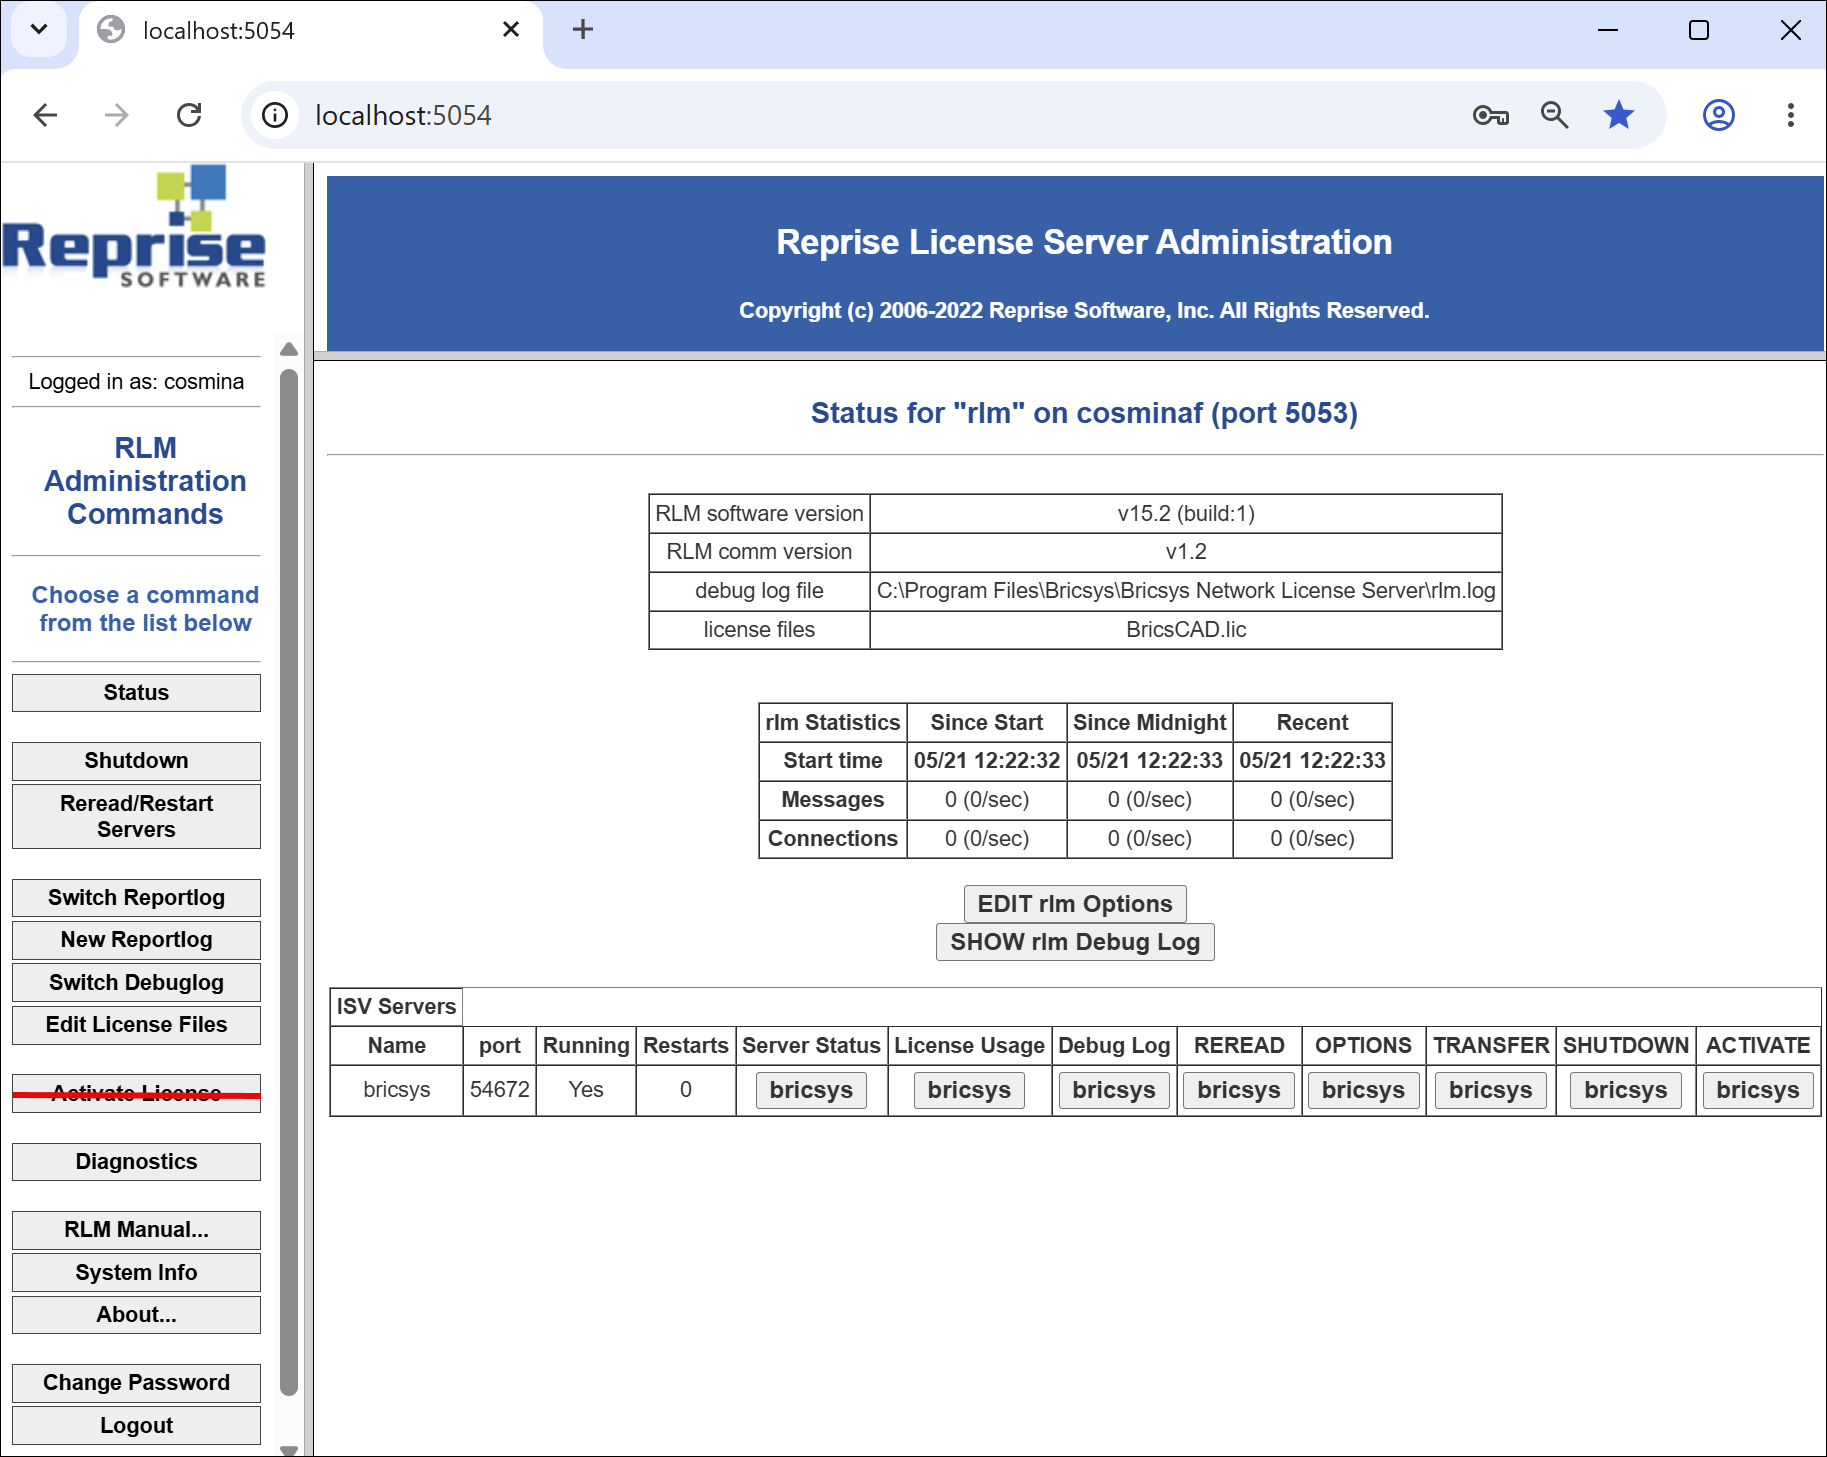
Check which ISV port is currently in use
- Go to the RLM web UI (localhost:5054).
- Click the Status button on the left-side menu to display the Status for "rlm" page. The port column in the ISV Servers table shows the ISV port currently in use.
Set a fixed value for the ISV port
- Open the license file in a text editor (for example Notepad). The default location of the file is C:\Program Files\Bricsys\Bricsys Network License Server.
- In the ISV bricsys line, add the port number as follows
ISV bricsys port=[port_number].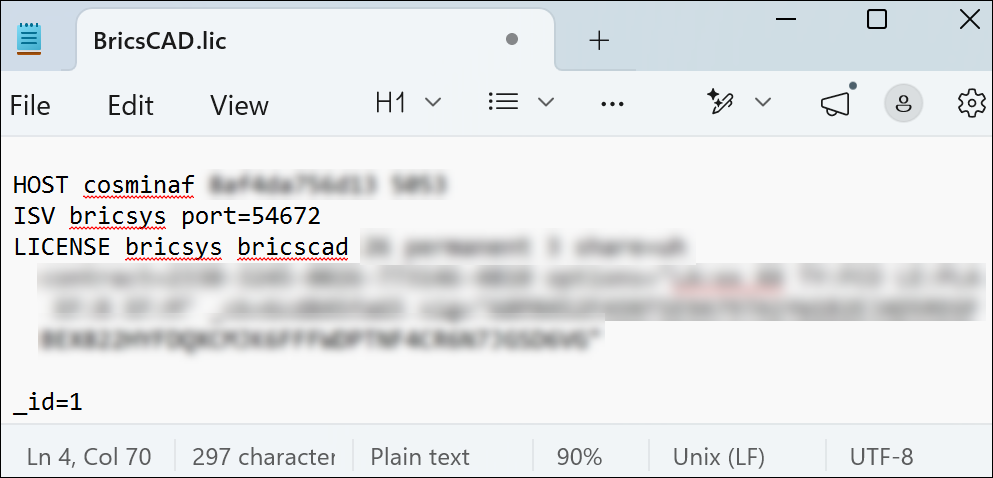
- Restart the computer or restart the RLM service from OS Services.
- The Network License Manager tool, located in the C:\Program Files\Bricsys\Bricsys Network License Server folder must be able to reach the license.bricsys.com/actpro on port 80 and https://api.bricsys.com/ on port 443.
- If a proxy server exists between BricsCAD and the Network License Server, proxy settings should be configured in BricsCAD. See the Proxy settings on a client computer article.
5.2. License pooling
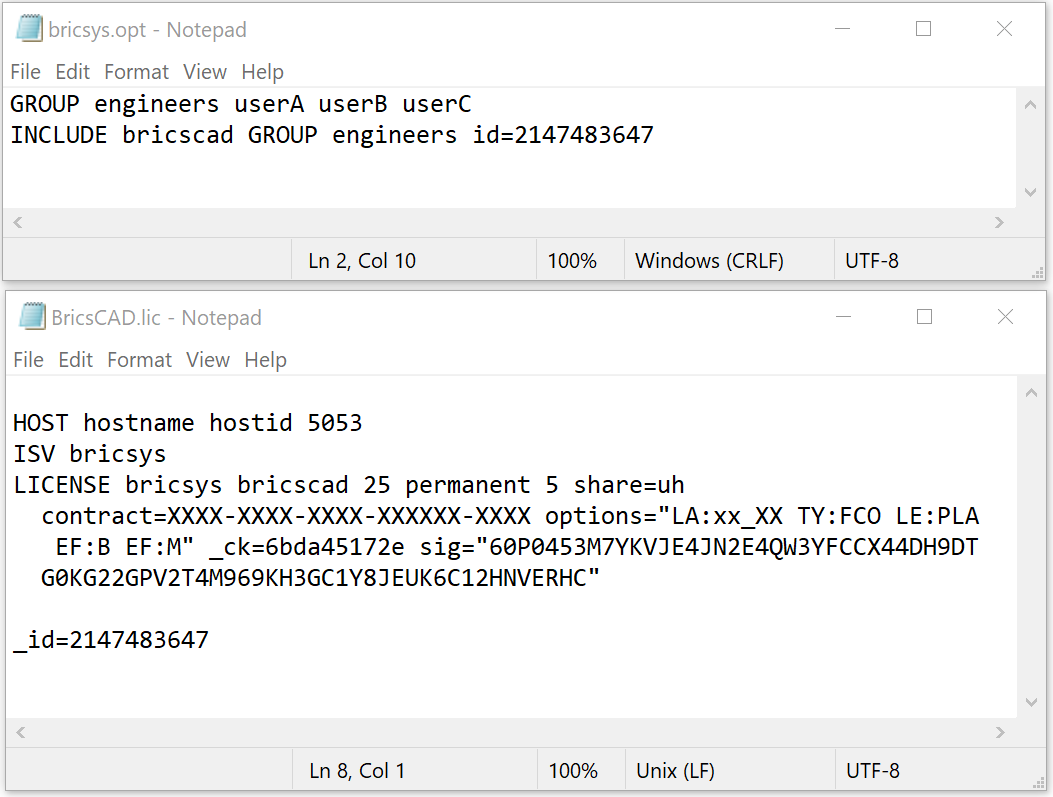
When multiple license levels are available, the Bricsys Network License Server allocates the seats to BricsCAD machines in the order of the ID number in the LIC file. If you want to control this action in detail, you can edit the options file: bricsys.opt.
Editing the options
You can edit the options in 2 ways:
- In the bricsys.opt file, located in the Bricsys Network License Server installation folder.
- On the web interface (Reprise License Server Administration).
- Browse to http://localhost:5054 on the Network License Server.
- Click Status in the menu on the left side.
- Click bricsys in the OPTIONS column for the bricsys ISV row.
Commonly used options
| Option | Description | Syntax | Example |
|---|---|---|---|
| GROUP | Defines a group of usernames. | GROUP name list-of-usernames | GROUP engineers userA userB userC |
| HOST_GROUP | Defines a group of hostnames. | HOST_GROUP name list-of-hostnames | HOST_GROUP firstFloor machineA machineB machineC |
| INTERNET_GROUP | Defines a group of IP-addresses. | INTERNET_GROUP name list-of-ip-addresses | INTERNET_GROUP networkGhent 192.168.1.* 192.168.2.* Note: The wildcard character (*) can be used in IP addresses.
|
| RESERVE | Reserve a number of seats to a specific (group of) user(s). | RESERVE num product user|host|group|host_group|internet|internet_group|project who [id=nnn] | RESERVE 20 bricscad GROUP engineers id=nnn |
| MAX | Limit the number of seats available to a specific (group of) user(s). | MAX num product user|host|group|host_group|internet|internet_group|project who [id=nnn] | MAX 5 bricscad HOST_GROUP firstFloor id=nnn |
| INCLUDE | Only allow licenses for a product to a specific (group of) user(s). Anyone not specified by the INCLUDE line is not allowed to use the product. | INCLUDE product userhost|group|host_group|internet|internet_group|project who [id=nnn] | INCLUDE bricscad GROUP bricscadusers id=nnn |
| EXCLUDE | Disallow licenses for a product to a specific (group of) user(s). | EXCLUDE product user|host|group|host_group|internet|internet_group|project who [id=nnn] | EXCLUDE bricscad INTERNET_GROUP networkGhent 192.168.1.* id=nnn Note: The wildcard character (*) can be used in IP addresses.
|
| TIMEOUT | Sets the inactivity timeout per product. | TIMEOUT secs [product [id=nnn]] | TIMEOUT 3600 bricscad id=nnn Note: The default minimum TIMEOUT in RLM is 3600 seconds.
|
| TIMEOUTALL | Sets the inactivity timeout for all licenses present on the server. | TIMEOUTALL secs | TIMEOUTALL 3600 Note: The default minimum TIMEOUTALL in RLM is 3600 seconds.
|
More options can be found in the RLM end user manual, under the The ISV Options File chapter.
License file identifiers
Each license file has an identifier as follows:
- After activation of a new network license, an '_id=nnn(*)' field is auto-generated, and it is added at the end of the license file. The (*) nnn is the number of the generated ID and can be modified.
- After upgrading an existing network license, its original IDentifier number remains unchanged.
The ID is used to identify each license file, and it will be used for license pooling options.
When specifying an [id=nnn] parameter for an added OPTION, that OPTION will only have effect on the pooling of the seats from the corresponding license.
License pooling by RLM_PROJECT
When multiple network license levels are activated on the same RLM server, users can obtain the license level when opening BricsCAD if the RLM_PROJECT environment variable is set.
The RLM_PROJECT environment variable should match the license server options. The license seats will be reserved on the license server for the specific PROJECT users by an IDentifier.
Actions for the RLM server
For example, if you have two license files with different IDentifiers (Lite _id=xxxxxxxx and Pro _id=yyyyyyyy), add the RESERVE options (in the bricsys.opt file) for all license seats:
RESERVE 5 bricscad PROJECT bc_lite id=xxxxxxxx
RESERVE 5 bricscad PROJECT bc_pro id=yyyyyyyy
Actions for the BricsCAD users
- Create a script that SETs a temporary environment variable, RLM_PROJECT, on the user's machine, allowing BricsCAD to negotiate with the RLM server for the PROJECT license pool.
- Execute a specific script to allow BricsCAD to pull the desired license level.
For example:
- *.CMD (command prompt) files:
-
@echo off set RLM_PROJECT=bc_lite call "C:\Program Files\Bricsys\BricsCAD V26 en_US\bricscad.exe" -
@echo off
set RLM_PROJECT=bc_pro
call "C:\Program Files\Bricsys\BricsCAD V26 en_US\bricscad.exe"
-
- *.PS1 (PowerShell) files:
-
$env:RLM_PROJECT = "bc_lite" Start-Process -FilePath "C:\Program Files\Bricsys\BricsCAD V26 en_US\bricscad.exe" -
$env:RLM_PROJECT = "bc_pro"
Start-Process -FilePath "C:\Program Files\Bricsys\BricsCAD V26 en_US\bricscad.exe"
-
- *.CMD (command prompt) files:
Because all license seats are reserved in the RLM options, BricsCAD cannot acquire a license if the RLM_PROJECT variable is missing or its value does not match the ISV server options.
Increasing available seats above 5 or reducing the RESERVE count below 5 makes some licenses available.
The RLM_PROJECT option works with other options, such as EXCLUDE and INCLUDE, which allows flexible configurations.
5.3. Network license usage report
Possibilities to check the network license usage:
- On the RLM web UI
Browse to http://localhost:5054/ and go to .
- In the bricsys.dlog file (contains the IN/OUT information)
This file is in the RLM folder: C:\Program Files\Bricsys\Bricsys Network License Server.
- Using the REPORTLOG option
This option is described on pages 66 and 90 in the RLM License Administration manual and it should be added to the bricsys.opt as follows:
REPORTLOG +D:\your_path\report_name.logNote:- After adding the option, perform a Reload/Restart Servers.
- The
+sign means the new data is appended to the file, otherwise the file is overwritten.
- Using a third party software
- RLM License Administration Bundle
Browse to https://support.reprisesoftware.com/support/admin/license-administration-bundle/
- JTB FlexReport
Browse to https://jtbworld.com/jtb-flexreport
- RLM License Administration Bundle
5.4. Migrating a Network license to another server
Do the following:
- Revoke the license. See the Revoke a BricsCAD license (limited operation) article for more information.
- Activate the license on your new server. See the Online activation (Network license) article for more information.
- Shut down the license manager on the old server and delete the license file on the old server.
6. Installing BricsCAD
Navigate to Download BricsCAD and download the installer.
6.1. Interactive installation
Steps for Interactive installation
- Double click the installer file.
- Click Next.
- Select the checkbox to accept the License Agreement.
- Click Next.
- Do one of the following:
- Accept the default installation folder.
- Click the Change... button and select an installation folder.
- Click Next.
- Click Install to start the installation.
- Choose whether to add a shortcut on the desktop and/or to display the release notes when the installation process has finished.
- Click Next.
- Click Finish to finish the installation process.
6.2. Silent installation
Open PowerShell or Command Prompt with administrator rights, change the directory (cd) to the folder containing the BricsCAD MSI installer and run msiexec /i BricsCAD-V26.1.05-1-en_US(x64).msi /qn /norestart to perform a silent installation without user interaction or automatic restart.
More options
ADDDESKTOPSHORTCUT=""suppresses the addition of a desktop shortcut.SHOWRELEASENOTES=""suppresses the display of the Release Notes when the installation completes.APPLICATIONFOLDER="your_app_folder"installs BricsCAD in a custom folder.BRXLICENSEDESTFILE="path_to_lic_file"specifies a folder for the license file if any of the properties BRXLICENSEKEY, BRXLICENSEFILE or BRXLICENSESERVER are defined.The default folder is: C:\ProgramData\Bricsys.
BRXLICENSEKEY="your_license_key"activates the license and store it in the folder specified by BRXLICENSEDESTFILE.BRXLICENSEFILE="your_license_file"copies the license file to the folder specified by BRXLICENSEDESTFILE.BRXLICENSESERVER="host", orBRXLICENSESERVER="port@host"(*) creates a license file in the folder specified by BRXLICENSEDESTFILE, containing the server host specification.(*) If your license server is using a different port than default port 5053.
REBOOT=ReallySuppresssuppresses a restart after the installation is complete.- (On 32-BIT only)
INSTALLVBA="0"orINSTALLVBA=""does not install VBA.Note: The 32-BIT version is only available for BricsCAD V20 and older.
Examples of command prompts
- To perform a silent installation while suppressing the creation of a desktop shortcut and the display of Release Notes:
msiexec /i "BricsCAD-Vxx.x.xx-x-en_US(x64).msi" /qn ADDDESKTOPSHORTCUT="" SHOWRELEASENOTES="" - To execute a silent installation and activate the license using the provided license key:
msiexec /i "BricsCAD-Vxx.x.xx-x-en_US(x64).msi" /qn BRXLICENSEDESTFILE=
"C:\ProgramData\Bricsys\BricsCAD.lic" BRXLICENSEKEY="****-****-****-****-****"
The license file, BricsCAD.lic, is generated at the specified location, C:\ProgramData\Bricsys, ensuring that all BricsCAD versions automatically find it.
- To create the license file containing the server host specification in the assigned folder, C:\ProgramData\Bricsys, ensuring that all BricsCAD versions automatically find it:
msiexec /i "BricsCAD-Vxx.x.xx-x-en_US(x64).msi" /qn BRXLICENSESERVER="port@host"
BRXLICENSEDESTFILE="C:\ProgramData\bricsys\BricsCAD.lic"
7. Using a Network license in BricsCAD
7.1. Using a Network license on a client computer
- Once the network license is activated on the license server, do one of the following on the client computer:
- If you start BricsCAD for the first time, click the Activate license button in the BricsCAD dialog box.
- If you replace an existing license, launch the LICENSEMANAGER command, click Manage License and click Modify.
- Select the Network License option in the dialog box.
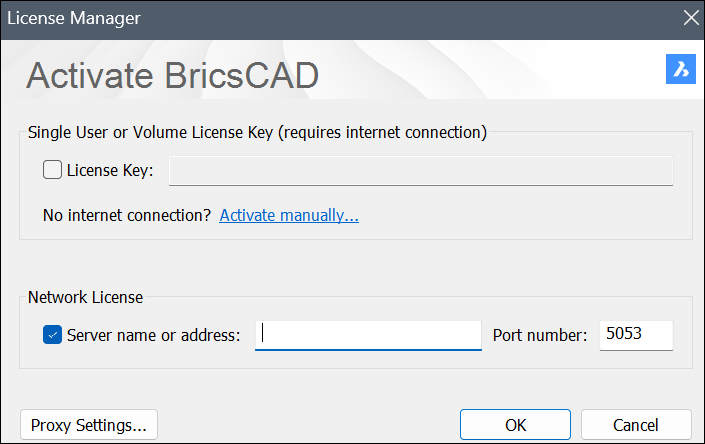
- Type the host name or IP address of the license server in the Server name or address field. If needed, change the port number in the Port Number field.Note: If your computer is connected to the license server through a proxy server, click the Proxy Settings button to configure the proxy settings for a network license.
- Click the OK button.
7.2. Roaming a Network license
A network license can be roamed on a client computer to use BricsCAD without a connection to the Network License Server (for example, to work outside the office or at home).
The license can be used in roaming for a specified number of days. After this period, the license is automatically checked back in to the Network License Server. If necessary, you can return the roaming license to the license server earlier.
Steps for roaming a network license and returning the roamed license to the server
- Launch BricsCAD.
- Launch the LICENSEMANAGER command to open the Bricsys License Manager dialog box.
- Click the Manage License button to open the dialog box.
- Click the Roaming... button to open the dialog box.
The Roaming status section displays whether your license is checked out for roaming or not, and allows you to change these settings.
- To roam a network license on a client computer you are prompted to enter the desired number of days to check out the roaming license, then click the Checkout button.Note: Select Store the number of days value if you want to automatically refresh the roaming period when your computer is connected to the server.
- To return a roamed network license on the server, you are prompted to click the Checkin button.
Important: Restart BricsCAD to apply the changes. - To roam a network license on a client computer you are prompted to enter the desired number of days to check out the roaming license, then click the Checkout button.
8. Troubleshooting
For troubleshooting errors, please see the Error codes section from our Help Center.
Common errors: