Structure panel
To open the Structure panel, run the STRUCTUREPANEL command or right-click a ribbon panel/toolbar and choose Structure from the Panels list.
- View the entire content of a drawing listed as a structure tree configured by predefined rules.
- Decide how the entities are displayed in the structure tree by selecting a Structure Tree Configuration or creating a new one via the Configure Structure Tree dialog box.
- Select specific entities from the structure tree to identify them in the model space (and vice versa) and to modify their properties.Note: BricsCAD does not support modifying sub-entities of blocks using the Structure panel.
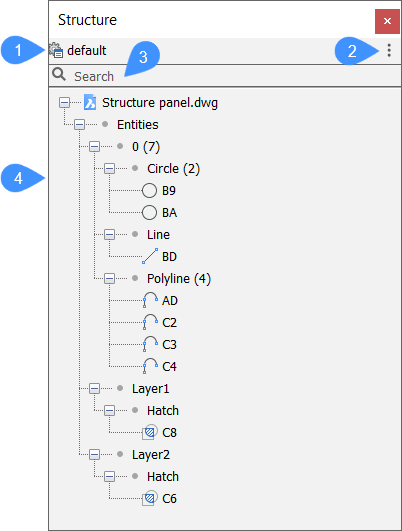
- Structure tree configuration
- Configurations menu
- Search bar
- Structure tree
Structure tree configuration
Displays the name of the structure tree's active configuration. To edit the active configuration or create a new one, open the Configure Structure Tree dialog box by clicking on the configuration's name. Here you can create rules by selecting entity properties as filter, group and sorting criteria (see Configure Structure Tree dialog box article).
Configurations menu
This drop-down menu lists the configuration (CST) files stored in the Support Folder. Select one to set it as the active Structure Tree Configuration.
- default
- Displays entities sorted and grouped by layer-based structure.
- mechanical
- Displays entities sorted and grouped by based structure.
- bim
- Displays BIM entities sorted and grouped by based structure.
- bim - Composition
- Displays BIM entities sorted and grouped by composition. For example, you can see/select all concrete walls on all floors at once, or see at a glance which compositions are used.
- bim - Profiles
- Displays BIM entities sorted and grouped by profile.
- bim - Type
- Displays BIM entities sorted and grouped by BIM-type. For example, you can see/select all walls on all floors at once.
- Configure structure tree
- Opens the Configure Structure Tree dialog box to edit the existing configurations or to add your own structure tree configurations (see Configure Structure Tree dialog box section below).
- Select Configuration…
- Allows you to load Structure Tree Configuration files (*.cst).
Search field
Structure tree
Displays a structured tree view of the drawing content. The configuration of the structure tree is defined in a CST file and specified by the STRUCTURETREECONFIG system variable. The location of CST files is specified by the SRCHPATH system variable. You can create custom CST files to meet your needs.
- General usage information
-
Click the drop-down menu (
 ) to select a definition.In the Structure panel you can:
- Click the expand (+) icon to expand a node.
- Click the collapse icon (-) to collapse a node.
- Click a node or entity in the Structure panel to select it in the drawing.Note: This depends on the settings in the Structure tree. To configure the Structure tree, right-click in .
Hold down the Ctrl key to compose a selection set.
Note: Select the drawing name. Next, right-click and choose Show in the context menu to display the entire drawing, or choose Show Entities in the General tab of the No Selection Quad.
A right-click menu on a tree node or on an entity offers relevant tools:
- Show
- Shows the selection set, when it was previously hidden.
- Hide
- Hides the selection set, and keeps all other drawing entities visible.
- Isolate
- Hides all other entities in the drawing, except the selection set.
- Zoom
- Zooms the view to the extents of the selected entities.
- Expand All
- Expands all nodes in the structure tree.
Select the drawing name and use this option to expand all nodes in the entire tree.
- Collapse All
- Collapses all nodes in the structure tree.
Select the drawing name and use this option to collapse the entire tree.
- Configure...
- Opens the Configure Structure Tree dialog box to edit the existing configurations or to add your own structure tree configurations.
Configure Structure Tree dialog box
The Configure Structure Tree dialog box allows you to define the Structure Tree Configuration of the Structure panel.
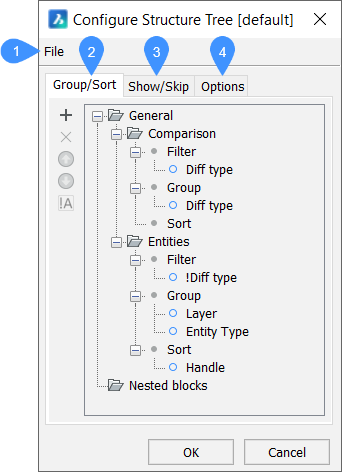
- File
- Group/Sort tab
- Show/Skip tab
- Options tab
File
- Open...: opens the Select Structure Tree Configuration File dialog box to select another CST configuration file.
- Save: saves the current configuration.
- Save As...: saves the current configuration under a different name.
Group/Sort Tab
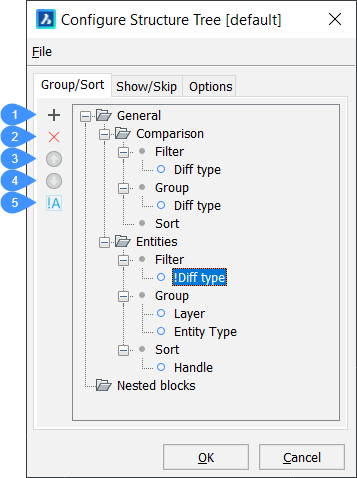
- Add rule or property
- Delete rule or property
- Move property up
- Move property down
- Toggle negation (filter properties only)
- Add rule or property (
 )
) -
Adds a new rule or a new property for Filter, Group, or Sort.
Note: The position of the rules and properties is essential, as the rule structure is hierarchical.-
Select an existing rule, then click the Add icon (
) or right-click and choose Add Rule in the context menu.The new rule is added below the selected rule (or at the end of the rule hierarchy when no rule is selected).
Note: To rename the rule, select it and click its name or right-click and choose Rename in the context menu. -
Select the Filter node of the rule, then click the Add icon or right-click and choose Add filter property in the context menu.
-
Select the Group node of the rule, then click the Add icon or right-click and choose Add grouping property in the context menu.
-
Select the Sort node of the rule, then click the Add icon or right-click and choose Add sorting property in the context menu.
The Select Property dialog box displays to let you choose a property for filtering, grouping, or sorting.
-
Select a property, then double-click or click OK.
Note: Properties and value definitions that are defined with the BIMPROPERTIES command can be selected to configure the structure tree. -
Optionally, type a search string in the Search field, then click the Find previous (Shift+F3) (
 ) or Find next (F3) (
 ) arrow buttons to look up the properties containing the search string.
 -
Repeat the previous step to add more filter/ grouping/ sorting properties.
-
- Delete rule or property (
 )
) - Deletes the selected rule or property. You can also use the Delete rule/Delete property option from the context menu of the selected rule/property.
- Move property up (
 )
) - Moves up the selected rule or property.
- Move property down (
 )
) - Moves down the selected rule or property.
- Toggle negation (filter properties only)
- Toggles negation only for filter properties.
Show/Skip Tab
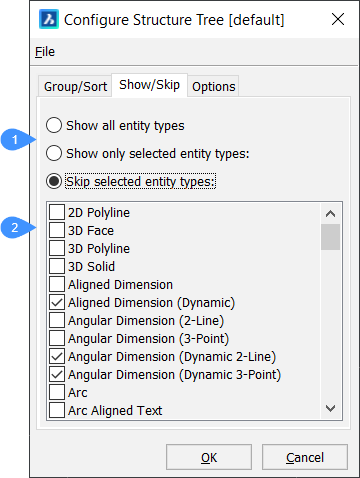
- Show/skip options
- Selection list
- Show/skip options
- Specifies whether selected entities should be shown or not.
- Selection list
- Allows you to create a selection of entity types to show or exclude.
Options Tab
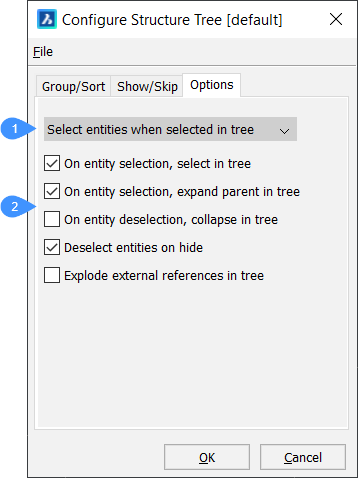
- Selection options
- Additional options
- Selection options
-
Defines what happens in the model when entities are selected in the structure tree. Several options are available:
- Ignore tree selection: entities are not selected in the drawing.
- Highlight entities when selected in tree: entities in the drawing are highlighted, but not selected.
- Select entities when selected in tree: matching entities are selected in the drawing.
- Additional options
-
Defines what happens in the structure tree when an entity is selected/deselected in the model.
- On entity selection, select in tree
- When on, selects matching entity(ies) in the structure tree when you select them in the drawing.
- On entity selection, expand parent in tree
- When on, expands the node related to the entity(ies) selected in the drawing.
- On entity deselection, collapse in tree
- When on, collapses the node related to the entity(ies) selected in the drawing.
- Deselect entities on hide
- When on, deselects hidden entities.
- Explode external references in tree
- When on, lists the contents of externally-referenced drawings in the structure tree.
See also the Working with the Structure panel guide linked in the Related information section which provides a step by step example on how to use the Structure panel.