PANELSTRUKTURY polecenie
Otwiera panel Struktura.

Opis
Otwiera panel Struktura, aby wyświetlić go w bieżącym obszarze roboczym. Panel Struktura pojawia się w tym samym rozmiarze i miejscu, w którym znajdował się przed zamknięciem lub zwinięciem. Podobnie jak każdy inny panel dokowany, panel Struktura może być pływający, zadokowany lub ułożony w stos.
- wyświetla całą zawartość rysunku w formie drzewa strukturalnego skonfigurowanego według wstępnie zdefiniowanych reguł,
- decydować o sposobie wyświetlania podmiotów w drzewie struktury, wybierając Konfiguruj drzewo struktury struktury lub tworząc nową za pomocą okna dialogowego Konfiguruj drzewo struktury,
- wybierać określone obiekty z drzewa struktury, aby zidentyfikować je w przestrzeni modelu (i odwrotnie) oraz modyfikować ich właściwości.Uwaga: BricsCAD® nie obsługuje modyfikowania podjednostek bloków za pomocą panelu Struktura.
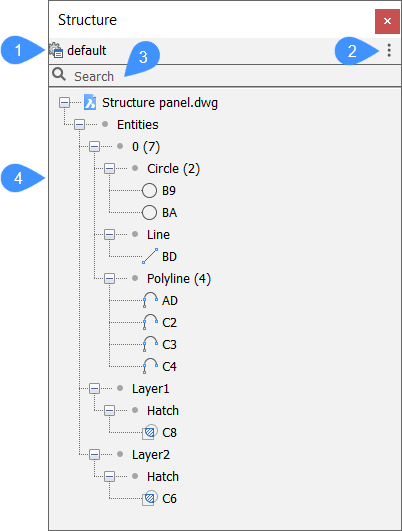
- Konfiguracja Drzewa Struktury
- Menu Konfiguracje
- Pasek wyszukiwania
- Drzewo strukturalne
Konfiguracja Drzewa Struktury
Wyświetla nazwę aktywnej konfiguracji drzewa struktury. Aby edytować aktywną konfigurację lub utworzyć nową, otwórz okno dialogowe Konfiguruj Drzewo Struktury, klikając nazwę konfiguracji. W tym miejscu można tworzyć reguły, wybierając właściwości jednostki jako kryteria filtrowania, grupowania i sortowania (patrz artykuł Konfigurowanie okna dialogowego drzewa struktury ).
Menu Konfiguracje
To menu rozwijane zawiera listę plików konfiguracyjnych (CST) przechowywanych w folderze Support. Wybierz jedną z nich, aby ustawić ją jako aktywną konfigurację drzewa struktury.
- domyślnie
- Wyświetla podmioty posortowane i pogrupowane według struktury warstwowej.
- mechaniczny
- Wyświetla podmioty posortowane i pogrupowane według struktury.
- bim
- Wyświetla jednostki BIM posortowane i pogrupowane według struktury.
- bim - Kompozycja
- Wyświetla jednostki BIM posortowane i pogrupowane według kompozycji. Na przykład można zobaczyć/wybrać wszystkie betonowe ściany na wszystkich piętrach jednocześnie lub zobaczyć na pierwszy rzut oka, które kompozycje są używane.
- bim - profile
- Wyświetla jednostki BIM posortowane i pogrupowane według profilu.
- bim - Typ
- Wyświetla jednostki BIM posortowane i pogrupowane według typu BIM. Na przykład można zobaczyć/wybrać wszystkie ściany na wszystkich piętrach jednocześnie.
- Konfiguracja drzewa struktury
- Otwiera okno dialogowe Konfiguruj drzewo struktury o strukturalne w celu edycji istniejących konfiguracji lub dodania własnych konfiguracji drzewa strukturalnego (patrz sekcja Konfiguruj drzewo struktury poniżej).
- Wybierz Konfiguracje...
- Umożliwia ładowanie plików konfiguracji drzewa struktury (*.cst).
Pole wyszukiwania
Okno dialogowe Konfiguruj drzewo struktury umożliwia zdefiniowanie konfiguracji drzewa struktury w panelu Struktura.
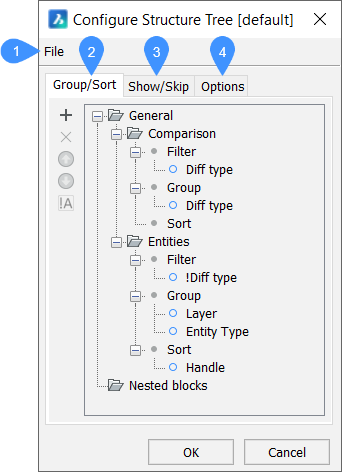
- Plik
- Karta Grupuj/Sortuj
- Karta Pokaż/Pomiń
- Karta Opcje
Plik
- Otwórz...: otwiera okno dialogowe Wybierz plik konfiguracji drzewa strukturalnego, aby wybrać inny plik konfiguracyjny CST.
- Zapisz: zapisuje bieżącą konfigurację.
- Zapisz jako...: zapisuje bieżącą konfigurację pod inną nazwą.
Karta Grupa/Sortowanie
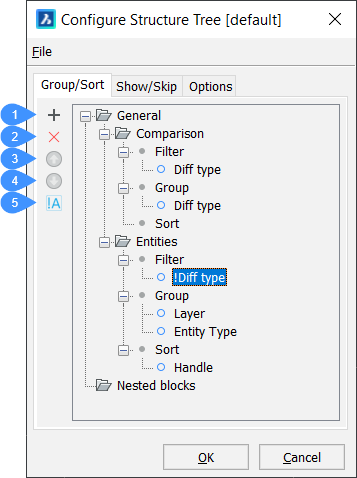
- Dodaj regułę lub właściwość
- Usuń regułę lub właściwość
- Przenieś właściwość powyżej
- Przenieś właściwość poniżej
- Przełącz negację (tylko właściwości filtra)
- Dodaj regułę lub właściwość (
 )
) -
Dodaje nową regułę lub nową właściwość dla filtru, grupy lub sortowania.
Uwaga: Położenie reguł i właściwości jest kluczowe, ponieważ struktura reguł jest hierarchiczna.-
Wybierz istniejącą regułę, a następnie kliknij ikonę Dodaj (
 ) lub kliknij prawym przyciskiem myszy i wybierz Dodaj regułę z menu kontekstowego.
Nowa reguła jest dodawana poniżej wybranej reguły (lub na końcu hierarchii reguł, jeśli nie wybrano żadnej reguły).
Uwaga: Aby zmienić nazwę reguły, zaznacz ją i kliknij jej nazwę lub kliknij prawym przyciskiem myszy i wybierz Zmień nazwę z menu kontekstowego. -
Wybierz węzeł Filtr reguły, a następnie kliknij ikonę Dodaj lub kliknij prawym przyciskiem myszy i wybierz Dodaj właściwość filtra z menu kontekstowego.
-
Wybierz węzeł Grupa reguły, a następnie kliknij ikonę Dodaj lub kliknij prawym przyciskiem myszy i wybierz Dodaj właściwość grupowania z menu kontekstowego.
-
Wybierz węzeł reguły Sortowanie, a następnie kliknij ikonę Dodaj lub kliknij prawym przyciskiem myszy i wybierz Dodaj właściwość sortowania z menu kontekstowego.
Zostanie wyświetlone okno dialogowe Wybierz właściwość umożliwiające wybranie właściwości do filtrowania, grupowania lub sortowania.
-
Wybierz właściwość, a następnie kliknij dwukrotnie lub kliknij OK.
Uwaga: Właściwości i definicje wartości zdefiniowane za pomocą polecenia BIMWŁAŚCIWOŚCI można wybrać w celu skonfigurowania drzewa struktury. -
Opcjonalnie można wpisać szukany ciąg znaków w polu Szukaj, a następnie kliknąć przyciski strzałek Znajdź poprzedni(Shift+F3) (
 ) lub Znajdź następny(F3) (
 ), aby wyszukać właściwości zawierające szukany ciąg znaków.
 -
Powtórz poprzedni krok, aby dodać więcej właściwości filtrowania/grupowania/sortowania.
-
- Usuń regułę lub właściwość (
 )
) - Usuwa wybraną regułę lub właściwość. Można również użyć opcji Usuń regułę/Usuń właściwość z menu kontekstowego wybranej reguły/właściwości.
- Przesuń właściwości w górę (
 )
) - Przenosi wybraną regułę lub właściwość w górę.
- Przesuń właściwości w dół (
 )
) - Przenosi wybraną regułę lub właściwość w dół.
- Przełącz negację (tylko właściwości filtra)
- Przełącza negację tylko dla właściwości filtra.
Karta Pokaż/Pomiń
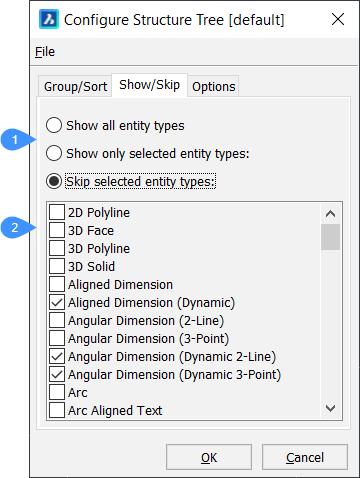
- Pokaż/pomiń opcje
- Lista wyboru
- Pokaż/pomiń opcje
- Określa, czy wybrane podmioty mają być wyświetlane, czy nie.
- Lista wyboru
- Umożliwia utworzenie wyboru typów jednostek do wyświetlenia lub wykluczenia.
Karta Opcje
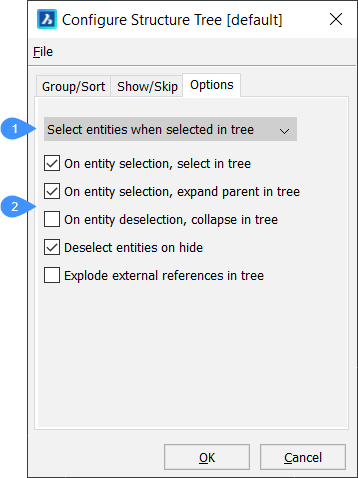
- Opcje wyboru
- Dodatkowe opcje
- Opcje wyboru
-
Określa, co dzieje się w modelu po wybraniu podmiotów w drzewie struktury. Dostępnych jest kilka opcji:
- Ignoruj zaznaczenie drzewa: jednostki nie są zaznaczane na rysunku.
- Podświetl podmioty po wybraniu w drzewie: podmioty na rysunku są podświetlone, ale nie wybrane.
- Wybierz jednostki po wybraniu w drzewie: pasujące jednostki są wybierane na rysunku.
- Dodatkowe opcje
-
Określa, co dzieje się w drzewie struktury, gdy encja jest zaznaczona/odznaczona w modelu.
- Po wybraniu podmiotu wybierz w drzewie
- Po włączeniu zaznacza pasujące jednostki w drzewie struktury po wybraniu ich na rysunku.
- Po wybraniu podmiotu rozwiń rodzinę w drzewie
- Po włączeniu rozwija węzeł powiązany z jednostką (jednostkami) wybraną na rysunku.
- Przy odznaczeniu obiektu, rozwiń w drzewie
- Po włączeniu zwija węzeł powiązany z jednostką (jednostkami) wybraną na rysunku.
- Odznacz elementy przy ukrywaniu
- Po włączeniu odznacza ukryte jednostki.
- Rozbij zewnętrzne odnośniki w drzewie
- Po włączeniu wyświetla zawartość rysunków z odnośnikami zewnętrznymi w drzewie struktury.
Zapoznaj się również z przewodnikiem Praca z panelem Struktury, do którego odnośnik znajduje się w sekcji Informacje pokrewne, gdzie przedstawiono krok po kroku przykład korzystania z panelu Struktura.

