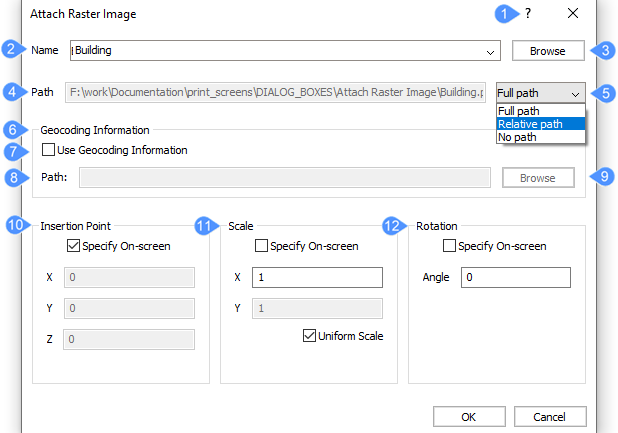
Dołącz obraz rastrowy Okno dialogowe
Otwiera się przez polecenie DOŁĄCZOBR
Okno dialogowe Dołącz obraz rastrowy umożliwia dołączanie obrazów rastrowych do rysunku.

- Pomoc
- Nazwa
- Przeglądaj
- ŚCieżka
- Typ ścieżki
- Informacja Geokodowana
- Użyj Informacji Geocoding
- ŚCieżka
- Przeglądaj (plik pozycji obrazu)
- Punkt Wstawienia
- Skala
- Obrót
Pomoc
Otwiera artykuł pomocy Bricsys dotyczący polecenia DOŁĄCZOBR.
Nazwa
Określa nazwę pliku do załączenia.
Przeglądaj
Otwiera okno dialogowe Wybierz plik obrazu umożliwiające wybór innego pliku rastrowego.
ŚCieżka
Wyświetla ścieżkę do pliku obrazu.
Typ ścieżki
Określa, jaka część ścieżki jest przechowywana.
- Ścieżka pełna
- Przechowuje pełną ścieżkę do pliku obrazu jako odniesienie bezwzględne, np: C:\foldername\imagename.jpg
- Ścieżka względna
- Przechowuje ścieżkę od lokalizacji rysunku do lokalizacji obrazu. Na przykład: ..\foldername\imagename.jpg. .. odnosi się do folderu znajdującego się powyżej bieżącego. Przed użyciem tej opcji rysunek musi zostać zapisany.
- Brak ścieżki
- Usuwa nazwy dysków i folderów, pozostawiając tylko nazwę pliku obrazu, np. imagename.jpg.
Informacja Geokodowana
Pliki pozycji lub pliki świata mają rozszerzenie, które zależy od rodzaju pliku obrazu, z którym są powiązane.
- Użyj Informacji Geocoding
- Przełącza użycie pliku pozycji, który określa rozmiar, położenie i obrót pliku obrazu.
- Tak: używa pliku pozycji
- Nie: nie używa pliku pozycji.
- ŚCieżka
- Wyświetla ścieżkę do pliku pozycji.
- Przeglądaj (plik pozycji obrazu)
- Otwiera okno dialogowe Wybierz plik pozycji obrazu.
Punkt Wstawienia
Określa położenie lewego dolnego rogu obrazu.
- Określ na ekranie
- Określa sposób określania punktu wstawiania.
- On: określenie punktu wstawienia na rysunku po zamknięciu okna dialogowego.
Off: określenie punktu wstawienia w oknie dialogowym przy użyciu pól X, Y i Z.
- On: określenie punktu wstawienia na rysunku po zamknięciu okna dialogowego.
- X,Y,Z
- Określa współrzędne x, y i z punktu wstawienia obrazu.
Skala
Określa rozmiar obrazu.
- Określ na ekranie
- Określa sposób określania współczynnika skali.
- On: określenie współczynników skali na rysunku po zamknięciu okna dialogowego.
Wyłączone: określ współczynniki skali w oknie dialogowym za pomocą pól X i Y.
- On: określenie współczynników skali na rysunku po zamknięciu okna dialogowego.
- XY
- Określa współczynniki skali wzdłuż osi X i Y.
- Jednorodna skala
- Sprawia, że współczynnik skali Y jest równy X.
Obrót
Określa kąt obrotu obrazu.
- Określ na ekranie
- Określa sposób określania kąta obrotu.
- On: określenie kąta obrotu na rysunku po zamknięciu okna dialogowego.
- Wyłączone: określ kąt w oknie dialogowym za pomocą pola Kąt.
Kąt
Określa kąt obrotu obrazu względem punktu wstawienia. Dodatnie kąty obracają obraz w kierunku przeciwnym do ruchu wskazówek zegara. Ujemne kąty obracają obraz zgodnie z ruchem wskazówek zegara. Użyj 0, aby zachować oryginalną orientację obrazu.

