


Диалоговое окно Создать новую подшивку
The Create New Sheet Set dialog box provides 4 methods to create a new sheet set.
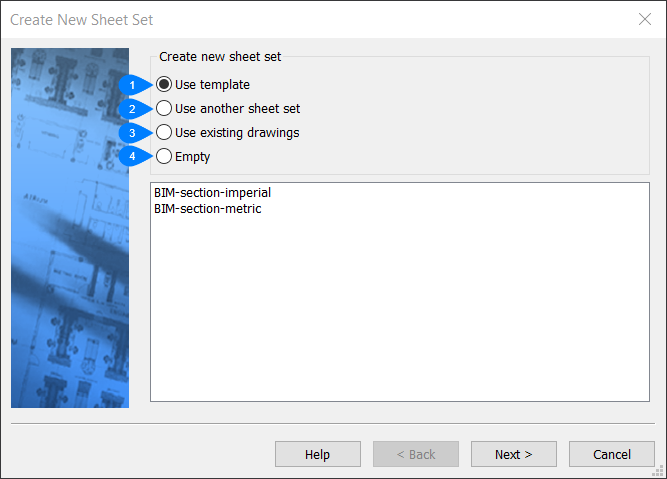
- Использование шаблона
- Использование другой подшивки
- Использование существующих чертежей
- Создание пустой подшивки
Использование шаблона
- Использование шаблона
-
Создание новой подшивки на основе шаблона.
Sheet set templates are stored as DST files in the folder set by the SheetSetTemplatePath preference (default path C:\Users\<UserName>\AppData\Local\Bricsys\BricsCAD\V[Version]\en_US\Templates\)
-
Выберите шаблон подшивки из списка, отображаемого в диалоговом окне.
Note: All metric projects use by default a sheet set template in mm, and will honor the setting of the SECTIONSHEETSETTEMPLATEMETRIC system variable, if not empty. The cm and meter sheet set and sheet template files are no longer included in the installation. - Нажмите Далее.
-
- Сохранить файл подшивки как
-
- Введите имя файла подшивки.
- Нажмите кнопку Обзор, чтобы выбрать папку назначения для сохранения подшивки и сохраните ее.
- Description (Описание)
-
- При необходимости, в поле Описание введите описание подшивки.
- Нажмите Далее.
- Предварительный просмотр подшивки
- Review the summary of the sheet set that will be created, then click Finish to create the new sheet set file. The program opens the Sheet Set Manager panel with the new sheet set.
Использование другой подшивки
Создание новой подшивки с использованием настроек существующей подшивки.
- Укажите подшивку для копирования
-
- Click Browse and select an existing sheetset file from the Select a Sheet Set file dialog box.
- Нажмите Далее.
- Сохранить файл подшивки как
-
- Введите имя файла подшивки.
- Click Browse to choose a destination folder for the sheet set and save it.
Important: You cannot progress until you have selected a folder that stores the new file.
- Description (Описание)
-
- Optional. Type a description for the sheet set file.
- Нажмите Далее.
- Предварительный просмотр подшивки
-
Review the summary of the sheet set that will be created, then click Finish to create the new sheet set file. The program opens the Sheet Set panel with the new sheet set.
Использование существующих чертежей
Создание подшивки из существующих чертежей.
- Выберите Использовать существующие чертежи.
- Нажмите Далее.
- Выбор папки
-
-
Select a folder from the Choose a folder dialog box where the new sheet set will be stored.
Note: The dialog box fills with names of drawings and their layouts. - Choose the options (it is recommended to keep both options turned on).
-
- Создать папки из дерева каталогов
-
Use the folders in the main folder to determine how the sheet set is structured.
- Размещать имя файла чертежа перед заголовками листов
-
- Add the drawing file's name to the start of the sheet set titles. This makes it easier to track the source of the files.
- Нажмите Далее.
- Сохранить файл подшивки как
-
- Введите имя файла подшивки.
- Click Browse to choose a destination folder for the sheet set and save it.Important: Вы не сможете продолжить процедуру до тех пор, пока не выберете папку.
- Description (Описание)
-
Optional. Type a description for the sheet set file.
- Шаблон по умолчанию для новых листов
-
- Выберите шаблон подшивки из списка, отображаемого в диалоговом окне Выбор шаблона чертежа.
- Нажмите Далее.
- Предварительный просмотр подшивки
- Review the summary of the sheet set that will be created, then click Finish to create the new sheet set file. The program opens the Sheet Set panel with the new sheet set.
Создание пустой подшивки
Создание подшивки "с чистого листа".
- Выберите Пустая.
- Нажмите Далее.
- Сохранить файл подшивки как
-
- Введите имя файла подшивки.
- Click Browse to choose a destination folder for the sheet set and save it.Important: Вы не сможете продолжить процедуру до тех пор, пока не выберете папку.
- Description (Описание)
- Optional. Type a description for the sheet set file.
- Шаблон по умолчанию для новых листов
-
- Выберите шаблон подшивки из списка, отображаемого в диалоговом окне Выбор шаблона чертежа.
- Нажмите Далее.
- Предварительный просмотр подшивки
- Review the summary of the sheet set that will be created, then click Finish to create the new sheet set file. The program opens the Sheet Set panel with the new sheet set.