


Render materials
The MATERIALS command creates materials and edits their properties through the Drawing Explorer.
The MATBROWSEROPEN command opens the Render materials panel, which shows an overview of available high-resolution render materials.
The MATBROWSERCLOSE command closes the Render materials panel.
The MATERIALMAP command allows you to adjust how a texture image is mapped to faces of a 3D solid and filled entities such as 3D faces, wide polylines and polygon meshes.
Material definitions are saved in the drawing. Each drawing contains the Global material, which cannot be deleted or renamed. The properties of the Global material can be edited.
Materials glossary
- Diffuse color: the color that the object reveals under pure direct, white light. It is perceived as the color of the object itself.
- Ambient color: the color of the object in the shadow, under ambient light rather than direct light.

- Highlights: highly reflective highlights in the color of the material.
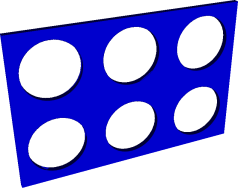
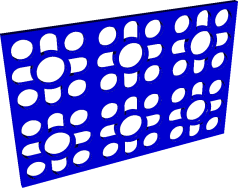
Metallic Highlights (left) and Non-metallic Highlights (right)
- Shading: how the color and brightness of a surface varies with lighting.
- Texture-Mapping: adds detail to a surface that is not included in the 3D model itself.
- Diffuse map: adds a structure or pattern to a surface to simulate a material.
- Transparency map: sets the transparency of a texture from 0% (black) to 100% (white) and anything between (grayscales). (Black=Transparency map)


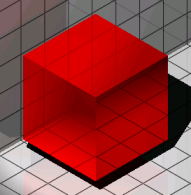
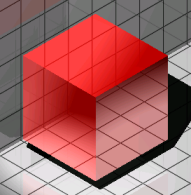
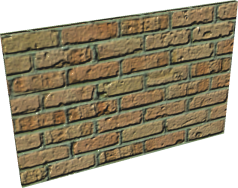
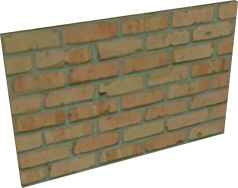
- Bump map: simulates a certain roughness or bumpiness on surfaces. (left = with bump map)
- Reflectivity: the property of a surface to reflect light.
- Transparency: sharp transmission of light through solid objects.
- Translucency: scattered transmission of light through solid objects.
- Refraction: bending of light when passing through transparent objects.
- Self-illumination: it appears as if a surface is emitting its own light. No light is cast on other objects.
Defining render materials
See the MATERIALS command.
Adding a render material to the drawing
- Select the material in the Render Materials panel.
- Right-click and choose the Add to drawing option.
Adding your own materials
- Download the textures you want to use.Note: You can download a photo of your texture, but in order to get the most realistic view it is best to download a zip file that gives you different representations of the texture:

- Launch the MATERIALS command.
The Drawing Explorer – Materials dialog box appears.
- Click the New button.
- Give your new material a name.
- Check on the Diffuse Map and the Bump Map.
- Edit the path of the diffuse map (
 ) to the colored image of your texture.
 - Edit the path of the bump map () to the normal image of your texture.
This will give your render material a more 3D and realistic look.
- Edit the scale of your image until you get a realistic image in the preview.
The scale of the texture represents the number of drawing units covered by the full width of your image.
- Right-click on your new material and choose Add material(s) to library in the context menu.
- Close the Drawing Explorer dialog box.
- Open the Render Materials panel and click on the folder User Defined.
You can find your new material in this folder of the library.
This folder is automatically generated under the following path: C:\ProgramData\Bricsys\RenderMaterials\UserMaterials\User defined.
Adding the Redway material library
See the Guide article Adding the Redway material library.
Assigning render materials
Materials can be assigned to a layer and to entities or subentities. If the Material property of an entity is ByLayer, the material assigned to the layer of the entity will be used.
By default, new entities get the ByLayer material setting.
Assigning a render material to entities
When the current visual style is BIM, Modeling, Realistic or X-Ray, entities and subentities are rendered using their material.
Method 1: Using the Properties panel
- Select the entities or sub-entities (e.g. faces or 3D solids).
- Under , click the down arrow and select the material in the Material list.
Method 2: Using the Render Materials panel
- Select the material, which launches the MATERIALASSIGN command.
The cursor turns into a paintbrush.
You are prompted: Select object to assign material to:
- Click the entities or subentities to assign the material.
- (option) Select a different material, then click more entities or subentities.
- (option) Hold down the Alt key.
The cursor turns into a dropper.
You are prompted: Select material from object:
Click an entity or subentity to copy the material from, then click entities or subentities to assign the material to.
To assign a material to a selection set:
- Select the entities.
- Search the material in the Render Materials panel.
- Click the material.
The material is assigned to all entities or subentities in the selection.
Assigning a material to a layer
- Select the Material field of the layer in the Layers panel or the Drawing Explorer – Layers dialog box.
- Click the down arrow and select the material in the list.
Materials in the drawing are available only.
Removing a render material
Assigning the Global material, removes a rendering material from an entity or subentity.
- Select the entities and/or subentities.
- Select the 3D Visualization / Material field in the Properties panel and select the Global material.