


Array dialog box
The Array dialog box allows you to create a 2D rectangular or polar array of entities.
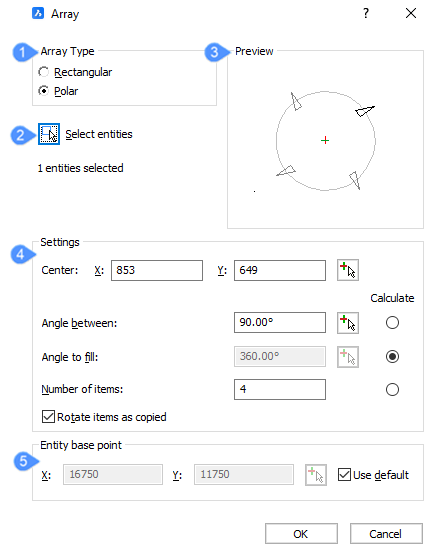
- Array Type
- Select entities
- Preview
- Settings
- Entity base point (Polar only)
Array Type
Specifies whether a rectangular or polar array will be created.
Select entities
Temporarily closes the Array dialog box and prompts you to select entities. Press Enter to complete your select and return to the Array dialog box.
Preview
Displays a preview of the array based on the specified settings.
Settings
Specifies the number and location of items in the array. The available settings differ based on the array type.
- Rectangular
- Copies the selected entities in a rectangular pattern.
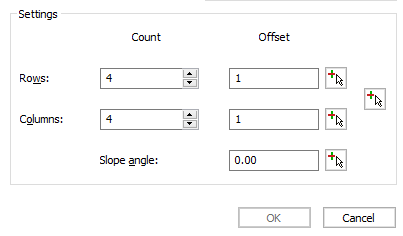
- Count
- Specifies the number of rows and columns in the array.
- Offset
- Specifies the distance between rows and columns. You can type a distance in the Offset fields or click the buttons to pick the offset distance in the drawing.
- Offset field
- Enables you to type distances for the offsets. Positive distances add rows along the positive Y axis and add columns along the positive X axis. Negative distances add rows along the negative Y axis and add columns along the negative X axis.
- Offset buttons
- Enables you to specify the offset distance by picking two points in the drawing. Clicking one of these buttons temporarily closes the Array dialog box and prompts you to pick points.
- Pick Row Offset
- Specifies the distance between rows. A temporary line displays between the two points you pick. The length of the line determines the offset distance. The angle of the line determines if rows are added along the positive or negative Y axis.
- Pick Column Offset
- Specifies the distance between columns. A temporary line displays between the two points you pick. The length of the line determines the offset distance. The angle of the line determines if columns are added along the positive or negative X axis.
- Pick Both Offsets
- Specifies the distance between rows and the distance between columns. A temporary rectangle displays between the two points you pick. The length of the rectangle determines the distance between columns and the width of rectangle determines the distance between rows.
- Slope Angle
- Specifies the angle of the array from the X axis. You can type an angle in the Angle field or click the button to pick an angle in the drawing.
- Angle field
- Enables you to type an angle for the slope.
- Pick Angle of Array button
- Enables you to specify the angle of the array by picking two points in the drawing. Clicking the button temporarily closes the Array dialog box and prompts you to pick points.
- Polar
- Copies the selected entities in a circular pattern.
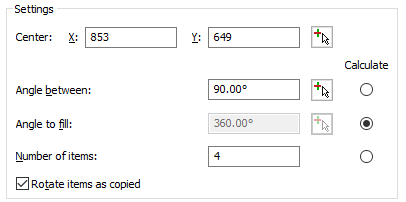
- Center
- Specifies the center point of the polar array. You can type coordinates in the X and Y fields or click the button to pick the center in the drawing.
- X field
- Enables you to type a coordinate to place the center of the array along the X axis.
- Y field
- Enables you to type a coordinate to place the center of the array along the Y axis.
- Pick Center Point button
- Enables you to specify the center of the array by picking a point in the drawing. Clicking the button temporarily closes the Array dialog box and prompts you to pick a point.
- Angle between
- Specifies the angle between each item in the polar array. You can type an angle in the field, click the button to pick an angle in the drawing, or choose the Calculate option.
- Angle field
- Enables you to type a value to specify the angle between each item of the array.
- Pick Angle Between Items button
- Enables you to specify the angle between each item by picking a point in the drawing. Clicking the button temporarily closes the Array dialog box and prompts you to pick a point. A temporary line displays between the center point of the array and the point you pick. The angle of the line determines the angle between items.
- Calculate
- Enables you to specify the angle between each item based on the Angle to fill and number of items. Choosing the Calculate radio button disables the Angle between options and enables the Angle to fill options.
- Angle to fill
- Specifies the fill angle and direction for a polar array. You can type an angle in the field, click the button to pick an angle in the drawing, or choose the Calculate option.
- Angle field
- Enables you to type a value to specify the fill angle of the array. Enter 360 for a full circle of copies. Enter a smaller number to draw a partial polar array. Positive values draw the array counterclockwise and negative values draw the array clockwise.
- Pick Angle to Fill button
- Enables you to specify the fill angle of the array by picking a point in the drawing. Clicking the button temporarily closes the Array dialog box and prompts you to pick a point. A temporary line displays between the center point of the array and the point you pick. The angle of the line determines the fill angle.
- Calculate
- Enables you to specify the fill angle based on the angle between items and the number of items. Choosing the Calculate radio button disables the Angle to fill options and enables the Angle between options.
- Number of items
- Specifies the number of items in the polar array. You can type a number in the field or choose the Calculate option.
- Number field
- Enables you to enter the number of items to include in the array.
- Calculate
- Enables you to specify the number of items based on the angle between items and the fill angle. Choosing the Calculate radio button disables the Number of items options and enables the Angle Between and Angle to Fill options.
- Rotate items as copied
- Specifies whether array items are rotated when they are copied to form the polar array.
- No: does not rotate items; all copies have the same orientation as the original item.
- Yes: rotates copies.
Entity base point (Polar only)
Specifies the base point of items in a polar array.

- X field
- Enables you to type a coordinate to specify the basepoint of array items along the X axis.
- Y field
- Enables you to type a coordinate to specify the basepoint of array items along the Y axis.
- Pick base point button
- Enables you to specify the base point of array items by picking a point in the drawing. Clicking the button temporarily closes the Array dialog box and prompts you to pick a point.
- Use Default
- Uses the default basepoint for array entities. Choosing the Use default option disables the other entity base point options.