


Alinear y cuadrícula.
Cuadrícula y ajuste le ayudan a dibujar de forma rápida y precisa.
Una cuadrícula es un conjunto de líneas o puntos espaciados uniformemente que sirven como referencia visual de distancia.
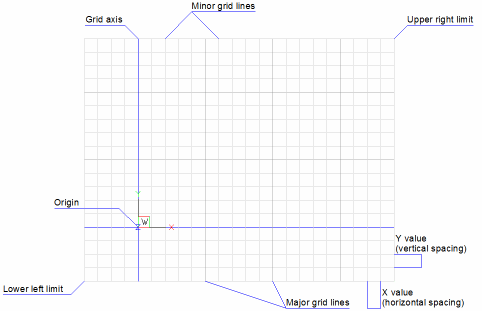
La función de ajuste crea un conjunto de puntos magnéticos invisibles espaciados uniformemente, que hacen que la cruz se mueva en incrementos uniformes. Tanto la cuadrícula como el complemento son como los puntos de intersección de las líneas en una hoja de papel cuadriculado. Los puntos de la cuadrícula son solo para referencia visual y no se imprimen. Ajustar restringe los puntos que puede seleccionar con el mouse.
-
Haga clic en la herramienta REJILLA (
 ) en la barra de herramientas Configuración o en el campo REJILLA en la barra de estado, o presione Ctrl+G para activar/desactivar la visualización de cuadrícula.
 -
Haga clic en la herramienta FORZCURSOR (
 ) de la barra de herramientas de Configuración o en el campo SNAP de la barra de estado, o pulse Ctrl+B para activar o desactivar el ajuste. La configuración se guarda a través de la variable de sistema SNAPMODE.
Si SNAPTYPE = 2, se utiliza el complemento de cuadrícula adaptable y se deniega SNAPMODE.
- Tanto FORZCURSOR como REJILLA pueden configurarse de forma diferente en cada ventana.
- La opción Ajustar del comando REJILLA iguala el espaciado de la rejilla al espaciado de ajuste actual.
- Las líneas o los puntos de la cuadrícula no se imprimen.
Mostrar la configuración de Alinear y cuadrícula
Haz una de las siguientes cosas:
- En la barra de estado, haga clic con el botón derecho en el campo FORZCURSOR o REJILLA, luego elija Configuración en el menú contextual.
- En el cuadro de diálogo Configuración, vaya a: .
Sincronizar el espaciado a presión y la cuadrícula
-
Inicie el comando ARCO.
Le solicita:
La red está encendida. Introduzca la distancia entre cuadrículas o [cuadrícula OFf/Snap/Aspect] <10>:
-
Escriba s y presione Intro.
El espaciado de la rejilla coincide con el espaciado de los broches de presión.
- (Opción) Utilice la opción Aspecto del comando SNAP para ajustar el espaciado.
Uso de los límites de dibujo
- Ejecute el comando LIMITES para establecer los límites del dibujo.
-
Haga clic en el elemento Límites de dibujo (
 ) en el menú Configuración para activar o desactivar la variable del sistema LIMCHECK.
Si LIMCHECK = ON, no es posible dibujar fuera de los límites de dibujo.
- La opción Mostrar más allá de los LÍMITES del área de la variable de sistema GRIDDISPLAY define si la cuadrícula se muestra o no más allá de los límites del dibujo.
Utilizar selección isométrica
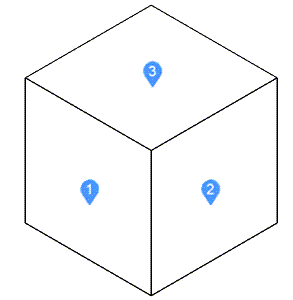
La cuadrícula isométrica permite crear dibujos isométricos bidimensionales, que simulan una vista tridimensional en un plano bidimensional. No confunda los dibujos isométricos con los tridimensionales.
La opción isométrica siempre usa uno de los tres planos preestablecidos, que se indican como Izquierda (1), Derecha (2) y Superior (3). No puedes alterar la disposición de estos planos. Los tres ejes isométricos son 30 grados, 90 grados y 150 grados.
Haga lo siguiente:
- Establezca SNAPSTYL = 1 (Ajuste isométrico).
- Establezca GRIDSTYLE = 1 (cuadrícula punteada).
-
Ajustar SNAPISOPAIR: 0 = Izquierda, 1 = Arriba, 2 = Derecha.
Pulse la tecla de función F5 para cambiar el ciclo de los planos isométricos.
- Establezca ORTHOMODE = Activado para restringir el movimiento de las cruz al plano isométrico actual.
- Asegúrese de que SNAPANG = 0.
Establecer el ángulo de alineación
Puede rotar una cuadrícula de puntos usando la variable de sistema SNAPANG (si SNAPANG es diferente de 0, las líneas de la cuadrícula no se muestran).
- Muestre la configuración Ajuste/Cuadrícula en el cuadro de diálogo Configuración.
- SNAPANG variable de sistema
- Escriba el valor deseado en el campo de configuración
- Cierre el cuadro de diálogo Configuración.