Editing dimensions
To edit dimension entities:
- Use grips.
- Edit the dimension text.
- Rotate the dimension text.
- Reposition the dimension text.
- Restore the text position.
- Make the extension lines oblique.
Using grips to edit a linear dimension
- Select the dimension entity.
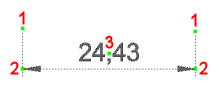
5 grips display:
2 origin point grips (1)
2 dimension line grips (2)
1 dimension text grip (3)
- (Optional) Drag the origin point grips to adjust the dimension origin points.
The dimension text is adjusted automatically.
- (Optional) Drag dimension line grips to move the dimension line.
- (Optional) Drag the text grip to move the dimension text.
- Depending on the Text movement setting (DIMTMOVE system variable), the dimension line will move along with the text or the text will move independently. A leader will be drawn if the Text movement setting is set to Move text, add leader.
- If two adjacent dimensions (continued dimensions) are selected both, you can move their coinciding grips simultaneously.
Editing the dimension text
- Dimension text can be edited:
-
- In the MText editor by using the DDEDIT command or by double clicking the dimension entity.
- In the Text override field in the Properties panel.
- Using the Edit Text option of the DIMEDIT command.
- In the Primary units or Alternate units fields in the Properties panel.
Note:- Use the following tags to format the dimension text for primary and alternate units:
- \L (backslash upper case L) to start underlined text, \l (backslash lower case L) to stop underlined text.
- <> to add the default dimension text (= measured distance).
- [] to add the alternate units, when alternate units are currently switched off in the dimension style.
- %%d to add the degree symbol (°).
- %%c to add the diameter symbol (
 ).
). - %%p to add the plus/minus symbol (
 ).
). - \X to insert a line break in the dimension text.
- \P to insert a paragraph break in the dimension text.
- \f to suppress subsequent text in the dimension text.
- \fArial to change the font of the subsequent text to Arial font.
- ; to end any previous formatting tags.
- Use text formatting to append units to the dimension values.
- Default font for the alternate dimension text is defined by FONTALT system variable.
- Samples of dimension text formatting
-
-
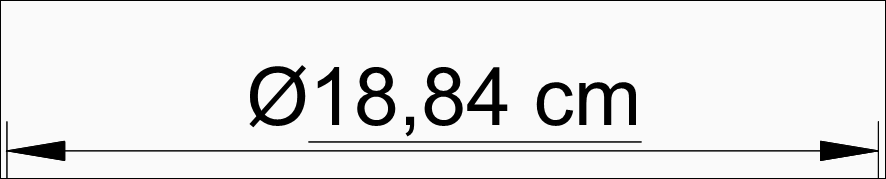
If you type %%c\L<> cm in the Text override field, dimension text displays as:
-
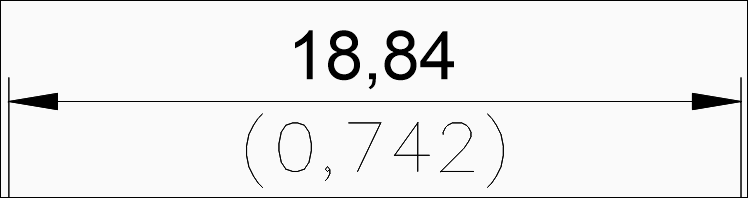
If you type \X\f in the Dim suffix field, ;( in the Alt prefix and )\f in the Alt suffix field, dimension text displays as:
-
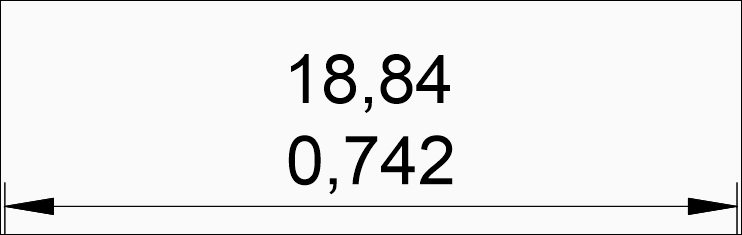
If you type \P\f in the Dim suffix field, ;\fArial; in the Alt prefix field and \f in the Alt suffix field, dimension text displays as:
 Note: Default font for the alternate dimension text is defined by FONTALT system variable.
-
To rotate the dimension text
- Do one of the following:
- Click the Rotate Dimension Text tool (
 ) in the Dimensions toolbar or ribbon panel.
 - Choose Rotate Dimension Text in the Dimensions menu.
- Launch the DIMEDIT command then choose the Rotate text option.
You are prompted: Angle of dimension text:
- Click the Rotate Dimension Text tool (
- Type a value, then press Enter.
You are prompted: Select entities to rotate text [selection options (?)]:
- Select the dimensions and press enter.
To reposition the dimension text
- Do one of the following:
- Click the Reposition Dimension Text tool (
 ) in the Dimensions toolbar or the ribbon panel.
 - Choose Reposition Dimension Text in the Dimensions menu.
- Launch the DIMTEDIT command.
You are prompted: Select dimensions to reposition text:
- Click the Reposition Dimension Text tool (
- Select the dimension.
The dimension text moves dynamically.
- Click to reposition the dimension text.
To restore the text position
- Do one of the following:
- Click the Restore Text Position tool (
 )
) - Choose Restore Text Position in the Dimensions menu.
- Launch the DIMEDIT command and choose the Restore text option.
You are prompted: Select dimensions to restore text to default position [selection options (?)]:
- Click the Restore Text Position tool (
- Select the dimensions, then press Enter.
To make the extension lines oblique
- Do one of the following:
- Click the Make Oblique tool (
 ) in the Dimensions toolbar or ribbon panel.
 - Choose Make Oblique in the Dimensions menu.
- Launch the DIMEDIT command and choose the Oblique lines option.
You are prompted Select linear dimensions to make oblique [selection options (?)]:.
- Click the Make Oblique tool (
- Select the dimension entities, then press Enter.
You are prompted Enter obliquing angle:.
- Type a value, then press Enter.