Working with Point File Formats
Overview
This article describes the procedures for importing Civil points from ASCII file and how to manage point file formats.
Importing Civil Points from file
- Launch the CIVILPOINT command.
- In the Command line type I or select the Import points from file option.
- In the Import Points From Point File dialog box, choose the point data file that you want to import, or select multiple files to import all at once.
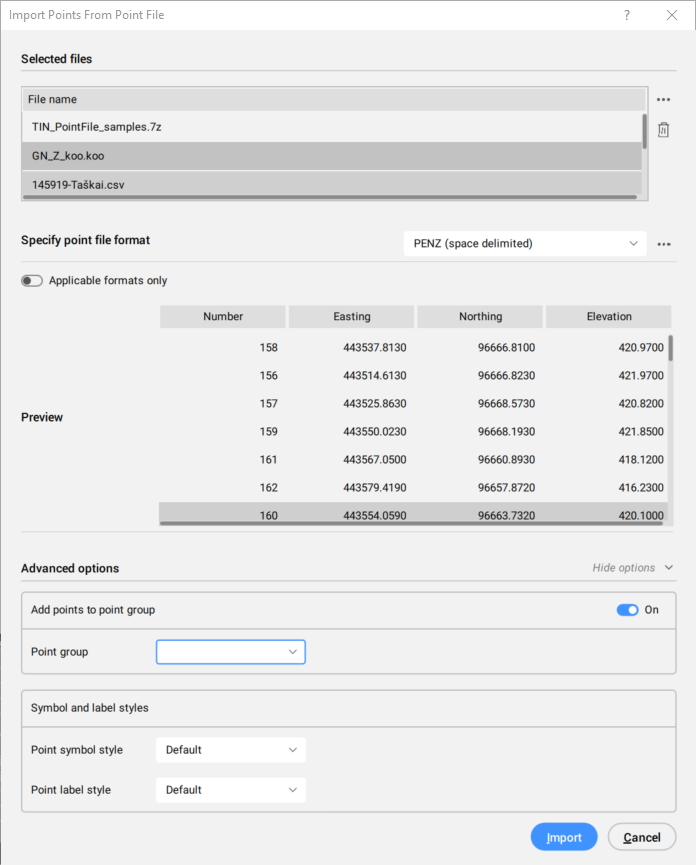
- Under Specify point file format, select the appropriate point file format of your ASCII file or click the three dots from the right side to open the Manage Point File Formats dialog box.
- The Preview window will automatically update once the right point file format is selected.
- Set the Add points to point group button to On and choose a Point group name.
- Set the symbol and label styles other than the default ones.
- Click Import button to import Civil points.Note: If no filter is specified or no point group is selected, the points are placed in the _All points group by default.
Manage Point File Formats
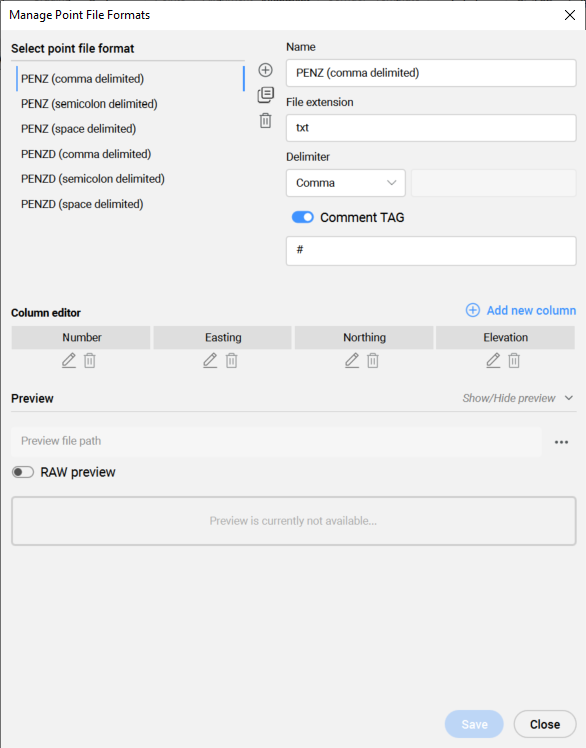
The Manage Point File Formats dialog box allows you to create, edit, and delete point file formats.
There are two ways to access the Manage Point File Format dialog box:
- Through the process of importing Civil points from the ASCII file, described in the section above. In Import Points From Point File dialog box, click the three dots from the right side of the Specify point file format section to open the Manage Point File Formats dialog box.
- Go to Settings tab of the Civil Explorer panel and double click (or right-click and select Edit) on Point File Formats section.
Delete Point File Format
In the Manage Point File Formats dialog box select the file format you wish to delete and click on the delete icon to remove the selected point file format.
You can also Delete point file formats directly from Civil Explorer panel. In the Settings tab of the Civil Explorer panel right-click the Point File Format you wish to remove, and select Delete.
Create a user-defined point file format
To create a user-defined point file format, you can:
- Add new point file format.
- Duplicate point file format.
- Edit existing point file format.
For the new point file format you have to specify the following:
- Specify the point file format Name.Note: A warning message appears when the name of the new point file format is empty or already exists.
- Specify the File extension of the ASCII file.
- Select the Delimiter used in your ASCII file. You can choose between space, tabulator, comma, dot, semicolon, or define a custom delimiter.
- Toggle to enable the Comment TAG. The comment tag can be set in the box bellow.
- Define columns in the Column Editor:
- Rename the column by selecting the edit icon. In the Column Editor dialog box you can choose between Predefined column names (<skip>, Easting, Northing, Elevation, Name, Number, Raw Description, Full Description), or use a User defined column name.
- Remove column by selecting the bin icon.
- Press the Add new column button to open the Column Editor dialog box, where you can choose the Predefined column names or use the User defined column name.
- It is possible to use the Preview option. In the Preview file path, open the ASCII file. You can view the data in its RAW/original state or as arranged in columns based on the settings in the Column Editor.
- Select Save and Close.