Sequence Manager panel (Experimental)
Disclaimer

Sequence Manager is an experimental feature that may not yet be stable and could be removed in the future. Use the MANAGEEXPERIMENTALFEATURES command to enable or disable experimental features.
The Experimental mode is disabled by default. Enabling or disabling the Experimental mode requires a restart of BricsCAD.
About
Launch he BMSEQUENCE command to open the Sequence Manager panel in the block-edit mode of the block in which the sequence is stored.
To open the Sequence Manager panel, run the BMSEQUENCEPANELOPEN. Run BMSEQUENCEPANELCLOSE command to close the panel.
The Sequence Manager panel allows you to manage the sequences and exploded views of a mechanical assembly.
If there are no assembly sequences in the drawing, there is only Create sequence option in the panel.
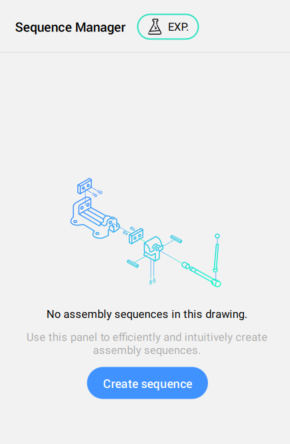
You can create the first sequence in the drawing by pressing the Create sequence button. The default sequence name is Assembly_Sequence_1.
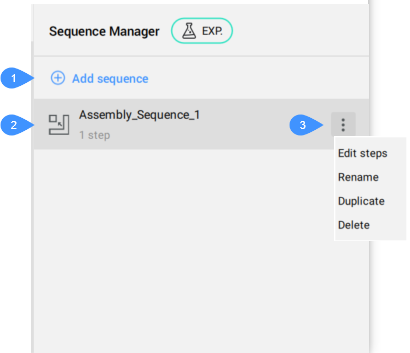
- Add sequence
- Assembly_Sequence created
- Options button
- Add sequence
- Adds a Assembly_Sequence in the list.
- Assembly_Sequence created
- Displays the created Assembly_Sequence.
- Options button
- Displays a list with editing options for the Assembly_Sequence.
- Edit steps
- Opens the Sequence Manager panel in the block-edit mode of the block in which the Assembly_Sequence is stored.Note: Also, double click an Assembly_Sequence opens the Sequence Manager panel in the block-edit mode.
- Rename
- Displays the Rename sequence dialog box to introduce the new name for the Assembly_Sequence.
- Duplicate
- Creates a duplicate for the Assembly_Sequence.
- Delete
- Deletes the Assembly_Sequence.
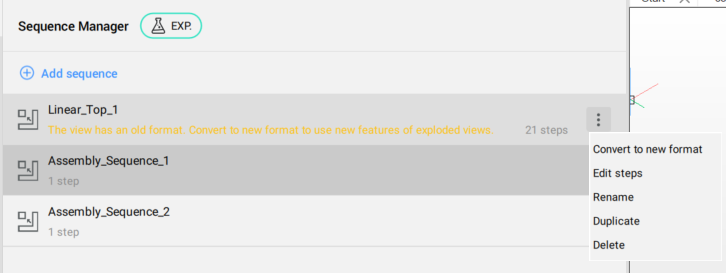
Exploded views in the old format can be converted to the new format by choosing the Convert to new format option from the Options button.
When open the Sequence Manager panel in the block-edit mode of the block in which the sequence is stored, you are able to manage the sequence steps.
The Sequence Manager panel in this mode shows a list of steps in the sequence in disassembly order, with a thumbnail for each step and a list of all parts in that step.
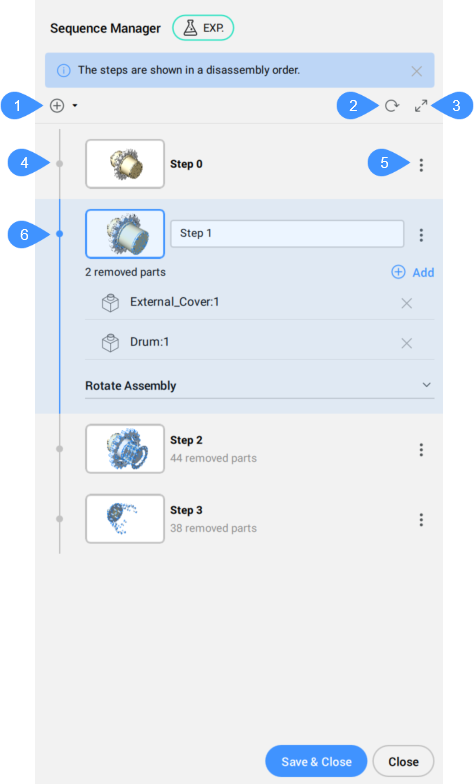
- Add new step
- Update thumbnails
- Switch to large thumbnails
- List of steps
- Options button
- Current/active step
- Add new step
- Adds a new step after the last step.
The drop down list contains several options for adding the step:
- After last step
- Adds a step after the last step.
- After current step
- Adds a step after the current step.
- Before current step
- Adds a step before the current step.
- Before first step
- Adds a step before the first step.
- Update thumbnails
- Updates the thumbnails after editing step(s).
- Switch to large thumbnails
- Enables to display large thumbnails.
- List of steps
- Displays the steps of the sequence.Note: Set the step as the current by clicking on its thumbnail.
- Options
- Lists the options applicable to the step.
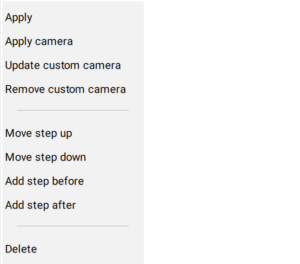
- Apply
- Sets the step as current.
- Apply camera
- Applies the camera position for the step.
- Update custom camera
- Updates the custom camera position.
- Remove custom camera
- Removes the custom camera position.
- Move step up
- Moves the step up.
- Move step down
- Moves the step down.
- Add step before
- Adds a step before this one.
- Add step after
- Adds a step after this one.
- Delete
- Deletes the step.
- Current/active step
- Allows you to edit the current step.
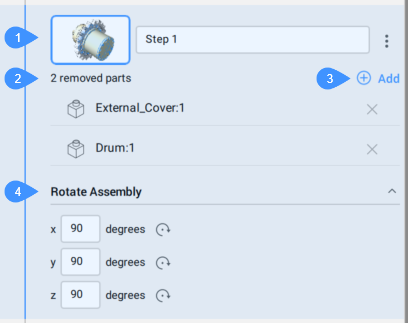
- Thumbnail
- Removed parts list
- Add removed part
- Rotate Assembly
- Thumbnail
- Displays the thumbnail of the step.Note: By clicking on the thumbnail you will launch the Apply camera option, to apply the custom camera.
- Removed parts list
- Lists the entities (mechanical components) that were disassembled in this step.Note: There are Show more and Show less buttons for large lists to manage the display of components.
- Add removed part
- Adds one or more mechanical components to this step.
- Rotate Assembly
- Rotates the assembly around the X, Y, or Z axes. You can click on the thumbnail to keep the camera position (Apply camera).