WSTAW polecenie
Otwiera okno dialogowe Wstaw blok.

Ikona: 
Alias: W, WSTAW
Opis
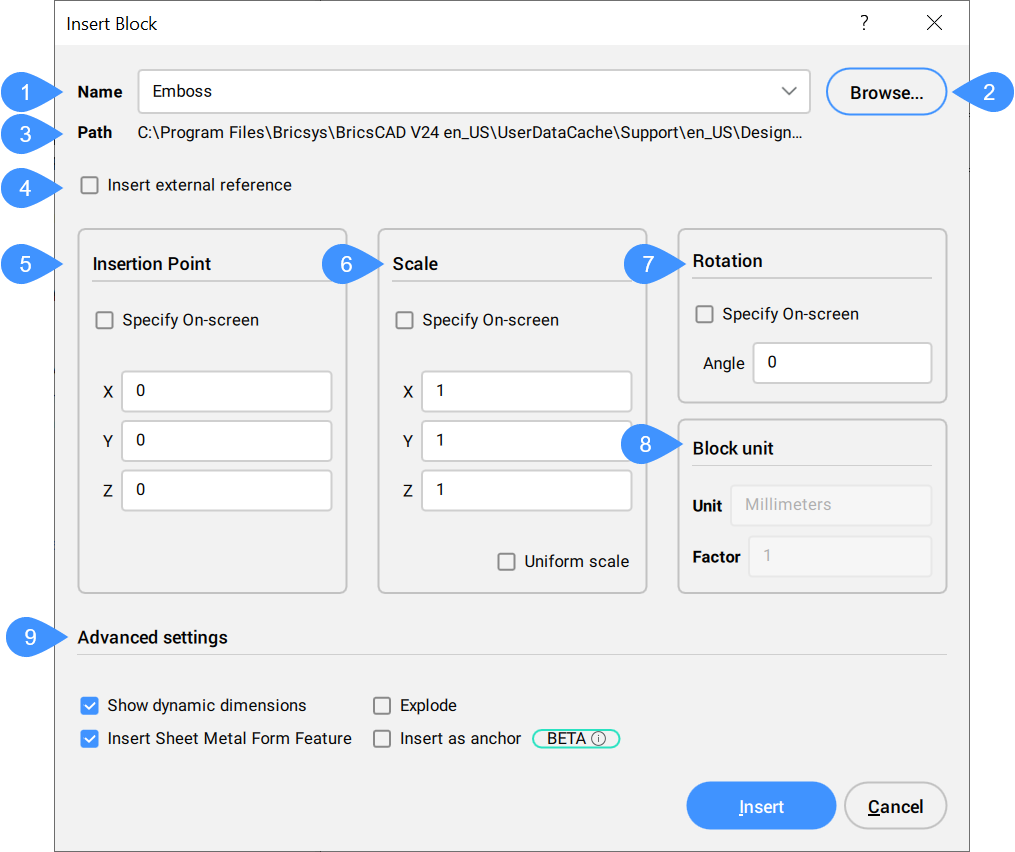
Otwiera okno dialogowe Wstaw blok w celu wstawienia instancji bloku z definicji bloku. Definicja bloku może istnieć w bieżącym rysunku lub jako zewnętrzny plik DWG.

- Nazwa
- Przeglądaj
- ŚCieżka
- Wstaw odnośnik zewnętrzny
- Punkt Wstawienia
- Skala
- Obrót
- Jednostka bloku
- Zaawansowane ustawienia
Nazwa
Określa nazwę bloku, którego definicja istnieje na rysunku. Może to być również plik DWG lub DXF na komputerze lub w sieci.
Przeglądaj
Wybiera plik DWG lub DXF z komputera lub sieci. Otwiera okno dialogowe Wybierz plik rysunku.
ŚCieżka
Wyświetla ścieżkę do bloku, jeśli blok został otwarty z pliku DWG lub DXF.
Wstaw odnośnik zewnętrzny
Przełącza, czy blok jest wstawiany jako odniesienie lokalne czy zewnętrzne.
Punkt Wstawienia
Określa punkt wstawienia bloku na rysunku.
Skala
Skaluje blok:
- X, Y, Z: Określa skalowanie bloku:
- X określa współczynnik skali wzdłuż osi x. Wprowadź wartość ujemną, aby wykonać odbicie lustrzane bloku wokół osi Y.
- Y określa współczynnik skali wzdłuż osi Y. Wprowadź wartość ujemną, aby wykonać odbicie lustrzane bloku wokół osi Y.
- Określa współczynnik skali wzdłuż osi Z.
- Jednolita skala: Przełącza, czy ten sam współczynnik skali jest używany dla wszystkich osi.
- Wartości większe niż 1 powiększają blok.
- 1 wstawia blok w rzeczywistym rozmiarze.
- Wartości mniejsze niż 1 zmniejszają blok.
- Wartości mniejsze od zera odwracają blok, podobnie jak jego odbicie lustrzane.
Obrót
Określa kąt obrotu (2) bloku wokół jego punktu wstawienia (1), zaczynając od osi x jako 0 stopni:
Jednostka bloku
Kontroluje automatyczne skalowanie bloku w odniesieniu do zmiennej systemowej INSUNITS bieżącego rysunku.
Zaawansowane ustawienia
Wyświetla dostępne ustawienia zaawansowane.
- Pokaż dynamiczne wymiary
- Przełącza, czy na rysunku mają być wyświetlane wymiary dynamiczne.
- Funkcja wstawiania kształtu blachy
- Przełącza, czy wstawić funkcję kształtu blachy. Opcja Wstaw cechę kształtu blachy jest dostępna tylko wtedy, gdy przestrzeń modelu zawiera kołnierze SM.
- Wstaw Komponent BIM
- Przełącza, czy wstawiać komponenty BIM.Uwaga: Opcja Wstaw komponent BIM jest dostępna tylko wtedy, gdy przestrzeń modelu zawiera encje BIM.
- Użyj krzywych odniesienia do wstawienia
- Przełącza, czy krzywe odniesienia są używane do wstawiania.
- Rozbij
- Przełącza, czy wstawić rozbity blok.
- Wstaw jako zakotwiczenie
- Kotwiczy blok do powierzchni bryły. Kotwica łączy blok z twarzą. Blok pozostanie na powierzchni, gdy bryła hosta zostanie przeniesiona lub edytowana.
Opcje w ramach polecenia
Gdy w oknie dialogowym Wstaw blok jest włączona, w wierszu polecenia wyświetlane są następujące opcje.
- Edycja wstawionego obiektu
- Umożliwia zmianę wyrażeń parametrów dla wstawionej jednostki. Kontynuuj edycję poszczególnych parametrów do momentu naciśnięcia przycisku ZAKOŃCZ w celu zakończenia opcji. Opcja ta jest również dostępna w Asystencie skrótów klawiszowych.
- Wprowadź nazwę parametru
- Określ nazwę parametru.
- Wprowadź wyrażenie
- Określa wyrażenie dla parametru.
- KONIEC
- Kończy edycję poszczególnych parametrów.
- Wstaw SMART
- Umożliwia podłączenie standardowej części Rurociągu do istniejącej standardowej części Rurociągu. Automatycznie tworzy odpowiednie wiązania 3D między dwiema częściami i kopiuje wyrażenia parametrów istniejącej części do nowej części. Opcja ta jest również dostępna w Asystencie skrótów klawiszowych.
- Obróć komponent
- Umożliwia zmianę kąta obrotu wstawionej jednostki.
- Ustaw punkt bazowy
- Umożliwia zmianę punktu bazowego dla wstawionej jednostki.Uwaga: Domyślnie jest to <0,0,0>.
- Nazwa
- Umożliwia zmianę nazwy wstawianego komponentu.
- Typ wstawienia
- Określa typ wstawienia.
- Odwróć
- Umożliwia odwrócenie kierunku wstawionej jednostki.
- Zmiana docelowych brył 3D
- Umożliwia zastosowanie wstawionego elementu do istniejących brył 3D w bieżącym rysunku.
- Wybór docelowych brył 3D
- Wybiera docelową bryłę 3D.
- WYczyść
- Czyści zestaw zaznaczeń, aby upewnić się, że wstawiona jednostka nie ma wpływu na elementy stałe.
- Wybierz wszystkie bryły 3D, których to dotyczy
- Dotyczy to wszystkich brył przecinających się lub dotykających brył w warstwach BC_SUBTRACT i BC_UNITE wstawionej jednostki.
- Wiele
- Umożliwia wstawienie wielu kopii tej samej jednostki poprzez określenie punktu wstawienia dla każdej instancji.Uwaga: Kontynuuj wstawianie podmiotów, aż naciśniesz Enter, aby zakończyć polecenie.
- Szyk
- Umożliwia utworzenie szyku asocjacyjnej wstawionej jednostki poprzez określenie punktu bazowego, odległości między kolumnami, odległości między wierszami i punktu końcowego szyku.
- Kierunek
- Umożliwia wybranie istniejącej jednostki osiowej w celu zdefiniowania kierunku.
- 2Punkty
- Wybiera dwa punkty do zdefiniowania kierunku.
- ośZ
- Wybiera oś Z jako kierunek.
- OBiekt
- Umożliwia wybranie elementu osiowego.
- OStatni
- Używa poprzedniej osi.
- Podgląd
- Umożliwia określenie kierunku punktu na widoku.
- Oś X
- Wybiera oś X jako kierunek.
- oś Y
- Wybiera oś Y jako kierunek.
- Pojedynczy wiersz
- Rozdziela kopie podmiotów do pojedynczego wiersza.
- Prostokątny
- Rozdziela kopie podmiotu na dowolną liczbę wierszy.
- Kolumny
- Określa liczbę kolumn.
- Wiersze
- Określa liczbę wierszy.
- Umieszczenie
- Ustawia odległość między podmiotami.
- Akceptuj
- Akceptuje wynikowy szyk.
- Skala
- Umożliwia skalowanie wstawionego bloku.
- X skala
- Umożliwia skalowanie wstawionego bloku na osi X.
- Y skala
- Umożliwia skalowanie wstawionego bloku na osi Y.
- X skala
- Umożliwia skalowanie wstawionego bloku na osi Z.

