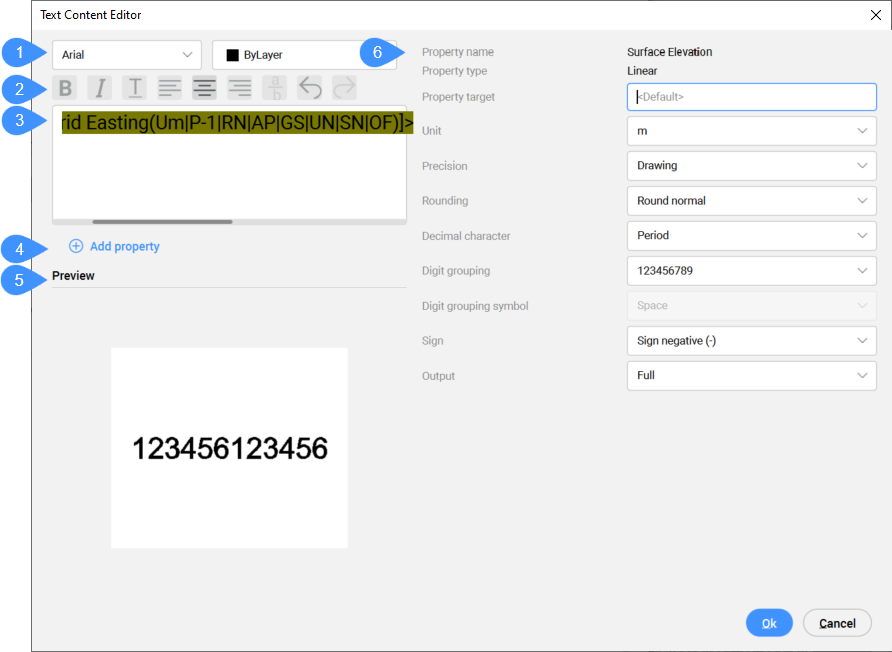
Okno dialogowe Edytor zawartości tekstowej
Otwiera przez Okno dialogowe Edytor stylów etykiet
Okno dialogowe Edytor zawartości tekstowej umożliwia dodawanie, edytowanie lub usuwanie elementów tekstowych wyświetlanych w stylu etykiety.

- Wybierz czcionkę i kolor
- Wybierz formatowanie tekstu
- Pole edytora tekstu
- Dodaj właściwość
- Podgląd
- Właściwości komponentu tekstowego
Wybierz czcionkę i kolor
Wybiera czcionkę i kolor elementów tekstowych. Wybierz elementy w polu edytora tekstu, które chcesz edytować i przypisz im czcionkę i kolor.
Wybierz formatowanie tekstu
Określa styl tekstu (pogrubienie, kursywa, podkreślenie), formatowanie (wyrównanie do lewej, wyśrodkowanie, wyrównanie do prawej) i zapis ułamkowy. Każda właściwość może mieć inną czcionkę, kolor i styl. Pozycja tekstu jest określana dla całego pola tekstowego. Na końcu znajdują się również przyciski cofnij i ponów.
 .
.Pole edytora tekstu
Wyświetla listę właściwości, które będą wyświetlane w stylu etykiety. Możliwe jest dodanie prefiksu i sufiksu do komponentów lub wstawienie tekstu. Komponenty można zmieniać za pomocą funkcji Wytnij (Ctrl + X) i Wklej (Ctl + V) lub usuwać, zaznaczając je i naciskając przycisk Usuń na klawiaturze.
Właściwości atrybutów można edytować po prawej stronie okna dialogowego Edytor zawartości tekstowej lub edytując skróty w nawiasach. Zmiany wprowadzone w ustawieniach atrybutów są automatycznie aktualizowane w edytorze tekstu i odwrotnie. Więcej informacji można znaleźć w artykule Zrozumieć punkty Civil Symbole i Etykiety.
Dodaj właściwość
Umożliwia dodanie nowej właściwości do wyświetlenia w stylu etykiety. W oknie dialogowym Dodaj właściwość można wybrać właściwości punktu Civil, a także użyć właściwości z innego obiektu (Powierzchnia, Wyrównanie w poziomie i Wyrównanie w pionie).
Podgląd
Wyświetla podgląd komponentów i dodatkowego tekstu (w tym prefiksów i sufiksów), które będą wyświetlane w etykiecie, wszystkie z przypisanym stylem.
Właściwości komponentu tekstowego
Klikając pojedynczą właściwość w polu edytora tekstu, można określić dodatkowe ustawienia dla tej właściwości po prawej stronie okna dialogowego.

