Panel Menadżer BOM
Aby otworzyć panel Menadżer BOM, kliknij prawym przyciskiem myszy panel wstążki/pasek narzędzi i wybierz Menadżer BOM z listy Panele.
Panel Menadżer BOM umożliwia przeglądanie, tworzenie i edytowanie zestawień materiałów (BOM) w bieżącym rysunku.
Konfiguracja zestawienia materiałów może zostać zapisana jako plik szablonu i ponownie wykorzystana w innych rysunkach.
Menedżer zestawień materiałowych BOM umożliwia:
- Przeglądać istniejące listy materiałów na rysunku.
- Tworzyć nowe listy materiałów przy użyciu typu standardowego (np. górnego poziomu, dolnego poziomu, hierarchicznego) lub istniejącego szablonu zestawienia materiałów.
- Edycja zestawień materiałów.
- Dodaj lub usuń kolumny (w tym kolumny z formułami).
- Przenieś wybrane kolumny na nowe pozycje.
- Zmień nazwy kolumn.
- Skonfiguruj sposób sortowania tabeli BOM.
- Skonfiguruj wartość stopki dla każdej kolumny.
- Skonfiguruj jednostki i sposób ich wyświetlania w każdej kolumnie.
- Skonfiguruj szerokość każdej kolumny za pomocą właściwości kolumny.
- Skonfiguruj widoczność każdej kolumny.
- Przefiltruj komponenty za pomocą wyrażenia filtru.
- Zmień tytuł zarówno wiersza tytułu, jak i wiersza stopki.
- Wyszukaj komponenty w tabeli.
- Podświetl i wybierz wystąpienia komponentów.
- Zapisz konfigurację BOM jako plik szablonu.
- Wczytaj konfigurację BOM z pliku szablonu.
- Umieść tabelę BOM na rysunku.
- Usuń tabele BOM.
- Skonfiguruj rodzaj obiektów, które powinny być obecne w tabeli BOM w trybie filtrowania BOM.
- BOM może zawierać części z innych dokumentów do zestawu wyboru.
- BOM może wykluczyć bieżący dokument z zestawu wyboru.Uwaga: Gdy tabela BOM jest tworzona w pliku, który jest częścią projektu BIM, ustawienia filtra, tryb grupowania i zestaw właściwości zostaną automatycznie rozszerzone, aby uwzględnić obiekty niemechaniczne, nawet jeśli w modelu znajdują się komponenty mechaniczne. Ponadto bieżący projekt zostanie uwzględniony w BOM, a bieżący dokument zostanie wykluczony (ponieważ zostanie dodany jako część projektu BIM).
Do modyfikowania lub tworzenia zestawień materiałów wymagana jest licencja Mechanical lub Ultimate. Można jednak uruchomić Menadżer BOM za pomocą polecenia BMBOMEDYCJASZABLONU, które wymaga licencji BIM, Mechanical lub Ultimate.

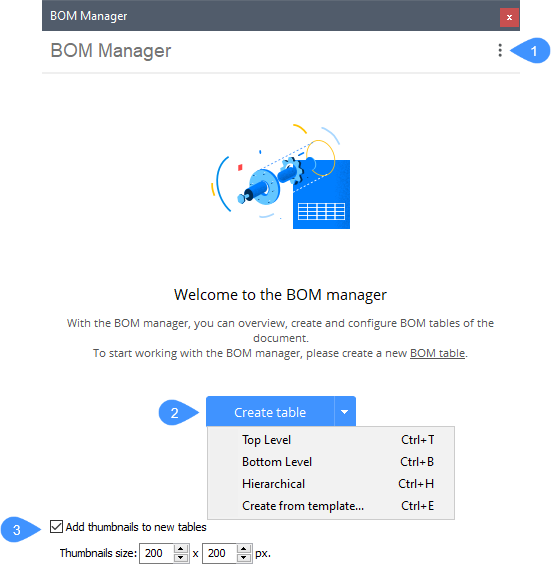
- Menu
- Utwórz tabelę
- Dodaj miniatury do nowych tabel
Menu
Otwiera menu główne.
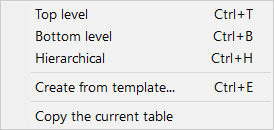
- Nowy BOM
- Otwiera podmenu.
 Uwaga: Zmienna systemowa BOMTEMPLATE określa ścieżkę do pliku z domyślnym szablonem BOM, który zostanie wykorzystany do utworzenia nowych tabel BOM.Uwaga: Jeśli zmienna systemowa BOMTEMPLATE jest pusta lub ścieżka jest nieprawidłowa, zostanie użyta poniższa domyślna konfiguracja BOM.
- Górny poziom: Tworzy nowy zestaw BOM tylko z komponentami najwyższego poziomu.
- Dolny poziom: Tworzy nową, tylko dolną listę komponentów.
- Hierarchiczny: Tworzy nowy hierarchiczny BOM, który zawiera wszystkie komponenty wraz z ich podkomponentami wymienionymi bezpośrednio poniżej.
- Utwórz z szablonu: Otwiera okno dialogowe umożliwiające wybranie pliku szablonu konfiguracji BOM.
- Kopiuje bieżącą tabelę: Dodaje nową tabelę BOM przy użyciu szablonu bieżącej tabeli.
- Tabele BOM w dokumencie
- Otwiera podmenu.
- Przejdź do pierwszej tabeli: Przełącza do pierwszej tabeli BOM w dokumencie.
- Przejdź do poprzedniej tabeli: Przełącza do poprzedniej tabeli BOM w dokumencie.
- Przejdź do następnej tabeli: Przełącza do następnej tabeli BOM w dokumencie.
- Przejdź do ostatniej tabeli: Przełącza do ostatniej tabeli BOM w dokumencie.
- <Nazwa BOM>: Przełącza do odpowiedniej tabeli BOM w dokumencie.
- Umieść tabelę BOM
- Rozpoczyna interaktywne umieszczanie tabeli na rysunku. Do dokumentu można wstawić wiele wystąpień tabeli BOM.
- Eksportuj do CSV
- Zapisuje zawartość bieżącej tabeli BOM do pliku CSV.
- Eksport do Excela
- Zapisuje zawartość bieżącej tabeli BOM do pliku XLSX.
- Zastąp z szablonu...
- Zastępuje bieżącą konfigurację BOM konfiguracją z szablonu.
- Zapisz jako szablon...
- Określa lokalizację pliku szablonu BOM.
- Zapisz jako szablon domyślny
- Określa lokalizację domyślnego pliku szablonu BOM, przechowywanego w zmiennej systemowej BOMTEMPLATE, który będzie używany do tworzenia nowych tabel BOM.
- Usuń bieżące BOM
- Usuwa bieżącą tabelę BOM z dokumentu.
- Usuń wszystkie listy BOM
- Usuwa wszystkie tabele BOM.
- Ustaw filtr
- Otwiera okno dialogowe Konfigurator filtra, które umożliwia określenie konfiguracji filtra. Więcej informacji można znaleźć w powiązanym artykule Okno dialogowe Konfigurator Filtra.
- Zbiór wskazań
- Otwiera podmenu.
- Cały model: Tabela BOM zostanie utworzona dla całego modelu.
- Podzespół: Tabela BOM zostanie utworzona dla wybranej instancji podzespołu.
- Widok rysunku: Tabela BOM zostanie utworzona dla części wybranych dla odpowiedniego widoku rysunku, niezależnie od ich widoczności w rzutni.
- Rzutnia układu: Tabela BOM zostanie utworzona dla wybranej rzutni układu.
- Wybór niestandardowy: Tabela BOM zostanie utworzona tylko dla wybranych części.
- Wyklucz bieżący dokument: tabela BOM nie będzie zawierać obiektów z bieżącego dokumentu.
- Pokaż wybór: Wyświetla bieżący wybór dla tabeli BOM.
- Dodatkowe dokumenty: tabela BOM będzie zawierać części z innych dokumentów.
- Dodaj rysunek lub zestaw arkuszy: tabela zestawienia komponentów będzie zawierać obiekty z wybranego rysunku lub zestawu arkuszy.
- Dodaj folder: Tabela BOM będzie zawierać obiekty z rysunków lub zestawów arkuszy, które znajdują się w folderze.Uwaga: Użytkownik może dołączyć tylko te dokumenty, które pasują do określonych symboli wieloznacznych, całego projektu BIM lub całego zestawu arkuszy.
- Edytuj: Umożliwia edycję zaznaczenia.
- Odśwież
- Aktualizuje bieżący BOM i listę wszystkich tabel BOM w rysunku.
- Aktualizuj wszystko
- Aktualizuje wszystkie tabele BOM.
- Wstaw kolumnę po
- Jeśli wybrano kolumnę: wstawia kolumnę z Selektora kolumn za wybraną kolumną w tabeli.
- Wstaw kolumnę wcześniej
- Wstawia kolumnę z Selektora kolumn przed wybraną kolumną.Uwaga: Jeśli nie zostanie wybrana żadna kolumna, nowa kolumna zostanie dodana po ostatniej kolumnie w tabeli.
- Wstaw kolumnę z formułą
- Otwiera edytor formuł, który umożliwia skonfigurowanie kolumny formuły (patrz artykuł Okno dialogoweKolumna formuły ).
- Wstaw kolumnę szablonu
- Otwiera edytor szablonów, który umożliwia skonfigurowanie kolumny szablonu (patrz artykuł Okno dialogoweKolumna szablonu ).
- Wstaw kolumnę wypełnianą przez użytkownika
- Wstawia kolumnę wypełnianą przez użytkownika, która może być używana w kolumnach formuł i szablonów.
- Edytuj szacowaną kolumnę
- Umożliwia edycję wybranej formuły lub kolumny szablonu.
- Wstaw kolumnę miniatur
- Jeśli wybrana jest kolumna: wstawia miniaturę kolumny z domyślnymi parametrami za wybraną kolumną w tabeli.
Jeśli nie wybrano żadnej kolumny: Nowa kolumna miniatur jest dodawana po ostatniej kolumnie w tabeli.
- Wyczyść nieużywane miniatury
- Usuwa bloki i załączniki z miniaturami, które nie są już używane.
- Usuń nieużywane miniatury z plikami
- Usuwa bloki, załączniki i pliki z miniaturami, które nie są już używane.
- Usuń kolumnę
- Usuwa bieżącą kolumnę z tabeli
- Przenieś kolumnę w lewo
- Przenosi wybraną kolumnę (kolumny) o jedną kolumnę w lewo.
- Przenieś kolumnę w prawo
- Przenosi wybraną kolumnę (kolumny) o jedną kolumnę w prawo.
- Zmień kolumnę na widoczną
- Wyświetla wybraną kolumnę w powiązanej tabeli na rysunku.
- Zmień kolumnę na niewidoczną
- Usuwa wybraną kolumnę z powiązanej tabeli. Niewidoczne kolumny pozostają widoczne w menedżerze BOM, ale są oznaczone ukośnym wzorem kreskowania w tle.
- Powiązana tabela
-
- Synchronizacja powiązanych tabel (Alt + Ctrl + R)
- Synchronizuje powiązane tabele.
- Stopka
- Otwiera podmenu dla każdej z wybranych kolumn.
- Brak stopki: Usuwa funkcję stopki.
- Suma: Wyświetla sumę w stopce.
- Wartość średnia: Wyświetla średnią wartość w stopce.
- Wartość minimalna:: Wyświetla minimalną wartość w stopce.
- Wartość maksymalna:: Wyświetla maksymalną wartość w stopce.
- Sortowanie
- Otwiera podmenu.
- Naturalna kolejność: Sortuj tabelę według naturalnej kolejności instancji komponentów w dokumencie.
- Kolejność automatyczna: Sortuje tabelę automatycznie.
- Kolejność niestandardowa: Sortuje wybrane kolumny w kolejności zdefiniowanej ręcznie przez użytkownika. Po ręcznym ułożeniu części ich numery są automatycznie regenerowane. Numery części podrzędnych są odpowiednio aktualizowane.
- Stała kolejność: Pozycje części w zestawieniu komponentów są zapamiętywane, a ich numery pozostają takie same po aktualizacji, niezależnie od dodanych lub usuniętych części.Uwaga: Gdy tryb sortowania zostanie zmieniony z powrotem na Automatyczny, Naturalny lub Niestandardowy, numery zostaną odtworzone automatycznie.
- Funkcja agregująca
- Otwiera podmenu.
- Brak funkcji: usuwa funkcję agregującą.
- Suma: wyświetla sumę wszystkich wartości w grupie.
- Średnia wartość: wyświetla średnią wszystkich wartości w grupie.
- Minimalna wartość: wyświetla minimalną ze wszystkich wartości w grupie.
- Wartość maksymalna: wyświetla maksymalną ze wszystkich wartości w grupie.
- Łączna liczba: Wyświetla całkowitą liczbę spotkań o tej samej wartości w grupach.
- Średnia liczba: Wyświetla średnią liczbę spotkań o tej samej wartości wśród grup.
- Minimalna liczba: Wyświetla minimalną liczbę spotkań o tej samej wartości wśród grup.
- Maksymalna liczba: Wyświetla maksymalną liczbę spotkań o tej samej wartości wśród grup.
- Najrzadziej występująca wartość: Wyświetla wartość z najmniejszą liczbą odpowiednich zliczeń. Jeśli istnieje więcej niż jedna wartość z minimalną liczbą, wyświetlane są wszystkie te wartości.
- Najczęściej występująca wartość: Wyświetla wartość z największą liczbą odpowiednich zliczeń. Jeśli istnieje więcej niż jedna wartość z maksymalną liczbą, wyświetlane są wszystkie te wartości.
- Konkatenacja: Wyświetla konkatenację wszystkich wartości w grupie w porządku rosnącym, oddzielonych określonym separatorem.
- Konkatenacja z liczbą: wyświetla konkatenację wszystkich wartości w grupie wraz z odpowiadającą im liczbą spotkań w kolejności rosnącej. Pary wartość i liczba są oddzielone określonym separatorem.
- Dodaj miniatury do nowych tabel
- Zmienia ustawienie dodawania kolumny miniatur do każdej nowej tabeli BOM.
- Wyświetl ostrzeżenia
- Kontroluje wyświetlanie komunikatów ostrzegawczych podczas tworzenia lub aktualizacji tabel BOM.
- Ustaw domyślny szablon
- Ustawia domyślny plik szablonu dla tabeli BOM.
Utwórz tabelę
- Górny poziom
- Tworzy nowy zestawienie komponentów najwyższego poziomu.
- Dolny poziom
- Tworzy nowy zestaw komponentów tylko na poziomie dolnym.
- Hierarchicznie
- Tworzy nowy Hierarchiczny BOM, który zawiera wszystkie komponenty z ich podkomponentami wymienionymi bezpośrednio poniżej.
- Utwórz z szablonu
- Otwiera okno dialogowe umożliwiające wybranie pliku szablonu tabeli BOM (*.BOM).

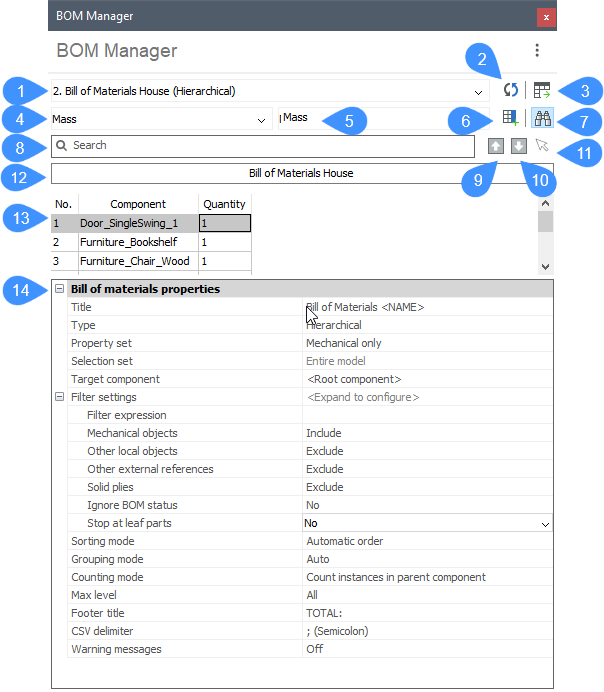
- Selektor BOM
- Odśwież
- Umieść tabelę BOM
- Selektor kategorii
- Selektor kolumn
- Wstaw kolumnę po
- Znadź
- Szukaj
- Znajdź wcześniejsze
- Znajdź następny
- Wybierz wszystkie znalezione
- Tytuł BOM
- Tabela BOM
- Właściwości zestawienia komponentów
- Selektor BOM
- Wybiera bieżącą tabelę BOM. Wybór zostanie zapisany na rysunku. Gdy rysunek zostanie zamknięty i ponownie otwarty, wybrana BOM zostanie przywrócona w menedżerze. Po wybraniu tabela jest aktualizowana zgodnie z bieżącym stanem rysunku.
- Odśwież
- Aktualizuje zarówno bieżącą tabelę BOM, jak i listę wszystkich tabel BOM w rysunku.
- Umieść tabelę BOM
- Rozpoczyna interaktywne umieszczanie tabeli na rysunku. Do dokumentu można wstawić wiele wystąpień tabeli BOM.
- Selektor kategorii
- Wybierz kategorię właściwości wyświetlanych w selektorze kolumn. Kategorię można dodać do bieżącego BOM, naciskając przycisk nr 9.
- Selektor kolumn
- Wybierz kolumnę, która ma zostać dodana do bieżącej listy BOM.
W tym miejscu można wpisać formułę dla pola formuły. Aby dodać formułę, wpisz wyrażenie zaczynające się od "=". Aby dodać wyrażenie szablonu typu "$", aby odwołać się do kolumn, użyj <> . Na przykład, aby odwołać się do kolumny Masa, należy wpisać: "=<Masa>".
Po dodaniu pola formuły i naciśnięciu przycisku nr 9 pojawi się okno dialogowe Formula column_1.
- Wstaw kolumnę po
- Jeśli wybrana jest kolumna, wstawi ona kolumnę z selektora kolumn po wybranej kolumnie w tabeli.
Jeśli nie wybrano żadnej kolumny, nowa kolumna zostanie wstawiona po ostatniej kolumnie w tabeli.
- Znadź
- Włącza lub wyłącza pole wyszukiwania. Po włączeniu tego przycisku przyciski nr. Pojawią się pozycje 11, 12, 13 i 14.
Po kliknięciu panelu Menadżer BOM można przełączyć pole wyszukiwania za pomocą kombinacji klawiszy CTRL+F.
- Szukaj
- Wpisz ciąg znaków do wyszukania i naciśnij Enter; obsługiwane są symbole wieloznaczne.
- Znajdź wcześniejsze
- Wybiera poprzednie dopasowanie w tabeli BOM.
Można również użyć Shift+F3.
- Znajdź następny
- Wybiera następne dopasowanie w tabeli BOM.
Można również użyć klawisza F3.
- Wybierz wszystkie znalezione
- Wybiera wszystkie elementy wyszukiwane w polu wyszukiwania.
- Tytuł BOM
- Wyświetla tytuł tabeli BOM. Zamiast <NAZWA> można wpisać dowolną nazwę. Naciśnij Enter, aby zapisać i zastosować zmian.
- Tabela BOM
- Wyświetla zawartość tabeli BOM.
Kliknięcie prawym przyciskiem myszy etykiety kolumny oferuje dodatkowe narzędzia.
- Dodaj kolumnę szablonu z wybranych: Otwiera edytor szablonów w celu skonfigurowania nowej kolumny szablonu. Wybrane kolumny zostaną automatycznie dodane do wyrażenia szablonu.
- Usuń: Usuwa kolumnę.
- Stopka: Otwiera podmenu.
- Brak stopki: Usuwa funkcję stopki.
- Suma: Wyświetla sumę w stopce.
- Wartość średnia: Wyświetla średnią wartość w stopce.
- Wartość minimalna:: Wyświetla minimalną wartość w stopce.
- Wartość maksymalna:: Wyświetla maksymalną wartość w stopce.
- Sortowanie: Otwiera podmenu.
- Kolejność automatyczna: Sortuje tabelę automatycznie.
- Naturalna kolejność: Sortuj tabelę według naturalnej kolejności instancji komponentów w dokumencie.
- Kolejność rosnąca: Sortuje wybrane kolumny w kolejności rosnącej.
- Kolejność malejąca: Sortuje wybrane kolumny w kolejności malejącej.
- Funkcja agregacji: Otwiera podmenu.
- Brak funkcji: usuwa funkcję agregującą.
- Suma: wyświetla sumę wszystkich wartości w grupie.
- Średnia wartość: wyświetla średnią wszystkich wartości w grupie.
- Minimalna wartość: wyświetla minimalną ze wszystkich wartości w grupie.
- Wartość maksymalna: wyświetla maksymalną ze wszystkich wartości w grupie.
- Konkatenacja: Wyświetla konkatenację wszystkich wartości w grupie w porządku rosnącym, oddzielonych określonym separatorem.
- Konkatenacja z liczbą: wyświetla konkatenację wszystkich wartości w grupie wraz z odpowiadającą im liczbą spotkań w kolejności rosnącej. Pary wartość i liczba są oddzielone określonym separatorem.
- Rola kolumny: Otwiera podmenu.
- Liczba: Kolumna będzie używana jako źródło liczb przez polecenie BMBALONY.
- Nazwa: kolumna jest używana jako źródło nazw przez polecenie BMBALONY.
- Ilość: Kolumna będzie używana jako źródło ilości przez polecenie BMBALONY.
- Regularny: Kolumna nie będzie pełnić żadnej konkretnej roli.
- Format: Otwiera okno dialogowe Format, które umożliwia określenie formatu dla wybranych kolumn. Więcej informacji można znaleźć w powiązanym artykule Formatowanie okna dialogowego.
- Ustaw filtr kolumn: Otwiera okno dialogowe Filtr kolumn, w którym można skonfigurować filtr kolumn. Więcej informacji można znaleźć w powiązanym artykule Okno dialogowe Filtr kolumn.
- Uczyń kolumnę widoczną: Pokazuje wybraną kolumnę w powiązanej tabeli na rysunku.
- Uczyń kolumnę niewidoczną: Usuwa wybraną kolumnę z powiązanej tabeli. Niewidoczne kolumny pozostają widoczne w menedżerze BOM, ale są oznaczone ukośnym wzorem kreskowania w tle.
- Dopasuj kolumny: Dopasowuje szerokość wybranych kolumn do ich zawartości.
- Dopasuj wszystkie kolumny: Dopasowuje szerokość wszystkich kolumn do ich zawartości. Uwaga: Szerokość kolumny automatycznie dopasowuje się do zawartości, chyba że szerokość została zmieniona ręcznie.
- Właściwości zestawienia komponentów
- Wyświetla BOM i właściwości kolumn. Właściwości kolumn pojawią się po wstawieniu kolumny do tabeli BOM.
Dodaj miniatury do nowych tabel
Zmienia ustawienie dodawania kolumny miniatur do każdej nowej tabeli BOM.
Szerokość i wysokość miniatur można ustawić w sekcji Rozmiar miniatur.

