Wizard Page dialog box
The Wizard Page dialog box guides you to export entity properties, block attributes, and drawing information to a table or to an external data file.
Wizard Page 1 Dialog Box
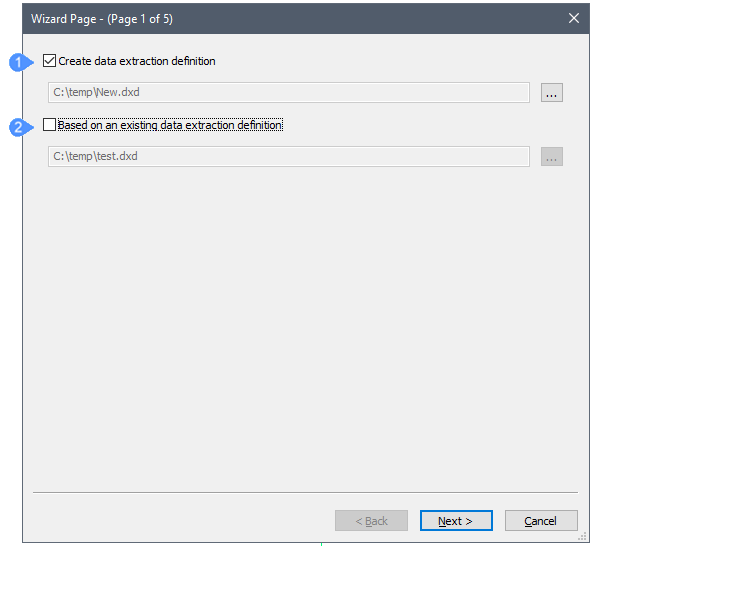
- Create data extraction definition
- Based on an existing data extraction definition
- Create data extraction definition
-
Creates a new .dxd (Data eXtraction Definition) file:
- Tick the checkbox.
- Click Browse.
- Select a folder in the Save Data Extraction file dialog box.
- Enter a name in the File name field.
- Click Save.
- Based on an existing data extraction definition
-
Uses an existing .dxd file as the template for the new one to perform the same type of extraction in a different drawing, or to edit the data extraction definition:
- Tick the checkbox.
- Click Browse.
- In the Open Data Extraction Definition file dialog box, select a .dxd file.
- Click Open.
Newly created custom *.dxd files can be used to create schedules in the Project Browser.
.dxd files can be edited in a text editor such as MS Notepad.
Click Next for the next page.
Wizard Page 2 Dialog Box
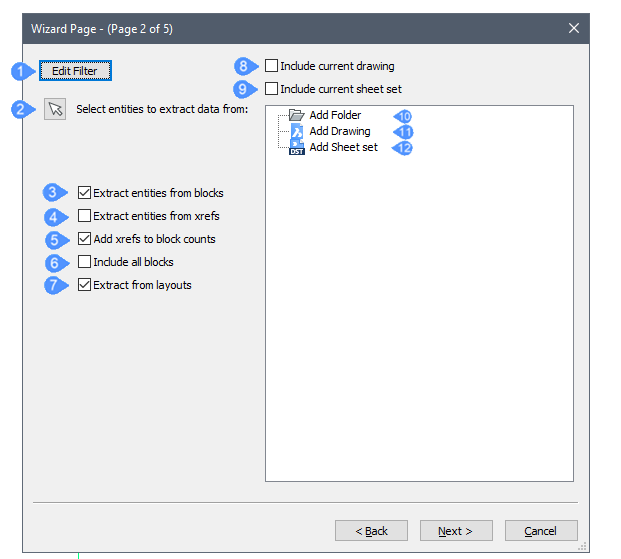
- Edit filter
- Select entities to extract data from
- Extract entities from blocks
- Extract entities from Xrefs
- Add Xrefs to block counts
- Include all blocks
- Extract from layouts
- Include current drawing
- Include current sheet set
- Add Folder
- Add Drawing
- Add Sheet Set
Guides you to select entities for Data Extraction and apply filters for them before it is extracted in order to have less information to sort later.
The DXEVAL system variable controls when the update notification occurs in the drawings where changes affect the extracted data.
- Edit filter
- Creates or edits a Filter.
- Select entities to extract data from
- Dismisses the dialog box temporarily so you can select entities in the drawing. Enter Ctrl+A to select all entities in the drawing. Press Enter or right-click to stop selecting entities.
- Extract entities from blocks
- Includes entities nested in blocks.
- Extract entities from Xrefs
- Includes entities in externally referenced drawings (Xref files).
- Add Xrefs to block counts
- Counts selected Xrefs as blocks.
- Include all blocks
- Includes all block entities.
- Extract from layouts
- Includes entities from paper space of the drawing.
- Include current drawing
- Adds the current drawing from which to extract data.
- Include current sheet set
- Adds the current sheet set from which to extract data.
- Add Folder
-
Adds a folder with the drawing from which to extract data.
Double-click to open the Folder Options dialog box.
- Folder: click Browse, then select a folder in Choose a Folder dialog box.
- Options
- Include subfolders: tick the checkbox to include subfolders.
- Use a wildcard to filter drawings to be included: tick the checkbox, then type a text string in the filter field. For example, House*.dwg includes all files starting with 'House'.
- Add Drawing
- Adds a drawing from which to extract data with a double click.
- Add Sheet Set
-
Adds a sheet set from which to extract data with a double click.
Click Next for the next page.
Wizard Page 3 Dialog Box
- Entities
- Select All
- Select Blocks
- Move Selected Up
- Move Selected Down
Controls which entity types are included or not in the data extraction procedure.
Select multiple items:
- To select more than one item in a row: select an item, then hold down the Shift key while clicking additional items.
- To select multiple items, hold the Ctrl key while selecting multiple entities.
- To deselect items, click them again while holding the Ctrl key.
To sort the list, click the title in the column heading. Click again to sort in reverse order.
- Entities
-
- Entity: lists the entity types and blocks in the selection, according to the options set in the Data Extraction dialog box.
- Name: entity names. Accept the default names or type a customized name. The entity type name displays in the default Name field in the data extraction export.
- Type: reports the type of the selected entity: Non-Block, Block or Block with attributes.
- Select All
- Selects all items for data extraction.
- Select Blocks
- Selects only blocks in the list, because they usually contain attributes.
- Move Selected Up
- Move the selected item(s) up the list.
- Move Selected Down
- Move the selected item(s) down the list.
Click Next for the next page.
Wizard Page 4 Dialog Box
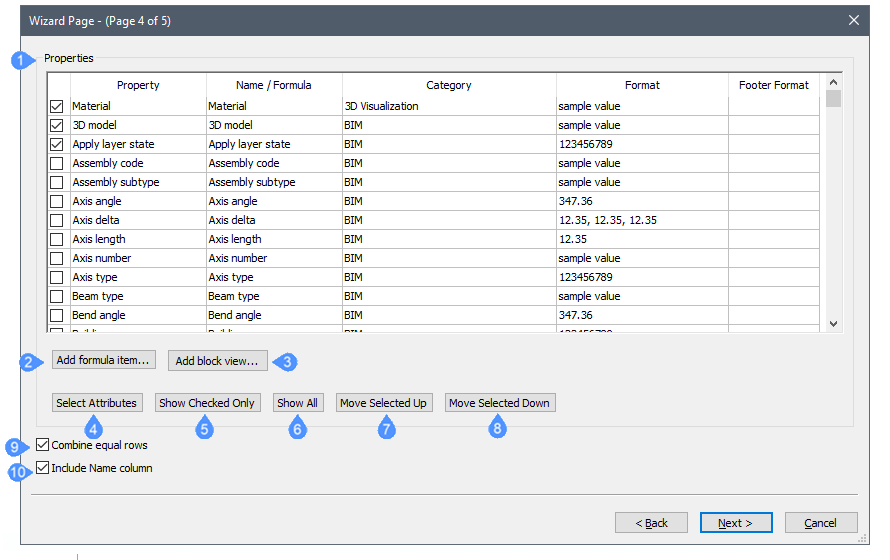
- Properties
- Add formula item
- Add block view
- Select Attributes
- Show checked only
- Show All
- Move Selected Up
- Move Selected Down
- Combine equal rows
- Include Name column
Select the properties to be included in the data extraction file: tick the checkbox to check/uncheck a property. Use the same techniques to select more than one item as described in Wizard Page 3 Dialog Box.
To sort the list, click the title in the column heading. Click again to sort in reverse order.
- Properties
-
- Property: lists all properties of the selected entities.
- Name /Formula: lists the name of the selected entities or the formula. Accept the default names or type a customized name. The property names display in the column headings in the data extraction export.
- Category: reports the category of the selected entities.
- Format: formats the item in the export file. Click to display the dialog box. The layout of the dialog box depends on the selected item, just like the Format section of the Field dialog box.
- Footer Format: selects from the drop-down list opened with right mouse button the Footer settings:
- Add formula item
- Adds a formula item.
- Add block view
- Adds BlockViewProperty as Block view category.
- Select Attributes
- Select only items that contain attributes.
- Show checked only
- Show only selected items, hiding the ones that are not selected.
- Show All
- Shows all items.
- Move Selected Up
- Move the selected item(s) up the list.
- Move Selected Down
- Move the selected item(s) down the list.
- Combine equal rows
- Combine rows that contain the same entities.
- Include Name column
- Toggles the display of the Name column in the exported data.
Click Next for the next page.
Wizard Page 5 Dialog Box
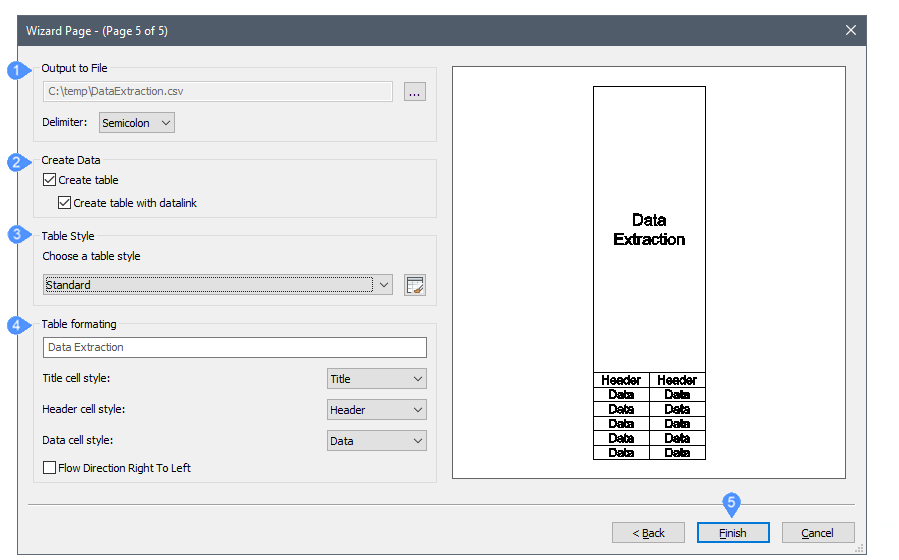
- Output to File
- Create Data
- Table Style
- Table formatting
- Finish
- Output to File
-
Exports the data in a delimiter separated format (.csv):
Click Browse, enter a name for the data file, and then click Save. If you select an existing .csv file, you will be prompted to overwrite it.
Delimiter: specifies the separator between fields of data:- Semicolon
- CommaNote: Multiply composition names contain a comma, therefore do not select comma as the delimiter character in case multiply compositions are processed.
- Space
- Tab
- Create Data
-
Exports the data in a Table:
- Create table: creates a static table.
- Create table with datalink: creates a dynamic table. Executing the DataLinkUpdate command synchronizes the data in the table with the model. Save the model first. You will be prompted to save the *.dxd definition file with the table.
- Table Style
-
Select a table style from the drop-down list.
Click the Table Style icon; edit an existing table style or create a new one.
- Table formatting
-
Type a title in the Title field.
- Title cell style: sets the title cell style.
- Header cell style: sets the Header cell style.
- Data cell style: sets the Data cell style.
- Flow Direction Right to Left: indicates the flow direction from right to left.
- Finish
-
Depending on the selected output:
- Extracts the data and saves them to the .csv file. The file can be opened in a spreadsheet or database program.
- Prompts you to specify an insertion point for the table(s).