


Wstawianie i edycja okien i drzwi
Informacje

Aby uzyskać więcej informacji, zapoznaj się z artykułami Dokumentacja poleceń BMWSTAW i -BMWSTAW.
Polecenie -BMWSTAW jest uruchamiane automatycznie po przeciągnięciu komponentu z panelu Biblioteki do modelu 3D.
Komponenty można wstawiać na rzucie, takie jak okna i drzwi, lub dodawać i przycinać ściany z widoku prostokątnego 2D, a także widoku 3D.
Wstawianie okna (lub drzwi)
-
Otwórz panel Biblioteka.
-
Upewnij się, że biblioteka Bricsys Bim jest wybrana w menu Biblioteka.
-
Kliknij folder Windows.
-
Kliknij ikonę okna, które chcesz wstawić.
Zostanie wyświetlony panel Właściwości.
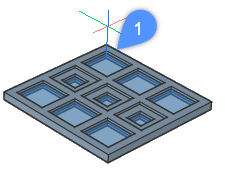
Okno jest dołączone do kursora (1).
-
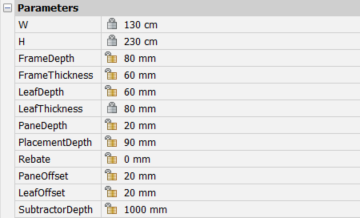
(Opcjonalnie) W obszarze Właściwości Wstawionego Komponentu edytuj parametry okna w panelu Właściwości.
-
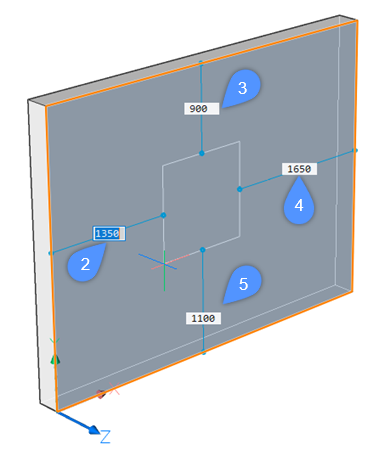
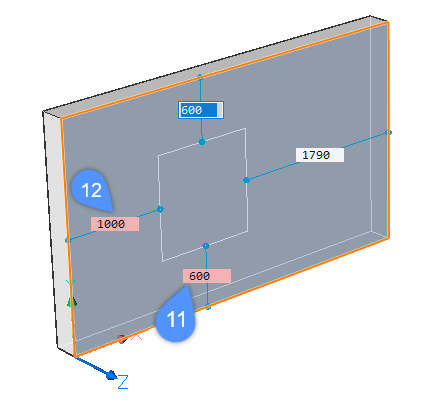
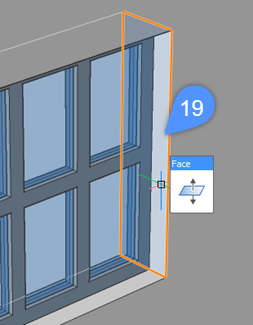
Przesuń okno nad licem bryły ściany.
Wyświetlane są podświetlenia powierzchni bryły i odległości od płytki do najbliższych równoległych krawędzi bryły macierzystej (2, 3, 4, 5):
-
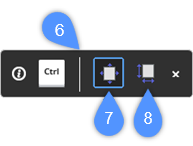
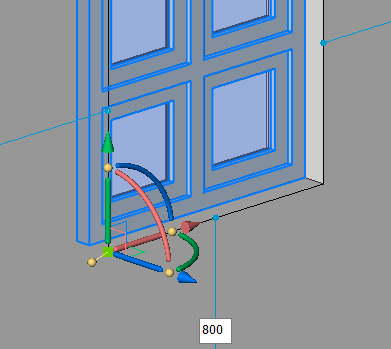
(Opcjonalnie) Naciśnij klawisz Ctrl, aby przełączyć się z trybu wyboru pozycji (7) do trybu Zmiany parametrów (8) w widżecie Asystent skrótów klawiszowych (6) i dostosuj szerokość i wysokość okna.
Naciśnij klawisz Tab, aby przełączać się między polami szerokości (9) i wysokości (10).
Naciśnij klawisz Ctrl, aby potwierdzić wymiary. Spowoduje to przełączenie trybu widżetu z powrotem do Wybierz pozycje.
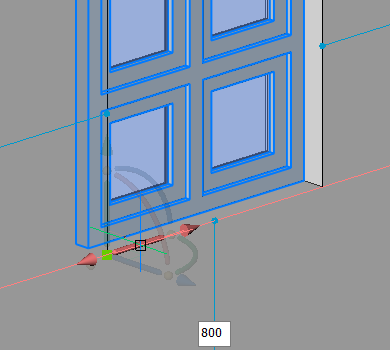
- Wykonaj jedną z następujących czynności:
-
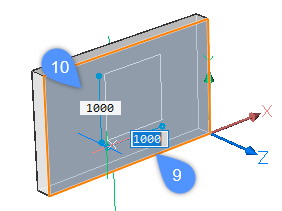
Określ punkt, w którym chcesz wstawić okno.
-
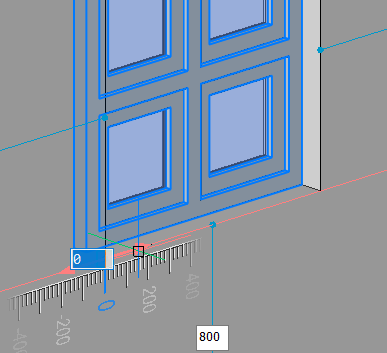
Wpisz wartość w żądanym polu wymiaru dynamicznego i naciśnij klawisz Tab, aby przejść do następnego pola. Pole wymiaru zmieni kolor na czerwony, wskazując, że jest zablokowane (11, 12).
Naciśnij Enter, aby wstawić okno.
-
-
(Opcjonalnie) Wybierz okno, aby dostosować jego położenie na ścianie. Zobacz sekcję Przenoszenie wstawienia.
Wstawianie kopii wkładki
-
Najedź kursorem na wstawkę i wybierz opcję Wstaw BIM na karcie Modyfikuj w oknie Quad.
Wstawka jest dołączona do kursora.
-
Przejdź od kroku 6 w poprzedniej procedurze.
Edycja parametrów wkładki
Parametry zdefiniowane na rysunku źródłowym okna lub drzwi pozwalają na osobną edycję każdego detalu okna/drzwi.
-
Wybierz wstawkę na rysunku. Bieżące wartości różnych parametrów są wyświetlane w sekcji Parametry panelu Właściwości.
-
Wybierz parametr i wpisz wartość w polu ustawień.
Przenoszenie insertu
- Korzystanie z pól odległości i punktów odniesienia wymiarów wyboru.
- Za pomocą polecenia MBWCIŚNIJWYCIĄGNIJ.
- Korzystanie z Manipulatora.
- Wykorzystywanie pól odległości i punktów odniesienia wymiarów wyboru
-
-
Wybierz wkładkę w modelu.
Wyświetlane są odległości od płytki do najbliższych równoległych krawędzi bryły macierzystej, a także ich odpowiednie punkty odniesienia (13, 14, 15, 16):
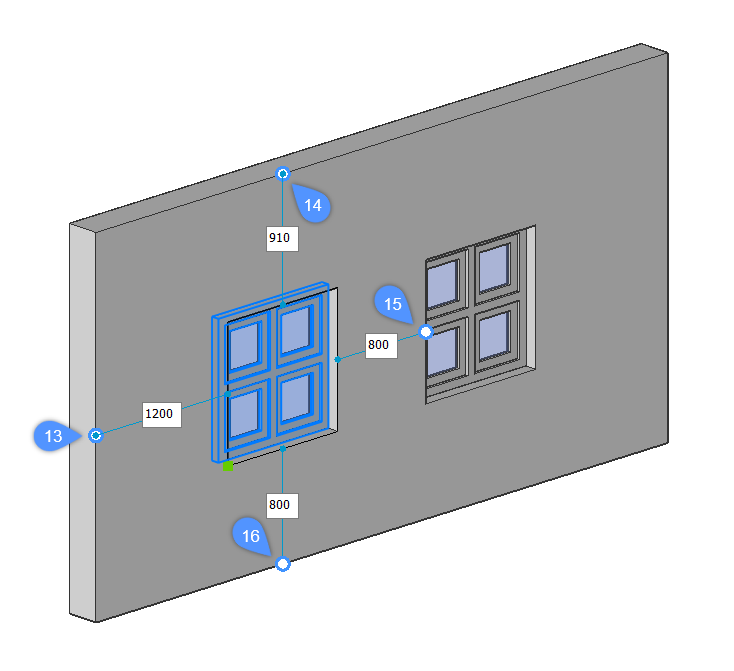
- (Opcjonalnie) Aby wyświetlić odległość od wstawki do innych punktów niż te wykryte automatycznie, przesuń położenie punktów odniesienia zgodnie z potrzebami (17).

- Kliknij pole odległości, wpisz wartość i naciśnij Enter.
-
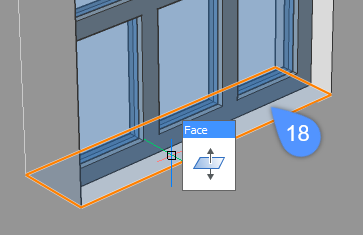
- Korzystanie z polecenia MBWCIŚNIJWYCIĄGNIJ
-
Uwaga: Włącz opcję Wybierz powierzchnie dla zmiennej systemowej SELECTIONMODE.
-
-
Wykonaj jedną z następujących czynności:
- Aby przesunąć wkładkę w pionie: najedź kursorem na górną lub dolną wewnętrzną powierzchnię otworu (14)
- Aby przesunąć wkładkę w poziomie: najedź kursorem na lewą lub prawą wewnętrzną powierzchnię otworu (15)
-
Gdy twarz zostanie podświetlona, wybierz opcję Wciśnij/Wyciągnij z zakładki Modyfikuj w oknie Quad.
-
Płytka porusza się pionowo, jeśli podświetlona jest górna lub dolna powierzchnia wewnętrzna.
Płytka przesuwa się poziomo, jeśli podświetlona jest lewa lub prawa ściana wewnętrzna.
-
Wykonaj jedną z następujących czynności:
- Określ punkt.
- Wpisz odległość w polu wymiaru dynamicznego.
- Użyj Adaptacyjny Skok Siatki linijki.
-
- Korzystanie z manipulatora
-
Uwaga: Ustaw wartość zmiennej systemowej MANIPULATOR na 2.
-
- Wybierz wkładkę przytrzymując nieco dłużej lewy przycisk myszy.
Zostanie wyświetlony Manipulator.
-
Najedź na strefę wyzwalania osi pionowej lub poziomej Manipulatora.
Oś zostaje podświetlona, a reszta Manipulatora gaśnie.
-
Kliknij, aby rozpocząć operację przenoszenia.
Wyświetli się linijka.
-
Wykonaj jedną z następujących czynności:
- Wpisz odległość w polu wymiaru dynamicznego.
- Użyj Adaptacyjny Skok Siatki linijki.
Uwaga: Przytrzymaj klawisz Ctrl przed rozpoczęciem operacji, aby utworzyć kopię wstawki.
- Wybierz wkładkę przytrzymując nieco dłużej lewy przycisk myszy.
Wymiana wkładki
Użyj polecenia BMZAMIEŃ aby zastąpić korek.
Polecenie umożliwia zamianę:
- Wstaw z pliku.
Plik źródłowy można wybrać w oknie dialogowym.
- Podobna wkładka w modelu.
Polecenie wyświetla monit o zastąpienie tylko wybranej wstawki lub wszystkich podobnych wstawek w całym modelu. Opcja Zmiany parametrów umożliwia zachowanie oryginalnych wartości lub zastosowanie wartości wstawki zastępczej.