Configure Structure Tree dialog box
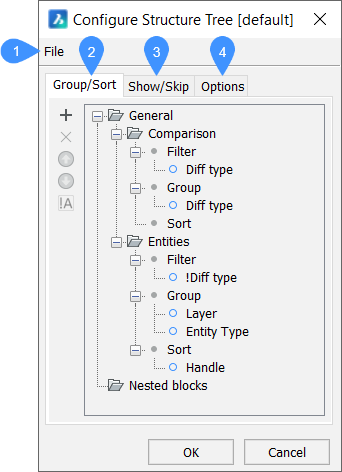
The Configure Structure Tree dialog box allows you to define the Structure Tree Configuration of the Structure panel. Click on the top bar of the Structure panel to open it.

- File
- Group/Sort tab
- Show/Skip tab
- Options tab
File
- Open...: opens the Select Structure Tree Configuration File dialog box to select another CST configuration file.
- Save: saves the current configuration.
- Save As...: saves the current configuration under a different name.
Group/Sort Tab

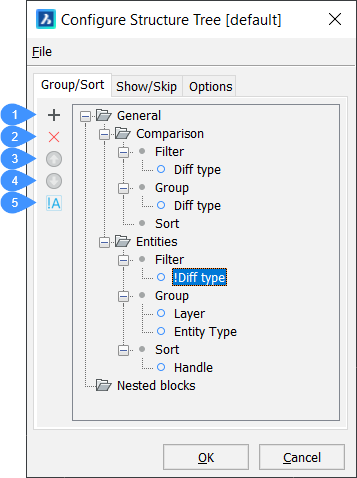
- Add rule or property
- Delete rule or property
- Move property up
- Move property down
- Toggle negation (filter properties only)
- Add rule or property (
 )
) -
Adds a new rule or a new property for Filter, Group, or Sort.
Note: The position of the rules and properties is essential, as the rule structure is hierarchical.-
Select an existing rule, then click the Add icon (
 ) or right-click and choose Add Rule in the context menu.
The new rule is added below the selected rule (or at the end of the rule hierarchy when no rule is selected).
Note: To rename the rule, select it and click on it's name or right-click and choose Rename in the context menu. -
Select the Filter node of the rule, then click the Add icon or right click and choose Add filter property in the context menu.
-
Select the Group node of the rule, then click the Add icon or right-click and choose Add grouping property in the context menu.
-
Select the Sort node of the rule, then click the Add icon or right-click and choose Add sorting property in the context menu.
The Select Property dialog box displays to let you choose a property for filtering, grouping, or sorting.
-
Select a property, then double-click or click OK.
Note: Properties and value definitions that are defined with the BIMPROPERTIES command can be selected to configure the structure tree. -
Optionally, type a search string in the Search field, then click the Find previous (Shift+F3) (
 ) or Find next (F3) (
 ) arrow buttons to look up the properties containing the search string.
 -
Repeat the previous step to add more filter / grouping / sorting properties.
-
- Delete rule or property (
 )
) - Deletes the selected rule or property. You can also use the Delete rule/Delete property option from the context menu of the selected rule/property.
- Move property up (
 )
) - Moves up the selected rule or property.
- Move property down (
 )
) - Moves down the selected rule or property.
- Toggle negation (filter properties only)
- Toggles negation only for filter properties.
Show/Skip Tab

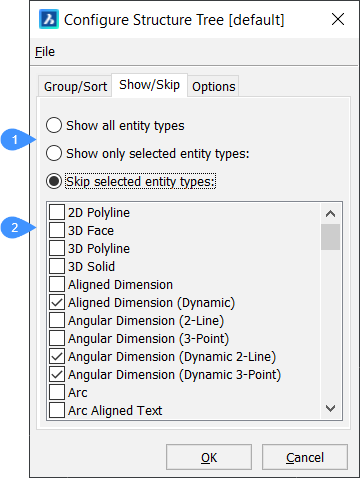
- Show/skip options
- Selection list
- Show/skip options
- Specifies whether selected entities should be shown or not.
- Selection list
- Allows you to create a selection of entity types to show or exclude.
Options Tab

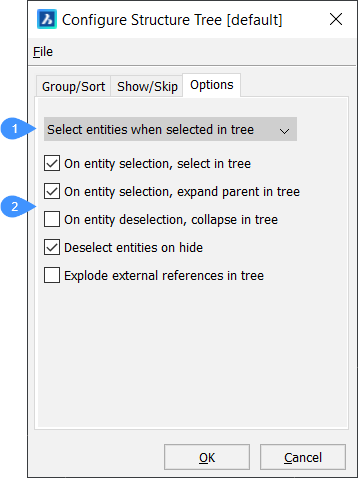
- Selection options
- Additional options
- Selection options
-
Defines what happens in the model when entities are selected in the structure tree. Several options are available:
- Ignore tree selection: Entities are not selected in the drawing.
- Highlight entities when selected in tree: Entities in the drawing are highlighted, but not selected.
- Select entities when selected in tree: Matching entities are selected in the drawing.
- Additional options
-
Defines what happens in the structure tree when an entity is selected/deselected in the model.

