QLeader Settings dialog box
Opens via: QLEADER command
The Qleader Settings dialog box allows you to specify the properties of leaders.
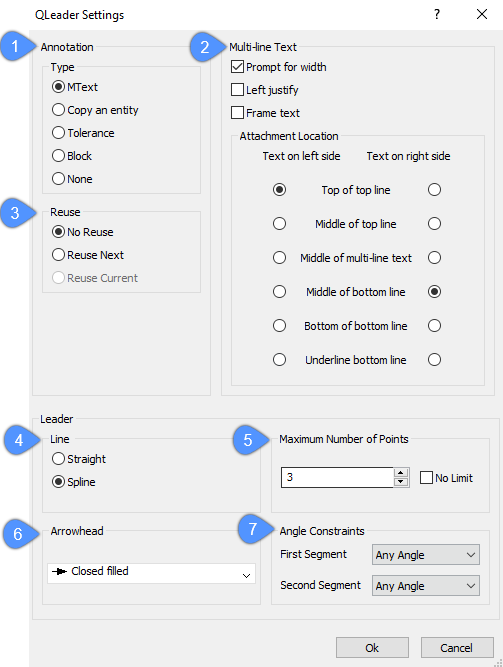
- Annotation
- Multi-line Text
- Reuse
- Leader Line
- Maximum Number of Points
- Arrowhead
- Angle Constraints
Annotation
Specifies the type of annotation:
-
Mtext: Text is placed as the leader line's annotation; a leader can have one or more lines of text.Note: Although the mtext editor does not appear when entering text (as with the MLeader command), the mtext editor does appear when editing the annotation (edit the text by double-clicking it).
-
Copy of an entity: Uses any other entity (than the leader itself) in the drawing as the annotation.
-
Tolerance: Uses tolerance notation for the annotation; displays the Geometric Tolerance dialog box. See the TOLERANCE command.
- Block: Uses a block from the drawing or an external block as the annotation. The prompt displayed is identical to that of the -INSERT command.
- None: No annotation is used.
Multi-line Text
Note: This option is only available when the annotation type is MText.
Specifies some multi-line text options:
- Prompt for width: Toggles the use of the 'Specify text width' prompt:
- On: Displays the 'Specify text width' prompt and so wraps the text to the specified width.
- Off: Disables the prompt.
- Left justify: Determines the justification of the text:
- On: Forces the text to be left-justified always.
- Off: The text is left or right-justified, depending on the orientation of the landing line.
- Frame text: Toggles the use of a frame:
- On: Places a rectangle around the text.
- Off: No frame.
- Attachment location: Determines the relative location of where the mtext is attached to the landing line.
Reuse
Specifies how to reuse the annotation:
- No reuse: Does not reuse the previous annotation text; you will be prompted to enter new text each time you use this command.
- Reuse next: You will be prompted to enter new text, which is then reused for subsequent leader(s).
- Reuse current: The current text is reused for each new leader, and you will not be prompted to enter new text.
Leader Line
Specifies the style of leader line:
-
Straight: Draws the leader lines as straight segments.
-
Spline: Draws the leader line as a smooth continuous spline.
Maximum Number of Points
Specifies the maximum number of vertices for the leader, before it stops drawing them automatically:
- Enter a number; the minimum number is 2.
- No limit: Keeps drawing leader segments until you press Enter at the 'To point' prompt.
Arrowhead
Specifies the type of arrow at the start of the leader; choose from the drop-down list:
- Choose an arrowhead type.
- None: No arrow is drawn.
- Select arrow: Choose a block from those in the current drawing; displays the Select Custom Arrow Block dialog box. See the related article Select Custom Arrow Block dialog box.
To create a custom arrow, draw it to your liking, and then use the BLOCK command to turn it into a block.
Angle Constraints
Set an angle to constrain the first and second leader segments. The angles are increments; for instance, choose 15 allows you to draw the leader at 0, 15, 30, 45, and so on degrees.
Click the drop-down list, then choose an option:
- Any Angle: No constraint; hold down the Shift key to draw the leader at 90 degrees.
- Horizontal: Forces the leader line to be drawn at 90 degrees only.
- 90°: Draws leader lines at 90-degree increments.
- 45°: Draws leader lines at 45-degree increments.
- 30°: Draws leader lines at 30-degree increments.
- 15°: Draws leader lines at 15-degree increments.