BIM Przekroje
Pliki źródłowe
- _SectionSettings.dwg: zawiera wszystkie typy objaśnień przekrojów.
Plik znajduje się w tym folderze:
C:\Users\%username%\AppData\Roaming\Bricsys\BricsCAD\V25x64\en_US\Support\Bim\Sections
Definiowanie przekroju
Narzędzie Definiuj Przekrój na stronie BricsCAD® BIM umożliwia tworzenie jednostek przekrojów BIM. BIM Przekrój umożliwia podział modelu BIM na płaszczyzny i wyświetlenie szczegółów wnętrza.

Więcej informacji na temat tego polecenia można znaleźć w artykule Polecenie BIMPRZEKRÓJ.
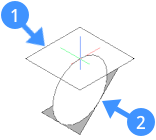
Płaszczyzna przekroju (1) leży w płaszczyźnie XY bieżącego układu współrzędnych (GUW lub LUW). Kierunek widoku (2) to ujemny kierunek bieżącego układu współrzędnych.
- Jeśli opcja Dynamiczny LUW (DLUW) ma wartość WŁ, płaszczyzna przekroju zostanie wyrównana do powierzchni bryły 3D znajdującej się pod kursorem. Naciśnij przycisk TAB, aby wybrać zasłoniętą powierzchnie.
- Naciśnij przycisk Shift, aby zablokować podświetloną płaszczyznę. Pozwala to na określenie punktu definicji dla jednostki przekroju BIM poza licem bryły.
- Linia przekroju jest równoległa do osi X układu współrzędnych (GUW, LUW lub DLUW).
Ogólna procedura tworzenia BIM Przekrój
- Wybierz Definiuj Przekrój w zakładce Model w oknie Brak Selekcji Quad.
Zostanie wyświetlony monit: Wybierz punkt do umieszczenia przekroju lub [Detal/Wnętrze/Skala/Odwrócony Strop]:
- Wykonaj jedną z następujących czynności:
- Kliknij punkt w dowolnym miejscu poza modelem, aby utworzyć przekrój planu.
- Umieść kursor nad powierzchnią bryły 3D, równolegle do płaszczyzny przekroju, którą chcesz utworzyć.
Funkcja śledzenia przekroju wyrównuje się do powierzchni pod kursorem, pod warunkiem, że aktywna jest funkcja DLUW. lewy przycisk myszy.
- (Opcjonalnie) Naciśnij przycisk Shift, aby zablokować podświetloną powierzchnie. Umożliwia to rozpoczęcie pracy od punktu znajdującego się poza wybraną bryłą 3D. Następnie kliknij lewym przyciskiem myszy.
- Początkowa płaszczyzna przekroju jest wyświetlana dynamicznie, a model 3D jest odpowiednio przycinany.
Zostanie wyświetlony monit: Określ odległość lub [Włącz obcinanie/Wyłącz obcinanie]:
Wykonaj jedną z następujących czynności:- Wprowadź wartość w polu wymiaru dynamicznego, aby przesunąć przekrój względem pozycji początkowej.
- Kliknij lewym przyciskiem myszy, gdy płaszczyzna przekroju znajdzie się w wybranym miejscu.
Obiet BIM Przekrój jest zdefiniowany.
Typ przekroju zależy od kierunku płaszczyzny przekroju (poziomej lub pionowej) i tego, czy przecina się ona z modelem.
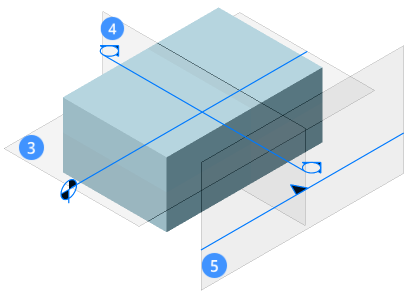
Plan (3) Wyświetla płaszczyznę przekroju poziomego. Przekrój (4) Wyświetla przekrój pionowy przecinający model. Elewacja (5) Wyświetla widok elewacji zewnętrznej.
Tworzenie przekroju planu
- Wybierz Definiuj Przekrój w zakładce Model w oknie Brak Selekcji Quad.
Zostanie wyświetlony monit: Wybierz punkt do umieszczenia przekroju lub [Detal/Wnętrze/Skala/Odwrócony Strop]:
- Umieść narzędzie do śledzenia przekrojów w pobliżu modelu 3D i kliknij przycisk (6).
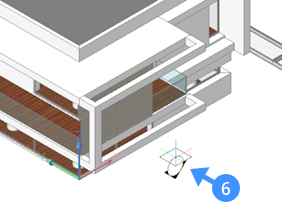
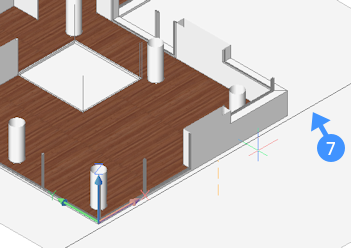
Początkowa płaszczyzna przekroju leży w płaszczyźnie XY (Z = 0) bieżącego układu współrzędnych (np. GUW).
Początkowa płaszczyzna przekroju jest wyświetlana dynamicznie, a model 3D jest odpowiednio przycinany.
Zostanie wyświetlony monit: Określ odległość lub [Włącz obcinanie/Wyłącz obcinanie]:
- Jeśli opcja Wymiar dynamiczny jest WŁ, bieżąca odległość jest wyświetlana w polu wymiaru dynamicznego.Wykonaj jedną z następujących czynności:
- Przesuń kursor i kliknij, gdy płaszczyzna przekroju znajdzie się na żądanej wysokości.
- Użyj przyciągania do obiektów, aby określić punkt.
- Wpisz wartość, aby zdefiniować przesunięcie od początkowej pozycji płaszczyzny przekroju.
Przekrój planu jest zdefiniowany.
Tworzenie przekroju poprzecznego
- Wybierz Definiuj Przekrój w zakładce Model w oknie Brak Selekcji Quad.
Zostanie wyświetlony monit: Wybierz punkt do umieszczenia przekroju lub [Detal/Wnętrze/Skala/Odwrócony Strop]:
- Umieść tracker przekroju nad bryłą 3D (8) równoległą do przekroju, który ma zostać zdefiniowany.
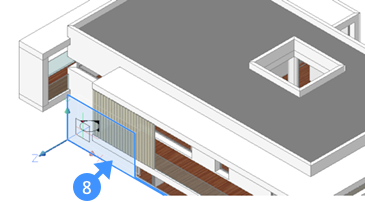
- Kliknij, gdy powierzchnia zostanie podświetlona i przesuń narzędzie do śledzenia przekroju wewnątrz modelu 3D.
Płaszczyzna przekroju jest wyświetlana dynamicznie, a model 3D jest odpowiednio przycinany (9).
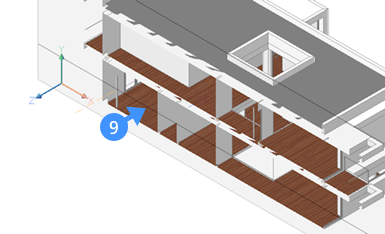
Zostanie wyświetlony monit: Określ odległość lub [Włącz obcinanie/Wyłącz obcinanie]:
Jeśli opcja Wymiar dynamiczny jest WŁ, bieżąca odległość jest wyświetlana w polu wymiaru dynamicznego.
- Kliknij, gdy płaszczyzna przekroju znajdzie się w żądanym miejscu lub określ odległość.
Przekrój jest zdefiniowany.
- (Opcjonalnie) Kliknij jednostkę sekcji i przytrzymaj lewy przycisk myszy nieco dłużej, aby wyświetlić Manipulator. Przeciągnij oś manipulatora, aby przesunąć przekrój.
- (Opcjonalnie) Kliknij grot strzałki, aby odwrócić kierunek widoku.
Tworzenie elewacji
- Wybierz Definiuj Przekrój w zakładce Model w oknie Brak Selekcji Quad.
Zostanie wyświetlony monit: Wybierz punkt do umieszczenia przekroju lub [Detal/Wnętrze/Skala/Odwrócony Strop]:
- Umieść śledzenie przekroju nad bryłą 3D (8) równoległą do przekroju, który ma zostać zdefiniowany.
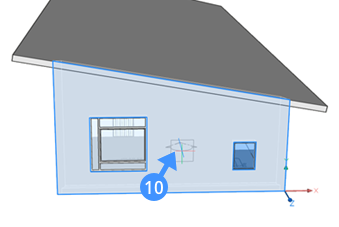
- Zostanie wyświetlony monit: Określ odległość lub [Włącz obcinanie/Wyłącz obcinanie]:
Przesuń narzędzie do śledzenia przekrojów poza model 3D i kliknij, aby zdefiniować elewację (11).
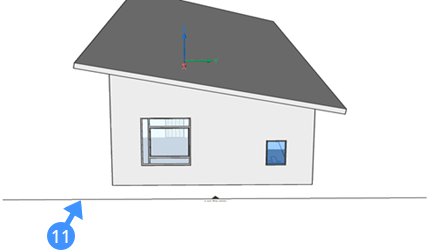
Przekroje pionowe poza modelem (geometria nie jest podzielona na przekroje) automatycznie otrzymują typ Przekroju Elewacji.
Edytowanie domyślnych właściwości BIM Przekrój
Domyślne właściwości jednostki BIM Przekrój są kopiowane z obiektu przekroju w pliku _SectionSettings.dwg w podfolderze BIM/Sections w folderze Support.
- Wybierz przekrój BIM na rysunku lub w panelu Struktury.
Właściwości przekroju są wyświetlane w panelu Właściwości.
- Zdefiniuj właściwości obiektu przekroju BIM.
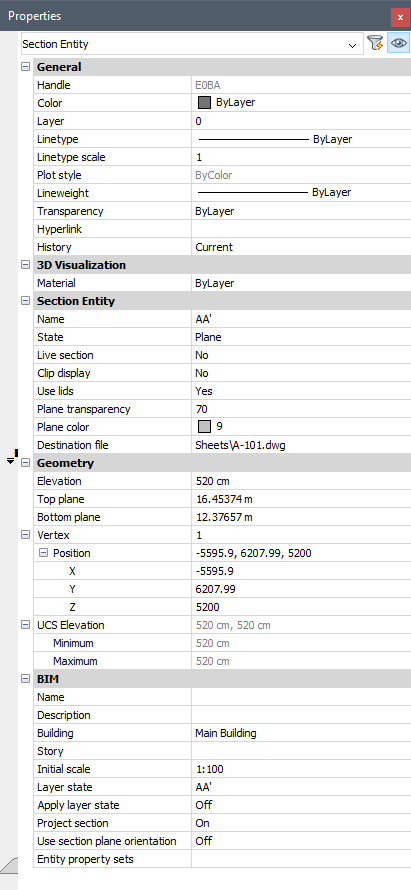
Obiekt Przekroju:
Nazwa Wpisz nazwę. Status Kliknij pole i wybierz stan. Wybrany stan określa sposób przycięcia wyniku przekroju.
Dostępne opcje to: Płaszczyzna (domyślnie), Granica i Objętość.
Przekrój dynamiczny Ustawia właściwość przekrój dynamiczny płaszczyzny przekroju. Tylko jedna jednostka sekcji może mieć właściwość Przekrój dynamiczny Wł.
Zamiast tego zaleca się użycie właściwości Przytnij widok .
Tryb ten służy wyłącznie do kontroli wizualnej, a nie do modelowania 3D.
Przytnij widok Przycina model 3D.
Stan wyświetlacza Przytnij można ustawić dla wielu jednostek sekcji jednocześnie. W przeciwieństwie do Przekroju Dynamicznego, punkty charakterystyczne są dostępne w płaszczyźnie przekroju.
Użyj pokrywy Zamyka górne ściany przyciętej geometrii. Przezroczystość płaszczyzny Ustawia przezroczystość płaszczyzny przekroju w renderowanych stylach wizualnych. Kolor płaszczyzny Ustawia kolor wypełnienia płaszczyzny przekroju w renderowanych stylach wizualnych. Plik docelowy Ustawia nazwę i ścieżkę pliku rysunku utworzonego przez polecenie BIMAKTUALIZUJPRZEKRÓJ.
Jeśli ścieżka nie zostanie określona, rysunek przekroju zostanie utworzony w folderze modelu 3D.
Geometria:
Elewacja Określa wartość Z punktu początkowego płaszczyzny przekroju. Górna płaszczyzna Określa górną płaszczyznę objętości przekroju. Dolna płaszczyzna Określa dolną płaszczyznę objętości przekroju. Wierzchołek Określa współrzędne punktów kontrolnych płaszczyzny przekroju. Liczba wierzchołków zależy od bieżącego stanu płaszczyzny przekroju.
Płaszczyzna: 2 wierzchołki
Granica i Objętość: 4 wierzchołki.
Wybierz pole, a następnie kliknij przyciski strzałek, aby wybrać wierzchołek. X oznacza wybrany wierzchołek w modelu.
Poziom LUW Określa minimalną i maksymalną wysokość LUW. BIM:
Nazwa Wpisz nazwę BIM. Opis Wpisz opis. Budynek Ustawia nazwę budynku. Piętro Ustawia nazwę wątku. Skala początkowa Ustawia początkową skalę rzutni przestrzeni papieru w wygenerowanym rysunku. Status warstw Ustawia stan warstwy używany do obliczania przekroju. Zatwierdź status warstw Określa, czy stan warstwy zostanie użyty do obliczenia przekroju, czy nie.
Zastosowanie stanu warstwy pozwala kontrolować, które warstwy są włączane/wyłączane podczas obliczania wyniku przekroju.
Rzut przekroju Kontroluje wyświetlanie objaśnień przekroju i linii przekroju na rysunkach przekroju, które są prostopadłe do tego przekroju. Użyj orientacji płaszczyzny przekroju Kontroluje, czy orientacja płaszczyzny przekroju jest używana, czy nie. Zestawy właściwości obiektu Kontroluje, czy właściwości obiektu "dla instancji" mogą być używane do generowania tagów.
Kliknij przycisk Przeglądaj (
 ), a następnie wybierz zestawy właściwości w oknie dialogowym Włącz zestaw właściwości dla instancji.
Jak przełączyć właściwość wyświetlania przyciętego elementu przekroju BIM?
Właściwość Przytnij Widok przekrojuBIM tymczasowo przycina modele 3D. Przytnij Widok może być używany we wszystkich operacjach modelowania i edycji na całej zawartości rysunku.
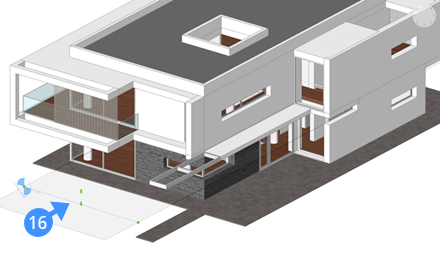
Poniższa ilustracja przedstawia model 3D willi z przekrojem planu (16) dla planu parteru:
Aby przyciąć model 3D, wykonaj jedną z poniższych czynności:
- Kliknij dwukrotnie obiekt przekroju.
- Wybierz Przytnij Widok z Quad.
- Wybierz płaszczyznę przekroju i ustaw właściwość Przytnij Widok na Tak w panelu Właściwości.
- Gdy na pasku stanu wybrana jest opcja RT(Wskazówki Rozwijane), umieść kursor nad obiekcie przekroju, aby ustawić właściwość Przytnij Widok.
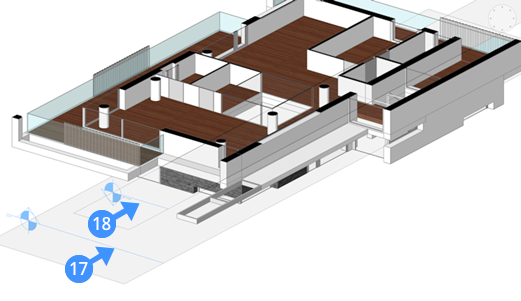
Na poniższej ilustracji Przytnij Widok jest włączony Wł dla dwóch jednostek przekroju BIM (17,18). Te jednostki przekroju znajdują się w przeciwnych kierunkach widoku: płaszczyzna przekroju 18 jest przekrojem rzutu, płaszczyzna przekroju 17 jest przekrojem sufitu odbitego.
Opcja: Ustaw właściwość Stan dla bieżącego przekroju na Objętościowy w panelu Właściwości.
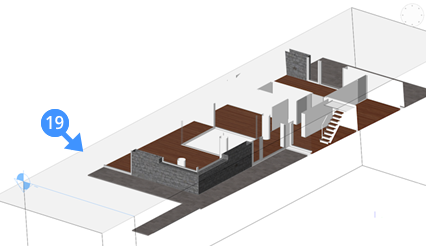
Odcinek przycięty w stanie Objętościowym (19).
Konwersja obiektu przekroju na przekrój BIM
- Uruchom polecenie BIMIFY.
Zostanie wyświetlony monit: Zastosuj lub [Zmień wybór]:
- Zostanie otwarty panel poleceń Bimify
- Wybierz Wybierz podmioty na rysunku, a następnie kliknij przycisk Wybierz (
 ).
). - Wybierz obiekt przekroju, a następnie naciśnij Enter.
- Kliknij przycisk Zastosuj w panelu poleceń Bimify.

