Menedżer Zestawienia Materiałów
Przegląd
Użyj poleceń BMBOMPANELOTW, BMBOMPANELZAM, BMBOM i BMBOMEDIT.
Panel Menedżera zestawień komponentów (panel Menedżer zestawień komponentów) umożliwia przeglądanie, tworzenie i edytowanie zestawień komponentów (BOM) w bieżącym rysunku. Użyj menedżera, aby interaktywnie konfigurować zarówno nowe, jak i istniejące, listy materiałów. Konfigurację listy materiałów można zapisać jako plik szablonu i wykorzystać później w innych rysunkach. Można również dodać listę materiałów, która nie jest połączona z tabelą na rysunku.
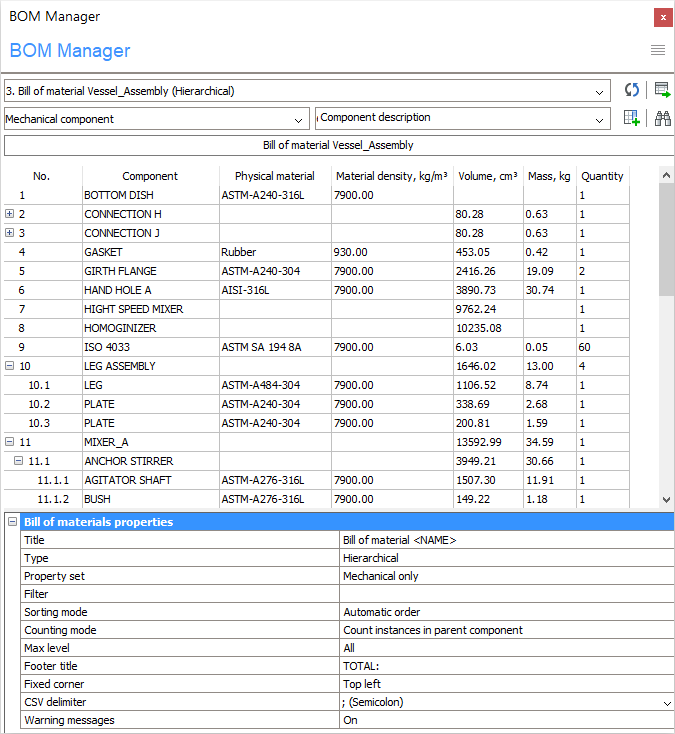
Za pomocą panelu BOM Manager można:
- Przeglądać istniejące listy materiałów na rysunku.
- Utwórz nową listę składową przy użyciu pliku szablonu przechowywanego w zmiennej systemowej BOMTEMPLATE, standardowego typu (takiego jak najwyższy poziom, najniższy poziom, hierarchiczny) lub istniejącego szablonu BOM. Jeśli zmienna systemowa BOMTEMPLATE zawiera prawidłową ścieżkę do pliku szablonu BOM, plik ten zostanie użyty z priorytetem do utworzenia nowej tabeli BOM.
- Edytuj listy materiałów:
- Dodaj lub usuń kolumny (w tym kolumny z formułami).
- Przenieś wybrane kolumny na nowe pozycje.
- Zmień nazwy kolumn.
- Skonfiguruj sposób sortowania tabeli BOM.
- Skonfiguruj wartość stopki dla każdej kolumny.
- Skonfiguruj jednostki i sposób ich wyświetlania w każdej kolumnie.
- Skonfiguruj szerokość każdej kolumny za pomocą właściwości kolumny.
- Skonfiguruj widoczność każdej kolumny.
- Przefiltruj komponenty za pomocą wyrażenia filtru.
- Zmień tytuł zarówno wiersza tytułu, jak i wiersza stopki.
- Wyszukaj komponenty w tabeli.
- Podświetl i wybierz wystąpienia komponentów.
- Zapisz konfigurację BOM jako plik szablonu lub jako domyślny plik szablonu (przechowywany w zmiennej systemowej BOMTEMPLATE).
- Wczytaj konfigurację BOM z pliku szablonu.
- Umieszczanie jednego lub większej liczby wystąpień tabeli zestawienia komponentów na rysunku.
- Usuń tabele BOM.
Otwórz Menedżera BOM
Wykonaj jedną z następujących czynności:
- Umieść kursor na pasku narzędzi, kliknij prawym przyciskiem myszy, wybierz Panele i wybierz Menedżer zestawień z menu kontekstowego.
- Uruchom polecenie BMBOMPANELOTW.
Narzędzia
Większość operacji konfiguracyjnych w menedżerze jest dostępna poprzez menu główne. Dla wybranych kolumn lub wierszy dostępne jest menu kontekstowe. Możesz także zmienić właściwości wybranych kolumn i samego zestawienia materiałów za pośrednictwem sekcji właściwości menedżera. Aby pracować z konkretną kolumną, wybierz ją w siatce zestawienia materiałów. Wiele kolumn można wybrać jednocześnie.
- Menu główne
- Kliknij Menu (
 ) w prawym górnym rogu panelu BOM Manager.
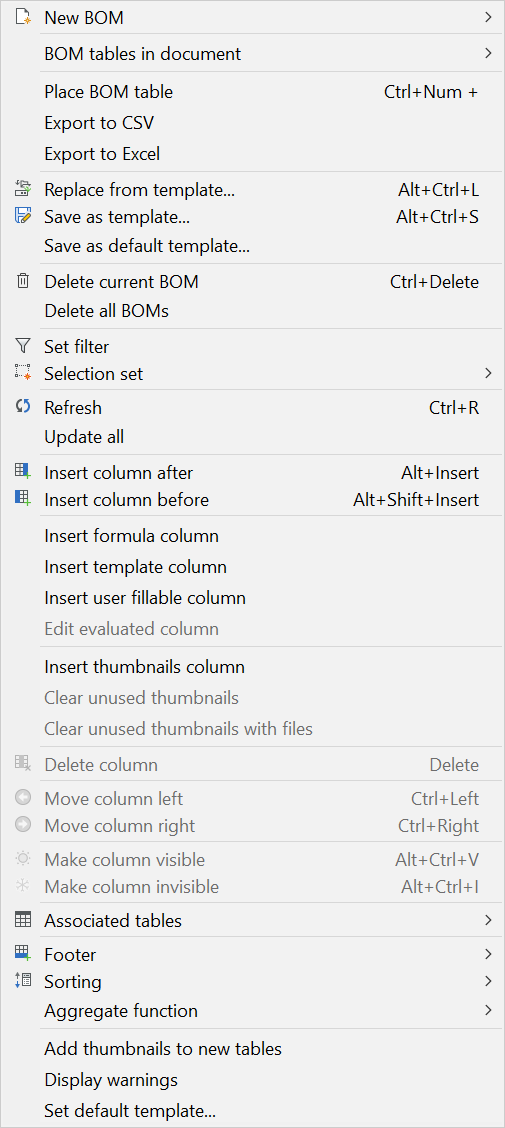
Menu główne
Ikona Narzędzie Opis 
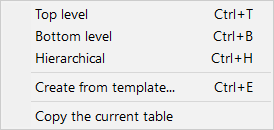
Nowy BOM Otwiera podmenu:
 Uwaga: Zmienna systemowa BOMTEMPLATE określa ścieżkę do pliku z domyślnym szablonem BOM, który zostanie wykorzystany do utworzenia nowych tabel BOM.Uwaga: Jeśli zmienna systemowa BOMTEMPLATE jest pusta lub ścieżka jest nieprawidłowa, zostanie użyta poniższa domyślna konfiguracja BOM.
- Górny poziom: tworzy nowy zestaw BOM tylko z komponentami górnego poziomu.
- Dolny Poziom: tworzy nową, listę komponentów dolnego poziomu.
- Hierarchiczny: tworzy nowy hierarchiczny BOM, który zawiera wszystkie komponenty wraz z ich podkomponentami wymienionymi bezpośrednio poniżej.
- Utwórz z szablonu: otwiera okno dialogowe umożliwiające wybór pliku szablonu konfiguracji BOM.
- Kopiuj bieżącą tabelę: tworzy nową listę BOM na podstawie bieżącej tabeli.
Tabele BOM w dokumencie Otwiera podmenu:
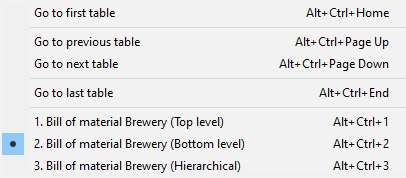
- Przejdź do pierwszej tabeli: przełącza do pierwszej tabeli BOM w dokumencie.
- Przejdź do poprzedniej tabeli: przełącza do poprzedniej tabeli BOM w dokumencie.
- Przejdź do następnej tabeli : przełącza do następnej tabeli BOM w dokumencie.
- Przejdź do ostatniej tabeli: przełącza do ostatniej tabeli BOM w dokumencie.
- <Nazwa BOM>: przełącza do odpowiedniej tabeli BOM w dokumencie.
Umieść tabelę BOM Rozpoczyna interaktywne umieszczanie bieżącej tabeli BOM na rysunku. Uwaga: Do dokumentu można wstawić wiele wystąpień tabeli BOM.Eksportuj do CSV oraz
Eksport do ExcelaZapisuje zawartość bieżącej tabeli BOM do pliku CSV lub XLSX.
Otwiera okno dialogowe umożliwiające wybór lokalizacji pliku CSV lub XLSX:
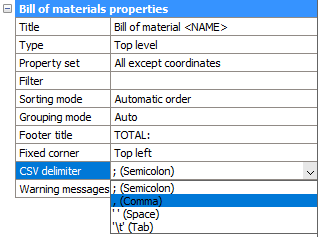
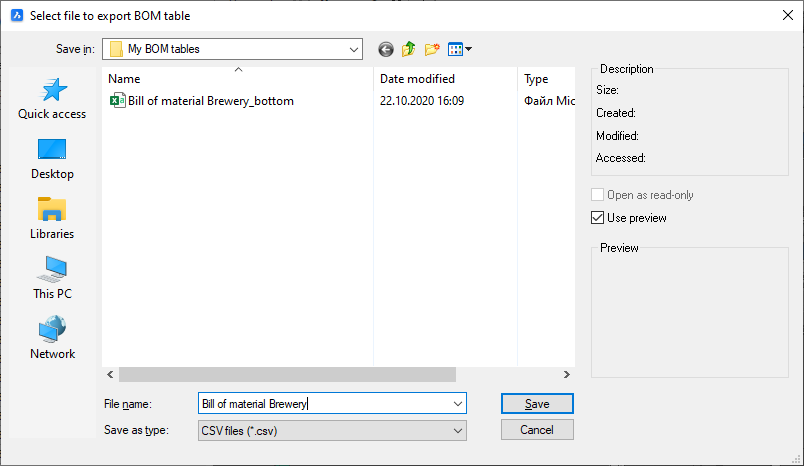 Uwaga: Uwaga: możesz dostosować separator dla wartości CSV, korzystając z właściwości tabeli.
Zastąp z szablonu Zastępuje bieżącą konfigurację tabeli BOM wybranym szablonem.
Otwiera okno dialogowe umożliwiające wybór pliku szablonu.

Zapisz jako szablon Zapisuje konfigurację bieżącej tabeli BOM jako szablon.
Otwiera okno dialogowe umożliwiające wybranie lokalizacji dla nowego pliku szablonu.
Zapisz jako szablon domyślny Zapisuje konfigurację bieżącej tabeli BOM jako szablon domyślny.
Otwiera okno dialogowe umożliwiające wybranie lokalizacji dla nowego pliku szablonu.
Ścieżka do pliku .bom będzie przechowywana w zmiennej systemowej BOMTEMPLATE i będzie używana jako domyślny szablon dla nowo utworzonych tabel BOM.

Usuń bieżące BOM Usuwa bieżącą tabelę BOM z dokumentu. Usuń wszystkie listy BOM Usuwa wszystkie dostępne struktury produktów. 
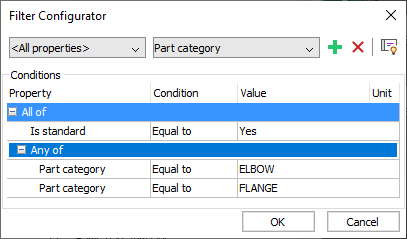
Ustaw filtr Otwiera okno dialogowe konfiguracji głównego filtra:

Zbiór wskazań Otwiera podmenu:
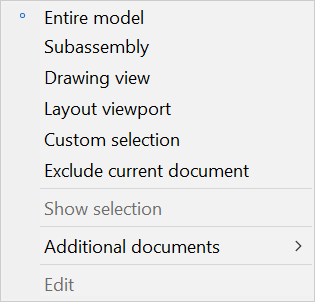
- Cały model: używa całego modelu jako zestawu wyboru.
- Podzespół: pozwala wybrać podzespół do wygenerowania tabeli BOM.
- Widok rysunku: synchronizuje BOM z wybranym widokiem rysunku.
- Rzutnia układu: w zestawieniu komponentów zostaną uwzględnione tylko części widoczne w wybranych rzutniach układu.
- Wybór niestandardowy: umożliwia wybór komponentów najwyższego poziomu, które mają zostać uwzględnione w tabeli BOM.
- Wyklucz bieżący dokument: tabela BOM nie będzie zawierać obiektów z bieżącego dokumentu.
- Pokaż wybór: podświetla bieżący zestaw wyboru.
- Dodatkowe dokumenty: tabela BOM będzie zawierać części z innych dokumentów.
- Dodaj rysunek lub zestaw arkuszy: tabela zestawienia komponentów będzie zawierać obiekty z wybranego rysunku lub zestawu arkuszy.
- Dodaj folder: tabela BOM będzie zawierać obiekty z rysunków lub zestawu arkuszy, które znajdują się w folderze.Uwaga: Użytkownik może dołączyć tylko te dokumenty, które pasują do określonych symboli wieloznacznych, całego projektu BIM lub całego zestawu arkuszy.
- Edytuj: umożliwia zmianę obiektów zawartych w bieżącym zestawie wyboru.

Odśwież Aktualizuje bieżący BOM i wyświetla listę wszystkich tabel BOM na rysunku. Aktualizuj wszystko Aktualizuje wszystkie tabele zestawienia komponentów na rysunku. 
Wstaw kolumnę po Jeśli wybrano kolumnę: wstawia kolumnę z Selektora kolumn za wybraną kolumną w tabeli.
Jeśli nie wybrano żadnej kolumny: dodaje nową kolumnę po ostatniej kolumnie w tabeli.

Wstaw kolumnę wcześniej Jeśli wybrano kolumnę: wstawia kolumnę z Selektora kolumn przed wybraną kolumną w tabeli.
Jeśli nie wybrano żadnej kolumny: dodaje nową kolumnę jako pierwszą kolumnę w tabeli.
Wstaw kolumnę z formułą Otwiera okno dialogowe Kolumna form uły w celu skonfigurowania kolumny formuły:
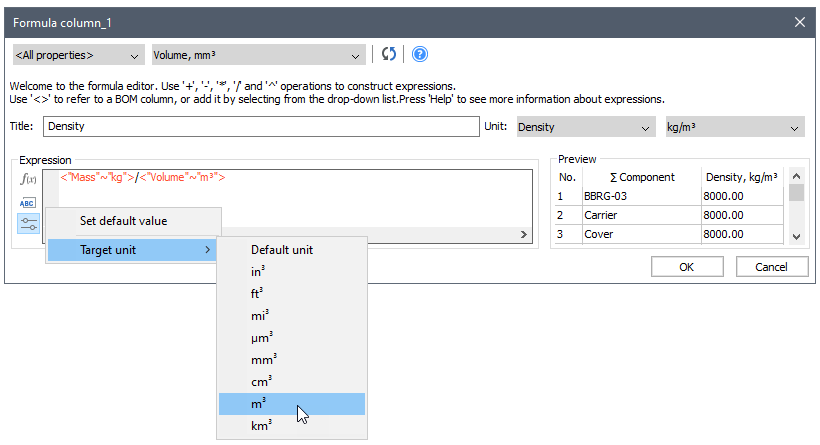
Kliknij OK, aby dodać nową kolumnę z formułą po wybranej. Jeśli nie wybrano żadnej kolumny, po ostatniej kolumnie w tabeli dodawana jest nowa kolumna z formułą.
W wyrażeniach formuł i szablonów ich składnia została rozszerzona, aby umożliwić ustawienie jednostki docelowej dla zmiennych (jeśli zmienna obsługuje konwersję jednostek). Pozwala to na napisanie formuły zależnej od jednostki (np. obliczanie gęstości) bez zawracania sobie głowy początkową jednostką zmiennej.
Jeśli jednostka formuły jest znana BricsCAD, konwersje jednostek będą obsługiwane dla wartości formuły.
Domyślnym trybem jednostek dla kolumn z formułami są jednostki użytkownika.
Wstaw kolumnę szablonu Otwiera okno dialogowe Kolumna szablonu w celu skonfigurowania kolumny szablonu:
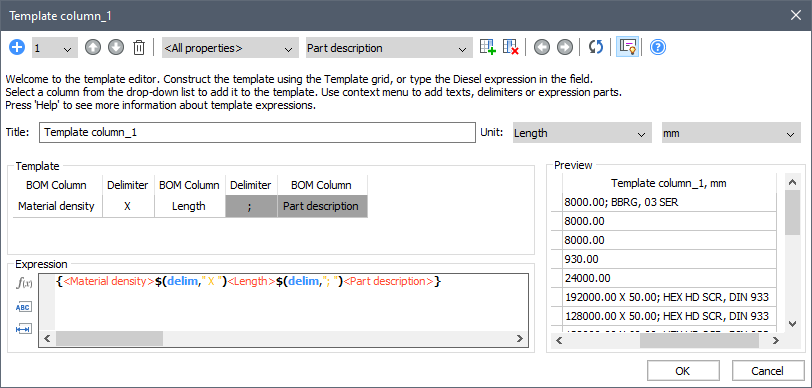
Kliknij OK, aby dodać nową kolumnę szablonu po wybranej. Jeśli nie wybrano żadnej kolumny, po ostatniej kolumnie w tabeli dodawana jest nowa kolumna szablonu.
Uwaga: Kolumna szablonu obsługuje ten sam tryb jednostek, co normalna kolumna, z opcjami wyboru najlepszej dla każdej lub najlepszej dla wszystkich jednostek.Wstaw kolumnę wypełnianą przez użytkownika Wstawia kolumnę, którą użytkownik może wypełnić. Edytuj szacowaną kolumnę Otwiera okno dialogowe umożliwiające edycję wybranej formuły lub kolumny szablonu. Wstaw kolumnę miniatur Jeśli kolumna jest zaznaczona: wstawia kolumnę miniatury z parametrami domyślnymi po wybranej kolumnie w tabeli.
Jeśli nie wybrano żadnej kolumny: po ostatniej kolumnie w tabeli zostanie dodana nowa kolumna miniatury.
Wyczyść nieużywane miniatury Usuwa bloki i załączniki z miniaturami, które nie są już używane. Usuń nieużywane miniatury z plikami Usuwa bloki, załączniki i pliki z miniaturami, które nie są już używane. 
Usuń kolumnę Usuwa bieżącą kolumnę z tabeli
Możesz także wybrać kolumnę w siatce BOM i nacisnąć klawisz Delete , aby usunąć kolumnę.

Przenieś kolumnę w lewo Przenosi wybraną kolumnę (kolumny) o jedną kolumnę w lewo. 
Przenieś kolumnę w prawo Przenosi wybraną kolumnę (kolumny) o jedną kolumnę w prawo. 
Zmień kolumnę na widoczną Wyświetla wybraną kolumnę w powiązanej tabeli na rysunku. 
Zmień kolumnę na niewidoczną Usuwa wybraną kolumnę z powiązanej tabeli. Niewidoczne kolumny pozostają widoczne w menedżerze BOM, ale są oznaczone ukośnym wzorem kreskowania w tle. 
Powiązana tabela Otwiera podmenu:
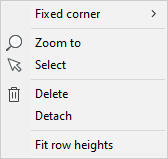
- Stały narożny: Ustawia tabelę o stałym rogu na Lewy górny, Prawy górny, Prawy dolny lub Lewy dolny.
- Przybliż do: przybliża do tabeli. W razie potrzeby ustaw układ tabeli jako bieżący.
- Wybierz: wybiera tabelę. W razie potrzeby ustaw układ tabeli jako bieżący.
- Usuń: usuwa tabelę z dokumentu.
- Odłącz: odłącza tabelę. Tabela w dokumencie nie jest już aktualizowana po zmodyfikowaniu tabeli BOM.
- Dopasuj wysokość wiersza: Ustawia wysokość wiersza, która najlepiej pasuje do wysokości tekstu lub miniatur.

Stopka Otwiera podmenu:
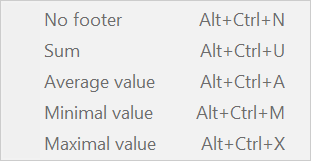
Dla każdej z wybranych kolumn:
- Bez stopki: usuwa stopkę.
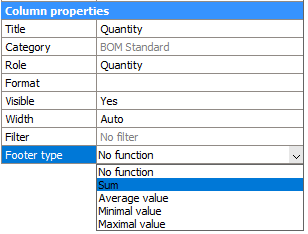
- Suma: wyświetla sumę w stopce.
- Średnia wartość: wyświetla średnią wartość w stopce.
- Wartość minimalna: wyświetla minimalną wartość w stopce.
- Wartość maksymalna: wyświetla maksymalną wartość w stopce.
Uwaga: Stopki kolumn szablonu są obsługiwane, jeśli zawierają głównie wartości liczbowe.Więcej informacji można znaleźć w sekcji Stopka w zestawieniu materiałów.

Sortowanie Otwiera podmenu:
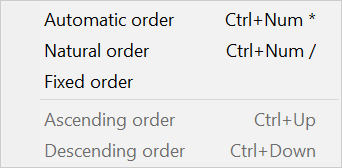
- Automatyczna kolejność: sortuje tabelę automatycznie.
- Naturalna kolejność: sortuje tabelę według naturalnej kolejności wystąpień komponentów w dokumencie.
- Stała kolejność: Pozycje części w zestawieniu komponentów są zapamiętywane, a ich numery pozostają takie same po aktualizacji, niezależnie od dodanych lub usuniętych części.
- Kolejność rosnąca: sortuje wybrane kolumny w kolejności rosnącej.
- Kolejność malejąca: sortuje wybrane kolumny w kolejności malejącej.
Więcej informacji można znaleźć w sekcji Sortowanie tabeli BOM w zestawieniu materiałów.
Funkcja agregująca Otwiera podmenu:
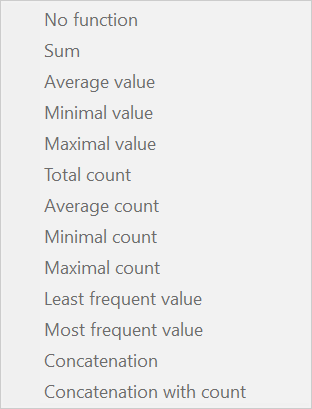
- Brak funkcji: usuwa funkcję agregującą.
- Suma: wyświetla sumę wszystkich wartości w grupie.
- Średnia wartość: wyświetla średnią wszystkich wartości w grupie.
- Minimalna wartość: wyświetla minimalną ze wszystkich wartości w grupie.
- Wartość maksymalna: wyświetla maksymalną ze wszystkich wartości w grupie.
- Konkatenacja: Wyświetla konkatenację wszystkich wartości w grupie w porządku rosnącym, oddzielonych określonym separatorem.
- Konkatenacja z liczbą: wyświetla konkatenację wszystkich wartości w grupie wraz z odpowiadającą im liczbą spotkań w kolejności rosnącej. Pary wartość i liczba są oddzielone określonym separatorem.
Dodaj miniatury do nowych tabel Zmienia ustawienie dodawania kolumny miniatur do każdej nowej tabeli BOM. Wyświetl ostrzeżenia Kontroluje wyświetlanie komunikatów ostrzegawczych podczas tworzenia lub aktualizacji tabel BOM. Ustaw domyślny szablon Otwiera okno dialogowe Wybierz plik z szablonem tabeli BOM, aby wybrać plik szablonu tabeli BOM (*.bom).
- Paski Narzędzi
-
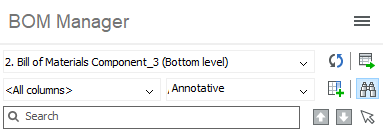
Ikona Narzędzie Opis 
Menu główne Otwiera menu główne. 
Selektor BOM Wybiera bieżącą tabelę BOM. Wybór zostanie zapisany na rysunku. Gdy rysunek zostanie zamknięty i ponownie otwarty, wybrana BOM zostanie przywrócona w menedżerze. Po wybraniu tabela zostanie zaktualizowana do bieżącego stanu rysunku. 
Odśwież Aktualizuje zarówno bieżącą tabelę BOM, jak i listę wszystkich tabel BOM w rysunku. 
Miejsce na stole Rozpoczyna interaktywne umieszczanie stołu na rysunku. Uwaga: Możliwe jest wstawienie wielu wystąpień tabeli BOM do rysunku.
Selektor kategorii Wybiera kategorię właściwości. 
Selektor kolumn Wybiera kolumnę, która ma zostać dodana do bieżącego BOM. Możesz również użyć tego do wprowadzenia formuły w polu formuły.
Aby dodać formułę, wpisz wyrażenie zaczynające się od znaku "=", na przykład "=<Mass><Quantity>*<Ilość>". Formuła może odwoływać się do innych kolumn. Użyj ich nazw wyświetlanych zawartych w <>.

Wstaw kolumnę po Jeśli wybrana jest kolumna: wstawia kolumnę z selektora kolumn po wybranej kolumnie w tabeli. Jeśli nie wybrano żadnych kolumn: dodaje nową kolumnę po ostatniej kolumnie w tabeli.

Znadź Włącza lub wyłącza pole wyszukiwania. Możesz także użyć Ctrl+F.

Pole wyszukiwania Wprowadza wyszukiwany ciąg znaków; obsługiwane są symbole wieloznaczne. 
Znajdź wcześniejsze Wybiera poprzednie dopasowanie w tabeli BOM. Możesz także użyć Ctrl+F3 .

Znajdź następny Wybiera następne dopasowanie w tabeli BOM. Możesz także użyć F3 .

Wybierz wszystkie znalezione Wybiera wszystkie dopasowania w tabeli BOM.
- Menu kontekstowe kolumny
- Kliknij prawym przyciskiem myszy etykietę kolumny, aby otworzyć menu kontekstowe. Kolumna zostanie dodana do aktualnego wyboru.
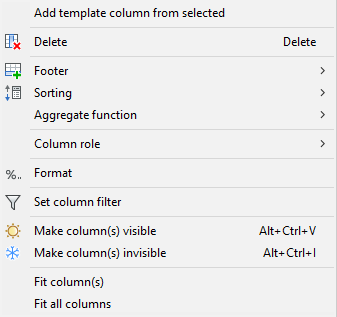
Ikona Narzędzie Opis Dodaj kolumnę szablonu z wybranych Otwiera okno dialogowe umożliwiające skonfigurowanie nowej kolumny szablonu. Wybrane kolumny zostaną automatycznie dodane do wyrażenia szablonu. 
Usuń kolumnę Usuwa wybrane kolumny z tabeli. Możesz także wybrać kolumnę w siatce BOM i nacisnąć klawisz Delete.

Stopka Otwiera podmenu dla wybranych kolumn:- Bez stopki: usuwa stopkę.
- Suma: wyświetla sumę w stopce.
- Średnia wartość: wyświetla średnie wartości w stopce.
- Wartość minimalna: wyświetla minimalną wartość w stopce.
- Wartość maksymalna: wyświetla maksymalną wartość w stopce.

Sortowanie Otwiera podmenu:- Automatyczna kolejność:sortuje tabelę automatycznie.
- Naturalna kolejność: sortuje tabelę według naturalnej kolejności wystąpień komponentów w dokumencie.
- Kolejność rosnąca: sortuje wybrane kolumny w kolejności rosnącej.
- Kolejność malejąca: sortuje wybrane kolumny w kolejności malejącej.
Funkcja agregująca Otwiera podmenu dla wybranych kolumn:
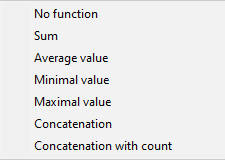
- Brak funkcji: usuwa funkcję agregującą.
- Suma: wyświetla sumę wszystkich wartości w grupie.
- Średnia wartość: wyświetla średnią wszystkich wartości w grupie.
- Wartość minimalna: wyświetla minimum wszystkich wartości w grupie.
- Wartość maksymalna: wyświetla maksymalną spośród wszystkich wartości w grupie.
- Powiązanie: wyświetla powiązanie wszystkich wartości w grupie w porządku rosnącym, oddzielonych określonym separatorem ("; " domyślnie).
- Powiązanie z liczbą: wyświetla powiązanie wszystkich wartości w grupie z odpowiadającą im liczbą spotkań w porządku rosnącym. Pary wartość i liczba są oddzielone określonym separatorem ("; " domyślnie).
Rola kolumny Otwiera podmenu dla wybranej kolumny:

- Liczba: kolumna jest używana jako źródło liczb przez polecenie BMBALONY.
- Nazwa: kolumna jest używana jako źródło nazw przez polecenie BMBALONY.
- Ilość: kolumna jest używana jako źródło ilości przez polecenie BMBALONY.
- Zwykły: kolumna nie ma określonej roli.

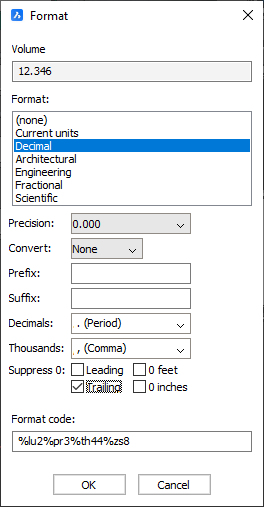
Format Ustawia określony format dla wybranych kolumn.
Otwiera okno dialogowe:

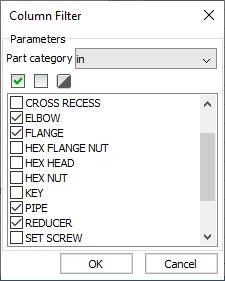
Ustaw filtr kolumn Otwiera okno dialogowe umożliwiające konfigurację filtra kolumn:

Zmień kolumnę na widoczną Wyświetla wybrane kolumny w powiązanej tabeli na rysunku. 
Zmień kolumnę na niewidoczną Usuwa wybraną kolumnę z powiązanej tabeli. Niewidoczne kolumny pozostają widoczne w menedżerze BOM, ale są oznaczone ukośnym wzorem kreskowania w tle. Dopasuj kolumny Dopasowuje szerokość wybranych kolumn do ich zawartości. Szerokość kolumny automatycznie dopasowuje się do zawartości, chyba że szerokość została zmieniona ręcznie.
Dopasuj wszystkie kolumny Dopasowuje szerokość wszystkich kolumn do ich zawartości. Szerokość kolumny automatycznie dopasowuje się do zawartości, chyba że szerokość została zmieniona ręcznie.
- Menu kontekstowe wiersza
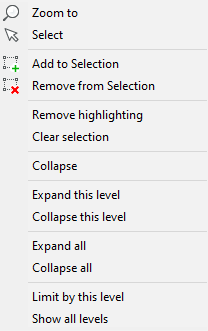
- Kliknij prawym przyciskiem myszy dowolną komórkę, aby otworzyć menu kontekstowe.
Ikona Narzędzie Opis 
Przybliż do Powiększa do wybranych części w modelu 
Wybierz Wybiera część(i). Zastępuje istniejący wybór. 
Dodaj do zaznaczenia Dodaje części do zaznaczenia. 
Usuń z zaznaczenia Usuwa części z zaznaczenia. Usuń podświetlenie Usuwa podświetlenie. Wyczyść wybór Czyści zaznaczenie. Rozdziel Rozdziela grupę podzespołów w siatce zestawienia materiałów. Rozwiń Rozwija grupę podzespołów w siatce zestawienia materiałów. Rozwiń ten poziom Rozwija wszystkie grupy podzespołów na tym samym poziomie drzewa zespołu, co bieżąca. Zwiń ten poziom Zwija wszystkie grupy podzespołów na tym samym poziomie drzewa zespołu co bieżąca. Rozwiń wszystko Rozwija wszystkie grupy podzespołów w bieżącym zestawieniu materiałów. Zamknij wszystko Zwija wszystkie grupy podzespołów w bieżącym zestawieniu materiałów. Ogranicz według tego poziomu Ustawia bieżący poziom jako maksymalny poziom dla hierarchicznych tabel BOM. Pokaż wszystkie poziomy Usuwa maksymalny limit poziomu dla hierarchicznych tabel BOM.
- Tytuł zestawienia materiałów
-

Wyświetla tytuł bieżącego zestawienia materiałów, tak jak pokazano na rysunku. Kliknij lewym przyciskiem myszy tę kontrolkę, aby edytować rysunek. W tym trybie kontrolka tytułu BOM pokazuje zamiast tego tytułu szablon . Tytułu szablon to ciąg znaków, który może zawierać symbol zastępczy <NAZWA>, który zostanie zastąpiony nazwą zestawu.
- Siatka
-
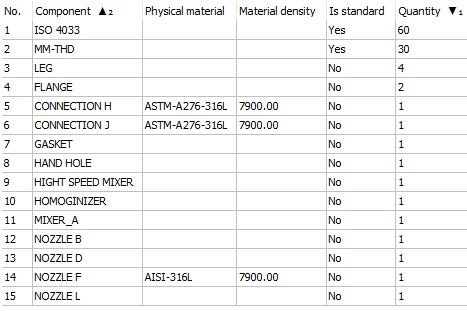
Siatka wyświetla zawartość wybranej tabeli BOM. Każdy wiersz jest połączony z odpowiadającymi mu instancjami. Po wybraniu wiersza odpowiadające mu części są podświetlane na rysunku. Użyj menu kontekstowego, aby wybrać odpowiednie części, dodać lub usunąć je z bieżącego wyboru i przybliżyć do tych części. Kliknij dwukrotnie dowolną komórkę w wierszu, aby powiększyć do odpowiednich części.
Uwaga: Aby usunąć tytuł lub wiersz nagłówka, tytuł BOM lub wszystkie nagłówki kolumn muszą być puste. Ponadto tytuły wprowadzone z wiersza poleceń zostaną przycięte w celu usunięcia wszystkich początkowych i końcowych spacji.
- Przenoszenie kolumny
- Aby przenieść kolumnę w tabeli BOM, przeciągnij ją i upuść w nowym miejscu.
- Widoczne i niewidoczne kolumny
-
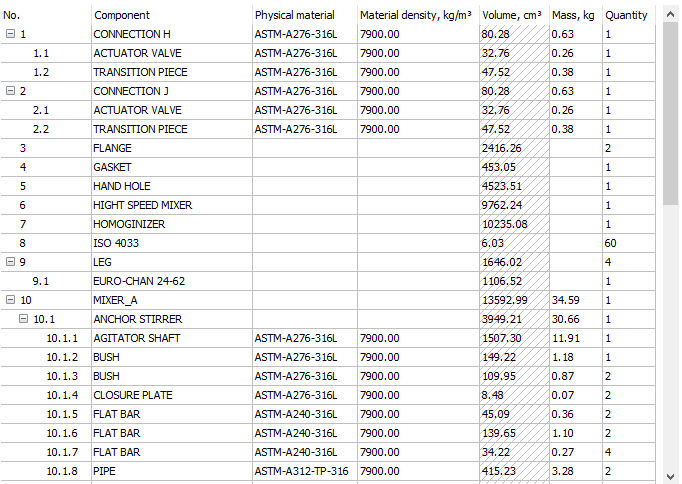
Każdą kolumnę w tabeli BOM można uczynić niewidoczną, aby nie była wyświetlana w tabeli wynikowej. Niewidoczne kolumny pozostają widoczne w siatce BOM z kreskowanym tłem. Widoczność kolumn można zmienić w menu głównym, menu kontekstowym kolumny lub poprzez edycję właściwości Widoczny kolumny w siatce Właściwości.
- Regulacja szerokości
-
Możesz dostosować szerokość dowolnej kolumny w siatce BOM, która jest niezależna od szerokości w powiązanej tabeli. Jeśli szerokość kolumny jest mniejsza niż wymagana do wyświetlenia tekstu komórki, wysokość odpowiedniego wiersza zwiększa się, aby dopasować się do tekstu.
Gdy szerokość kolumny jest dostosowywana ręcznie, pozostaje ona taka sama niezależnie od zawartości tabeli. Szerokość jest również przechowywana w konfiguracji BOM. Wszystkie dopasowane szerokości kolumn pozostają takie same, nawet po zamknięciu i ponownym otwarciu rysunku.
Aby automatycznie dopasować szerokość kolumny do zawartości, wykonaj jedną z następujących czynności:- Wybierz kolumnę (kolumny), kliknij prawym przyciskiem myszy menu kontekstowe i wybierz opcję Dopasuj kolumnę (kolumny).
- Kliknij dwukrotnie separator w nagłówku kolumny.
- Sortowanie BOM
- Użyj siatki, aby kontrolować sposób sortowania spisu treści. Kliknij dwukrotnie etykietę kolumny, aby zmienić kolejność na rosnącą, malejącą i nieuporządkowaną. Jeśli do sortowania tabeli używana jest kolumna, do jej etykiety dodawany jest symbol (▲ dla rosnącej i ▼ dla malejącej). Kliknij dwukrotnie etykietę, aby przywrócić porządek sortowania.
Do sortowania możesz użyć wielu kolumn. Symbole sortowania tych kolumn mają indeks dolny oznaczający kolejność sortowania. Na przykład, jeśli chcesz posortować według ilości w porządku malejącym, a następnie według nazwy składnika w porządku rosnącym, kolumna Ilość będzie miała symbol ▼₁, a kolumna Komponent będzie miał symbol ▲₂.
- Rozwiń/zwiń grupy
-
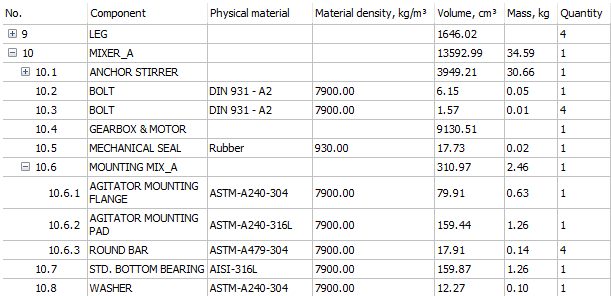
W hierarchicznych zestawieniach materiałów każdy podzespół tworzy grupę, którą można zwinąć lub rozwinąć w siatce BOM.
Aby zwinąć lub rozwinąć grupę, wykonaj jedną z następujących czynności:- Kliknij ikonę węzła w pierwszej kolumnie siatki BOM.
- Kliknij wiersz prawym przyciskiem myszy, a następnie wybierz polecenie Zwiń lub Rozwiń z menu kontekstowego.
Możesz również zwinąć lub rozwinąć wszystkie grupy lub wszystkie grupy odpowiadające temu samemu poziomowi zespołu za pomocą menu kontekstowego.
Uwaga: Status grupy podzespołów (zwinięty lub rozwinięty) nie jest przechowywany w dokumencie. Gdy tabela BOM jest zamykana i ponownie otwierana, wszystkie grupy podzespołów są domyślnie rozwijane.
Właściwości
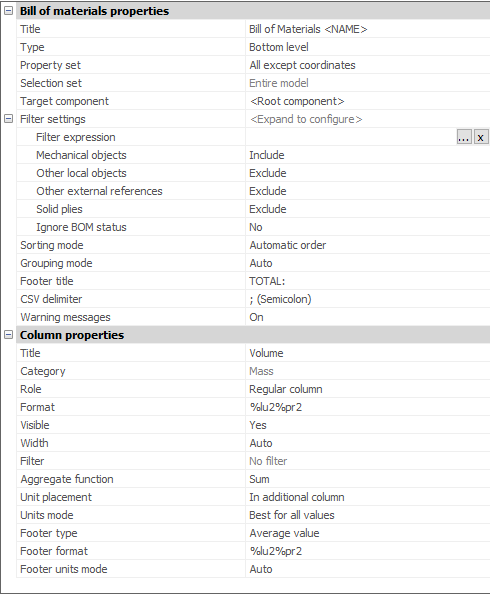
Siatka właściwości znajduje się na dole panelu menedżera. Aby dostosować jej rozmiar, użyj kontrolki rozdzielającej znajdującej się między siatką a siatką właściwości.
Siatka właściwości zawiera właściwości bieżącej tabeli; tytuł, typ, filtr, tryb sortowania i tytuł stopki. W przypadku wybrania dowolnych kolumn siatka wyświetli również ich wspólne właściwości. Możesz zmienić dowolną wspólną właściwość dla wszystkich wybranych kolumn jednocześnie. Właściwości kolumny zmieniają tytuł, widoczność i szerokość kolumny.
W przypadku wartości liczbowych można ustawić typ stopki, tryb jednostek stopki, rozmieszczenie jednostek, tryb jednostek i jednostkę stopki (jeśli kolumna ma jednostki, które można zmienić).
Umieszczenie jednostek określa, gdzie jednostki są wyświetlane: w tytule kolumny, w tej samej komórce co sama wartość lub we własnej kolumnie.
Tryb jednostek określa sposób uzyskania wyświetlanej jednostki; najlepsza jednostka dla wszystkich wartości, najlepsza jednostka do wyświetlenia określonej wartości w komórce lub określona jednostka. Możesz wybrać Tryb jednostek dla właściwości odległości, powierzchni, objętości lub masy.
Typ stopki określa, co powinno być wyświetlane w komórce, suma, wartość średnia, wartość minimalna lub wartość maksymalna.
Tryb jednostek stopki definiuje jednostki dla komórki stopki, automatyczne, najlepsze lub zdefiniowane przez użytkownika.
Jednostka stopki ustawia inną jednostkę dla wartości stopki.
Ustawienia filtra
- Wyrażenie filtru
-
Możliwe jest dodanie niestandardowego filtra do bieżącego zestawienia materiałów. Aby zastosować filtr, wykonaj jedną z następujących czynności:
- Użyj właściwości Wyrażenie filtru w sekcji Właściwości zestawienia materiałów w siatce Właściwości.
- użyj polecenia Ustaw filtr z menu głównego.
W obu przypadkach wyświetlane jest okno dialogowe Filter Configurator / expression:

Każdy wiersz w tym oknie dialogowym reprezentuje stan podstawowy. Możliwe jest również dodawanie grup w celu zgrupowania kilku podstawowych warunków i/lub grup razem. Grupy pozwalają na tworzenie rozbudowanych filtrów.
Dodanie nowego podstawowego warunku
Wykonaj następujące czynności:- Jeśli ma to zastosowanie, wybierz wymaganą kategorię, aby ograniczyć listę właściwości do tej konkretnej kategorii.
- Wybierz żądaną właściwość z listy właściwości. Po wybraniu warunek dla właściwości jest dodawany automatycznie.
- Jeśli dotyczy, wymagany typ warunku:
- Różny
- Mniej niż
- Więcej niż
- Nie mniej niż
- Nie więcej niż
- Ustaw wartość docelową. W przypadku wartości tekstowych można wybrać wartość docelową z listy rozwijanej wszystkich możliwych wartości. W przypadku wartości liczbowych można określić jednostkę wartości docelowej. Wartość zostanie automatycznie przekonwertowana na jednostkę dokumentu.
Usuwanie co najmniej jednego warunku
Wykonaj następujące czynności:- Wybierz warunki do usunięcia. Możesz użyć klawisza Ctrl, aby wybrać kilka warunków, i klawisza Shift, aby wybrać zakres warunków.
- Kliknij narzędzie Usuń (
 ) lub kliknij prawym przyciskiem myszy wiersz, który chcesz usunąć i wybierz Usuń warunek z menu kontekstowego.
Dodanie nowej grupy warunków
Wykonaj następujące czynności:- Kliknij narzędzie Dodaj (
 ).
). - Wybierz opcję Dodaj grupę "Wszystkie z ", aby dodać nową grupę "Wszystkie z" lub wybierz opcję Dodaj grupę "Dowolne z", aby dodać nową grupę "Dowolne z".
- Dodaj niezbędne warunki.
Grupowanie wybranych warunków
Wykonaj następujące czynności:- Wybierz warunki do usunięcia. Możesz użyć klawisza Ctrl, aby wybrać kilka warunków, i klawisza Shift, aby wybrać zakres warunków.
- Kliknij prawym przyciskiem myszy wiersz, który chcesz zgrupować.
- Wybierz Form " All of" group z selected, aby utworzyć nową grupę "All of" lub wybierz Form "Any of" group z selected, aby utworzyć nową grupę "Any of".
Aby zastosować filtr, kliknij OK.
- Obiekty mechaniczne
- Obejmuje lub nie obejmuje komponentów mechanicznych.
- Inne lokalne obiekty
- Obejmuje lub wyklucza niemechaniczne lokalne bloki i elementy stałe.
- Inne obiekty zewnętrzne
- Obejmuje lub wyklucza niemechaniczne odniesienia zewnętrzne.
- Warstwy brył
- Obejmuje lub nie obejmuje stałych warstw.
- Ignoruj status BOM
- Określa, czy status BOM będzie ignorowany.
Filtr kolumnowy
Filtry kolumn umożliwiają ustawienie warunków, na jakich wiersze mają być uwzględniane w tabeli. Każdy filtr kolumn ustawia warunek, który wartości kolumn powinny spełniać, aby zostały uwzględnione. Na przykład możesz ustawić filtr kolumn, aby obejmował tylko części o ilości większej niż określona liczba lub części, których nazwy zawierają Dyszę. Kolumna może mieć nie więcej niż jeden filtr. Możliwe jest jednak jednoczesne ustawienie filtrów dla dowolnej liczby kolumn. Kolumny z aktywnymi filtrami są oznaczone ikoną filtra ( ) w tytule.
Przykład kolumn z aktywnymi filtrami:

Aby dodać filtr kolumn, kliknij prawym przyciskiem myszy tytuł kolumny i wybierz z menu kontekstowego Ustaw filtr kolumn.
Zostanie wyświetlone okno dialogowe Filtr kolumn.
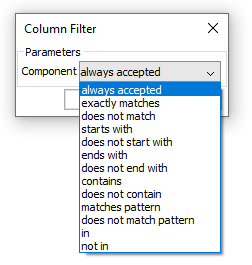
Wybierz wymagany typ filtra. Następnie musisz ustawić wartości docelowe dla filtra, w zależności od typu filtra i zawartości kolumny.

W przypadku kolumn z zawartością liczbową można ustawić jednostkę wartości docelowej. Wartość docelowa zostanie automatycznie przekonwertowana wewnętrznie na jednostkę dokumentu.
W przypadku filtrów tekstowych możesz wybrać opcje ignorowania i dopasowania wielkości liter. Filtry W i Nie w pokazują listę wszystkich możliwych wartości dla tej kolumny (w odniesieniu do już zastosowanych filtrów). Zaznacz wartości, które chcesz odpowiednio uwzględnić lub wykluczyć. Możesz także sprawdzić wszystkie wartości, odznaczyć wszystkie wartości lub odwrócić bieżące zaznaczenie za pomocą odpowiednich przycisków na paskach narzędzi lub poleceń z menu kontekstowego.
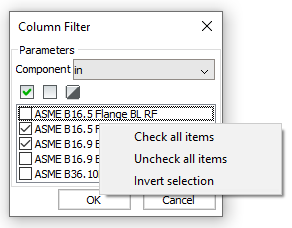
Aby zastosować filtr kolumn, kliknij OK.
Aby usunąć filtr kolumny, kliknij prawym przyciskiem myszy tytuł kolumny i wybierz Usuń filtr kolumny z menu kontekstowego.
Więcej informacji można znaleźć w sekcji Sortowanie tabeli BOM w zestawieniu materiałów.
Zbiór wskazań
Możliwe jest powiązanie tabeli BOM z zestawem selekcji, który będzie działał jak filtr dla zawartości BOM. Obsługiwane są następujące typy zestawów wyboru:
- Cały model: Tabela BOM zostanie utworzona dla całego modelu.
- Podzespół: Tabela BOM zostanie utworzona dla wybranej instancji podzespołu.
- Widok rysunku: Tabela BOM zostanie utworzona dla części wybranych dla odpowiedniego widoku rysunku, niezależnie od ich widoczności w rzutni.
- Rzutnia układu: Tabela BOM zostanie utworzona dla wybranej rzutni układu.
- Wybór niestandardowy: Tabela BOM zostanie utworzona tylko dla wybranych części.
- Wyklucz bieżący dokument: tabela BOM nie będzie zawierać obiektów z bieżącego dokumentu.
- Pokaż wybór: Wyświetla bieżący wybór dla tabeli BOM.
- Dodatkowe dokumenty: tabela BOM będzie zawierać części z innych dokumentów.
- Dodaj rysunek lub zestaw arkuszy: tabela zestawienia komponentów będzie zawierać obiekty z wybranego rysunku lub zestawu arkuszy.
- Dodaj folder: Tabela BOM będzie zawierać obiekty z rysunków lub zestawów arkuszy, które znajdują się w folderze.Uwaga: Użytkownik może dołączyć tylko te dokumenty, które pasują do określonych symboli wieloznacznych, całego projektu BIM lub całego zestawu arkuszy.
- Edytuj: Umożliwia edycję zaznaczenia.
Możliwe jest wyświetlenie bieżącego zestawu wyboru za pomocą polecenia Pokaż wybór z menu głównego.
Typ zestawu wyboru można zmienić w dowolnym momencie, wybierając żądany typ zestawu wyboru w menu głównym. Ponadto można edytować istniejący zestaw zaznaczeń, dodając lub usuwając z niego obiekty.
Sortowanie
Tabele BOM obsługują kilka trybów sortowania (więcej szczegółów można znaleźć w sekcji Sortowanie tabeli BOM w zestawieniu materiałów).
Aby przełączać się między tymi trybami, użyj właściwości Tryb sortowania w sekcji Właściwości zestawienia materiałów siatki Właściwości. Użyj menu rozwijanego Tryb sortowania lub kliknij dwukrotnie etykiety kolumn w Siatce, aby przełączać się między rosnącym, malejącym lub naturalnym porządkiem dla odpowiedniej kolumny.
Jednostki kolumn
Dla większości właściwości numerycznych z jednostkami można zmienić Rozmieszczenie jednostek i Tryb jednostek. Wybierz żądane kolumny w Siatce i użyj sekcji Właściwości kolumny siatki Właściwości, aby zmienić Położenie jednostki i Tryb jednostki.
Więcej informacji można znaleźć w sekcji Jednostki kolumnowe w zestawieniu materiałów.
Zobacz także sekcję Zmiana jednostek i trybów umieszczania jednostek dla kolumny.
Szacowane kolumny
BOM obsługuje szacowane kolumny. Istnieją dwa typy szacowanych kolumn: kolumny z formułami i szablony. Kolumny miniatur są również uważane za kolumny oceniane, chociaż nie wymagają żadnych wyrażeń. Więcej informacji na temat pól formuł, takich jak składnia wyrażeń, można znaleźć w sekcji Kolumny oceniane w zestawieniu materiałów.
Zobacz także sekcję Dodawanie ocenianej kolumny.
- Kolumny z formułami
- Aby dodać kolumnę z formułą, wykonaj następujące czynności:
- Wybierz Szacowana kolumna za pomocą selektora Kategorii.
- Wybierz Kolumna z formułą w selektorze Kolumny.
- Użyj opcji Wstaw kolumnę za lub Wstaw kolumnę przed.
Alternatywnie można użyć opcji Wstaw kolumnę formuły z menu głównego.
W obu przypadkach wyświetlone zostanie okno dialogowe Konfigurator wyrażeń:
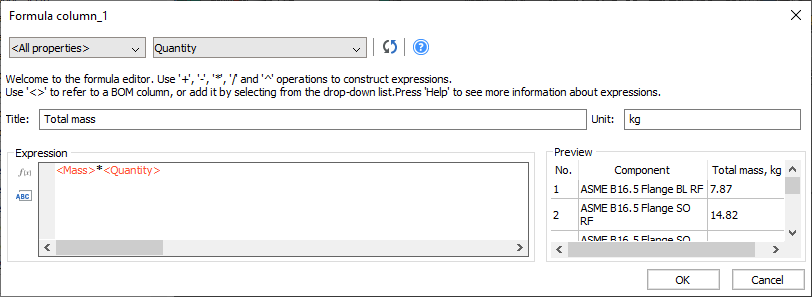
To okno dialogowe umożliwia skonfigurowanie tytułu, jednostki i wyrażenia dla kolumny z formułą. Pokazuje również podgląd wyników formuły. Pole wyrażenia obsługuje auto uzupełnianie.
Aby dodać odwołanie do kolumny lub właściwość do wyrażenia w pozycji kursora, wybierz żądaną właściwość z listy właściwości. Możesz także kliknąć narzędzie Dodaj odwołanie do kolumny (
 ) i wybierz właściwość z menu lub kliknij narzędzie Dodaj funkcję (
 ), aby wybrać żądaną funkcję.
Aby dodać kolumnę z formułą do tabeli BOM, kliknij OK.
- Kolumna szablonu
-
Aby dodać kolumnę szablonu, wykonaj następujące czynności:
- Wybierz kategorię <Evaluated column> za pomocą selektora kategorii.
- Wybierz <Template column> kolumnę w selektorze kolumn.
- Użyj opcji Wstaw kolumnę za lub Wstaw kolumnę przed.
Alternatywnie można użyć opcji Wstaw kolumnę szablonu z menu głównego.
W obu przypadkach wyświetlane jest okno dialogowe Konfigurator szablonów.
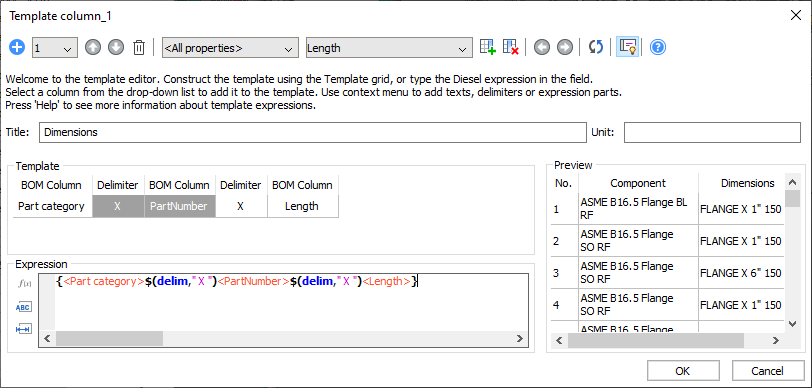
To okno dialogowe umożliwia skonfigurowanie tytułu, wyrażenia i, jeśli to konieczne, jednostki dla kolumny szablonu. Wyświetla również podgląd wyników. Pole wyrażenia obsługuje auto uzupełnianie.
Kolumny szablonu mogą zawierać więcej niż jedno podwyrażenie szablonu. W takim przypadku będą one oszacowane od pierwszego do ostatniego i zostanie użyte pierwsze podwyrażenie dające niepusty wynik. Konfigurator szablonów pozwala dodawać, usuwać i przełączać się między podwyrażeniami szablonów za pomocą paska narzędzi. Pozwala również na zmianę kolejności podwyrażeń szablonu.
Uwaga: Zauważ, że w polu wyrażenia wszystkie podwyrażenia są wyświetlane jednocześnie, przy czym każde podwyrażenie jest ujęte w nawiasy {}.Aby dodać podwyrażenie, kliknij
 .Aby usunąć bieżące podwyrażenie, kliknij
 . Uwaga: Po usunięciu ostatniego podwyrażenia zostanie ono zastąpione pustym.
Aby zmienić bieżące podwyrażenie, wybierz numer wymaganego podwyrażenia z listy rozwijanej.
Użyj
 i
i  , aby zmienić kolejność podwyrażeń.
Aktualnie wybrane podwyrażenie można skonfigurować za pomocą sekcji Szablon. Każda kolumna w tej sekcji reprezentuje element wyrażenia szablonu, który można zmienić.
Rodzaje elementów szablonu to:- Odniesienie do kolumny: reprezentuje odniesienie do kolumny BOM lub właściwości. Aby dodać odwołanie do kolumny, wybierz żądaną kolumnę z listy właściwości. Zostanie ona automatycznie dodana za ostatnią wybraną kolumną lub, jeśli nie wybrano żadnej kolumny, za ostatnią kolumną. Jeśli to konieczne, Ogranicznik zostanie automatycznie dodany przed Odniesieniem do kolumny.
- Ogranicznik: reprezentuje separator między dwoma elementami. Tekst ogranicznika pojawi się w ostatecznym wyniku tylko wtedy, gdy tekst po obu jego stronach nie będzie pusty. Na przykład, jeśli masz odniesienia do kolumn PartNumber i Length z separatorem "X" między nimi, "X" zostanie dodany do końcowego tekstu tylko wtedy, gdy zarówno PartNumber, jak i Length nie są puste. W większości przypadków ograniczniki są dodawane automatycznie. Możesz jednak dodać ograniczniki, używając przycisku
 i wybierając z listy rozwijanej Dodaj ogranicznik. Alternatywnie możesz dodać ogranicznik z menu kontekstowego.
 - Tekst: reprezentuje niestandardowy tekst. Możesz dodać własny tekst, klikając
 i wybierając Dodaj tekst z listy rozwijanej. Alternatywnie możesz dodać własny tekst z menu kontekstowego.
 - Szacowany tekst: reprezentuje element, który powinien zostać dodany do końcowego wyrażenia bez zmian. Szacowany tekst może zawierać funkcje lub inne specjalne symbole, które modyfikują wynik. Możesz dodać szacowany tekst, używając przycisku
 i wybierając z listy rozwijanej Dodaj wyrażenie. Alternatywnie możesz dodać szacowany tekst z menu kontekstowego.
W każdej chwili możesz zmienić zawartość dowolnego elementu w szablonie. Możesz także usuwać elementy, wybierając je i używając przycisku
 lub wybierając opcję Usuń kolumnę z menu kontekstowego. Aby przenieść element, wybierz kolumnę w szablonie, a następnie przeciągnij ją i upuść w żądanym miejscu. Wszelkie modyfikacje szablonu zostaną odzwierciedlone w polu wyrażenia. Podobnie wszelkie zmiany w polu wyrażenia zostaną odzwierciedlone w obszarze szablonu.
Aby dodać kolumnę szablonu do tabeli BOM, kliknij OK.
- Kolumna miniatur
- Aby dodać kolumnę miniatur, wykonaj jedną z poniższych czynności:
- Wybierz kategorię <Evaluated column> za pomocą selektora kategorii.
- Wybierz "<Thumbnails column>" w selektorze kolumn.
- Użyj narzędzi Wstaw kolumnę za lub Wstaw kolumnę przed.
lub
- Użyj opcji Wstaw kolumnę miniatur z menu głównego.
W obu przypadkach do tabeli zostanie wstawiona kolumna z miniaturami.
Po wstawieniu możliwe jest dostosowanie parametrów miniatur za pomocą właściwości kolumny, takich jak rozmiar, kolor tła, typ widoku i styl wizualny.
Wiersz stopki
Tabela BOM może zawierać wiersz stopki. Aby dodać wiersz stopki, określ typ stopki dla co najmniej jednej kolumny. Domyślnie tytuł wiersza stopki to Całkowita:. Zmień tytuł stopki za pomocą właściwości Tytuł stopki w sekcji właściwości Listy materiałów siatki Właściwości.
Możliwe jest również dodawanie stopek do kolumn formuł lub szablonów.
Więcej informacji na temat wiersza stopki w zestawieniu BOM można znaleźć w sekcji Stopka w zestawieniu materiałów.
Zobacz też: Dodaj stopkę do kolumny.
Kolumny zagregowane
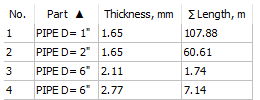
W tabelach BOM najwyższego poziomu, najniższego poziomu i hierarchicznych niemal każda kolumna może zostać przypisana za pomocą funkcji agregacji. Funkcje agregujące grupują wartości kilku wierszy w BOM (które różnią się tylko tymi wartościami) w jedną wartość. Na przykład, funkcje agregujące mogą służyć do obliczania całkowitej długości rur w odniesieniu do ich rozmiaru i grubości lub do łączenia wszystkich rozmiarów śrub i nakrętek użytych w zespole w jednej komórce.
Więcej informacji można znaleźć w sekcji Jednostki kolumnowe w zestawieniu materiałów.
- Kliknij prawym przyciskiem myszy tytuł kolumny i wybierz żądaną funkcję agregującą z podmenu Funkcja agregująca.
- Wybierz kolumnę i zmień funkcję agregującą w odpowiedniej właściwości kolumny.
Kolumny zagregowane są oznaczone w tytule symbolem ∑.
Przykład zagregowanych kolumn:
Szablony
Konfiguracje BOM można zapisać jako szablony. Użyj menedżera BOM, aby utworzyć nową tabelę z szablonu i zastąpić bieżącą konfigurację tabeli konfiguracją z szablonu. W każdej chwili możesz zapisać konfigurację jako szablon. Możesz zmienić załadowaną konfigurację szablonu za pomocą zwykłych narzędzi i zapisać ją jako inny szablon.
Więcej informacji na temat szablonów BOM można znaleźć w sekcji Szablony w zestawieniu materiałów.
Wyszukiwanie

Menedżer BOM posiada pole wyszukiwania, które umożliwia wyszukanie określonej wartości w tabeli. W polu wyszukiwania można również używać symboli wieloznacznych. Domyślnie BricsCAD przeszukuje całą tabelę. Aby ograniczyć obszar wyszukiwania, wybierz wymagane kolumny. Jeśli wartość zostanie znaleziona, kursor przesunie się do tej komórki. Jeśli nie wybrano żadnych kolumn, zaznaczony jest wiersz. Siatka automatycznie przewija się, aby komórka była widoczna. Aby znaleźć inną wartość, użyj przycisków  lub
lub  . Możesz także użyć F3 lub Ctrl+F3. Aby wybrać wszystkie znalezione wyniki, użyj przycisku
  .
.
Domyślnie wyszukiwany jest tekst w polu wyszukiwania. Można jednak również użyć symboli wieloznacznych.
Obsługiwane są następujące symbole specjalne:
| Nazwa | Znak | Opis |
|---|---|---|
| Odwrotny cytat | ` | Ucieka następnemu znakowi (dosłownie). |
| Przecinek | , | Oddziela wzory. |
| Gwiazdka | * | Dopasowuje dowolną sekwencję znaków, w tym sekwencję zerową, w dowolnym miejscu. |
| Znak zapytania | ? | Dopasowuje pojedynczy znak. |
| Okres | . | Dopasowuje pojedynczy znak niealfanumeryczny. |
| Na znaku | @ | Dopasowuje pojedynczy znak alfabetyczny. |
| Symbol funta | # | Dopasowuje pojedynczy znak numeryczny. |
| Tilde | ~ | Jeśli pierwszy znak we wzorcu pasuje do czegokolwiek poza wzorcem. |
| Nawiasy | [...] | Dopasowuje pojedynczy zamknięty znak. |
| Wsporniki tyldy | [~...] | Dopasowuje pojedynczy nieujęty znak. |
| Łącznik | - | W nawiasach dopasowuje pojedynczy znak z określonego zakresu. |
Aby otworzyć pole wyszukiwania, użyj narzędzia Szukaj na pasku narzędzi lub użyj klawiszy Ctrl+F.
Powiązana tabela
Każda tabela BOM w menedżerze może mieć powiązaną tabelę w dokumencie, która jest aktualizowana po zmianie konfiguracji BOM. Tabela BOM może mieć tylko jedną powiązaną tabelę. Można jednak tworzyć tabele BOM, które nie mają skojarzonej tabeli w dokumencie.
Aby utworzyć powiązaną tabelę, użyj opcji Umieść/zaktualizuj tabelę. Jeśli tabela BOM została utworzona za pomocą BMBOM, powiązana tabela jest tworzona automatycznie.
Możesz zlokalizować powiązaną tabelę w dokumencie za pomocą opcji lub . W razie potrzeby aktywny układ przełącza się na powiązany układ tabeli.
Powiązaną tabelę można usunąć za pomocą opcji . Alternatywnie można odłączyć powiązaną tabelę od tabeli BOM za pomocą opcji . Po odłączeniu skojarzona tabela traci łącze do tabeli BOM i nie jest aktualizowana wraz z BOM.
Aktualizowanie BOM
Z BricsCAD V20.2 menedżer BOM automatycznie aktualizuje zawartość tabeli w panelu, gdy zespół jest modyfikowany lub aktualizowany. W przypadku dużych zespołów może to być niewygodne. Menedżer BOM automatycznie aktualizuje tabelę, gdy jest aktywna.
Aby uniknąć automatycznej aktualizacji, zamknij Menedżera BOM, aby panel był nieaktywny.
Zawartość menedżera BOM można odświeżyć ręcznie za pomocą polecenia Odśwież.
Dodawanie nowego zestawienia materiałów
- Użyj podmenu Nowy BOM w Menu głównym:Uwaga: Jeśli zmienna systemowa BOMTEMPLATE zawiera prawidłową ścieżkę do pliku .bom ten szablon będzie używany do tworzenia nowych tabel BOM. Jeśli jest pusta lub ścieżka jest nieprawidłowa, zostanie użyta poniższa domyślna konfiguracja BOM.

- Wybierz typ BOM lub wybierz Z szablonu, aby wybrać plik szablonu dla BOM.
Wybór bieżącego zestawienia materiałów
Użyj selektora BOM, aby wybrać istniejące zestawienie materiałów.
Zmianacbieżącego typu BOM
Zmień właściwość Typ w sekcji właściwości zestawienia materiałów siatki Właściwości.

Zmiana zestawu właściwości bieżącego zestawienia materiałów
Zmień Zestaw właściwości w sekcji właściwości zestawienia materiałów siatki Właściwości.

Zmiana trybu zliczania hierarchicznego BOM
Zmień właściwość Tryb zliczania w sekcji właściwości zestawienia materiałów siatki Właściwości.

Zmiana trybu grupowania na najwyższym lub najniższym poziomie oraz hierarchicznych zestawień BOM
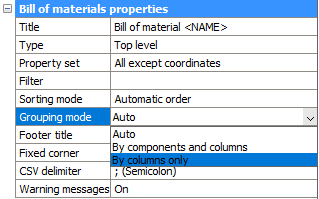
Zmień właściwość Tryb grupowania w sekcji właściwości zestawienia materiałów siatki Właściwości.
Ustawianie niestandardowego filtra dla bieżącego zestawienia materiałów
-
Wybierz opcję Ustaw filtr z Menu głównego.
Zostanie wyświetlone okno dialogowe Filter Configurator (Konfigurator filtra ).
-
Skonfiguruj filtr za pomocą narzędzia dialogowego.
Zobacz Filtr, aby uzyskać szczegółowe informacje.
-
Kliknij OK, aby zastosować filtr.

Dodawanie nowych kolumn do bieżącego BOM
-
W stosownych przypadkach użyj selektora kategorii, aby wybrać kategorię właściwości, które chcesz dodać.
-
Wybierz właściwość do dodania z listy dostępnych kolumn. Ta lista zawiera wszystkie kolumny z wybranej kategorii, które nie zostały jeszcze dodane do BOM. Jeśli zaczniesz wpisywać nazwę pola, BricsCAD® automatycznie zasugeruje Ci nazwy. Kliknij, aby wybrać go z listy.
- (opcjonalnie) Wybierz kolumnę w BOM, obok której chcesz umieścić nową kolumnę.
-
Kliknij Wstaw kolumnę za (
 ), aby umieścić nową kolumnę za wybraną kolumną, lub Wstaw kolumnę przed (
 ), aby umieścić nową kolumnę przed wybraną kolumną.
Jeśli nie wybrano żadnej kolumny, nowa kolumna zostanie umieszczona odpowiednio na ostatniej lub pierwszej pozycji.
Dodawanie szacowanej kolumny
-
Wybierz kategorię Szacowana kolumna za pomocą selektora Kategorii.
-
Wybierz Kolumna z formułą, aby utworzyć kolumnę z formułą lub wybierz Kolumna szablonu, aby utworzyć kolumnę szablonu.
-
Kliknij Wstaw kolumnę za (
 ), aby umieścić nową kolumnę za wybraną kolumną, lub Wstaw kolumnę przed (
 ), aby umieścić nową kolumnę przed wybraną kolumną.
Jeśli nie wybrano żadnej kolumny, nowa kolumna zostanie umieszczona odpowiednio na ostatniej lub pierwszej pozycji.
Zostanie wyświetlone okno dialogowe do konfiguracji szacowanej kolumny.
-
Zmień Nazwę kolumny.
-
W razie potrzeby zmień Jednostkę.
-
Skonfiguruj wyrażenie za pomocą narzędzi dialogowych.
-
Kliknij OK, aby dodać kolumnę do tabeli BOM.
Dodawanie kolumny szablonu z wybranych kolumn
-
Wybierz kolumny do połączenia w kolumnie szablonu. Użyj klawisza Ctrl, aby wybrać wiele kolumn lub klawisza Shift, aby wybrać zakres kolumn.
-
Kliknij prawym przyciskiem myszy nazwę jednej z wybranych kolumn.
-
Wybierz Dodaj kolumnę szablonu z wybranego z menu kontekstowego.
Zostanie wyświetlone okno dialogowe do konfiguracji szacowanej kolumny.
-
Zmień Nazwę kolumny.
-
W razie potrzeby zmień Jednostkę.
-
Skonfiguruj wyrażenie za pomocą narzędzi dialogowych.
-
Kliknij OK, aby dodać kolumnę do tabeli BOM.
-
W razie potrzeby usuń lub ukryj kolumny, które nie są już potrzebne.
Zmiana szacowanej kolumny
-
Kliknij prawym przyciskiem myszy nazwę kolumny w siatce BOM.
-
Wybierz Edytuj wyrażenie kolumny z menu kontekstowego.
Zostanie wyświetlone okno dialogowe do konfiguracji szacowanej kolumny.
- W razie potrzeby zmodyfikuj nazwę kolumny, jednostkę i wyrażenie.
-
Kliknij OK, aby zastosować zmiany.
Usuwanie kolumny z bieżącego BOM
-
Wybierz kolumnę w siatce.
- Kliknij narzędzie Usuń kolumnę (
 ) lub naciśnij klawisz Delete.
Zmiana nazwy BOM
Użyj opcji Tytuł BOM, aby edytować tytuł lub użyj właściwości Tytuł w sekcji właściwości zestawienia materiałów w siatce Właściwości.
Możesz użyć symbolu zastępczego <NAZWA>, aby odwołać się do nazwy zestawu.
Zmiana tytułu wiersza stopki
Użyj właściwości Tytuł stopki w sekcji Właściwości zestawienia materiałów w siatce Właściwości.
Dodawanie prefiksu lub sufiksu do liczb
-
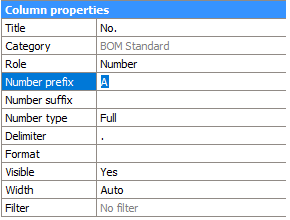
Wybierz kolumnę Numer.
-
Wybierz Właściwość Numer sufiksu w sekcji Właściwości kolumny.
-
W razie potrzeby wprowadź nowy ciąg prefiksu.
-
Wybierz Właściwość Numer sufiksu w sekcji Właściwości kolumny.
-
W razie potrzeby wprowadź nowy ciąg sufiksu.
Zmiana separatora między liczbami w hierarchicznym zestawieniu materiałów
-
Wybierz kolumnę Numer.
-
Wybierz właściwość Separator w sekcji Właściwości kolumny.

-
Wprowadź nowe wyrażenie ogranicznika.
Zmiana typu numeru w hierarchicznym zestawieniu materiałów
-
Wybierz kolumnę Numer.
-
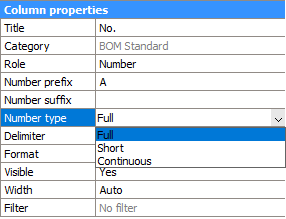
Wybierz właściwość Typ liczby w sekcji Właściwości kolumny.
-
Wybierz żądany typ numeru.
Zmień tytuł kolumny
-
Wybierz kolumnę w siatce BOM.
-
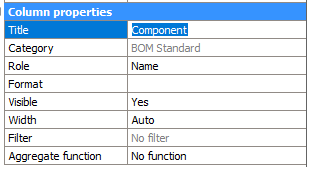
Wybierz właściwość Tytuł w sekcji Właściwości kolumny.
-
Zmień wartość właściwości Tytuł na nowy tytuł kolumny.
Zmień format kolumny
-
Wybierz kolumny.
-
Kliknij prawym przyciskiem myszy tytuł wybranej kolumny.
-
Wybierz Format z menu kontekstowego.
Zostanie wyświetlone okno dialogowe Format.

-
Zdefiniuj żądany format.
-
Kliknij OK, aby zastosować zmiany.
Zmiana jednostek i trybów umieszczania jednostek dla kolumny
-
Wybierz kolumny.
-
(Opcjonalnie) Zmień właściwość Rozmieszczenie jednostek w sekcji Właściwości kolumny.
-
(Opcjonalnie) Zmień właściwość Tryb jednostek w sekcji Właściwości kolumny.
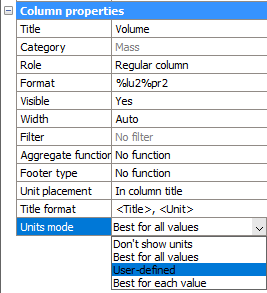
- (Opcjonalnie) Zmień Format tytułu.
- Użyj <Tytuł>, aby dodać tytuł kolumny.
- Użyj <Rozdział>, aby dodać jednostkę kolumny.
- Użyj znaku \n, aby dodać podział wiersza.
Zapisanie aktualnej konfiguracji jako szablon
-
Wybierz Zapisz jako szablon (
 ) w menu głównym (
 ).
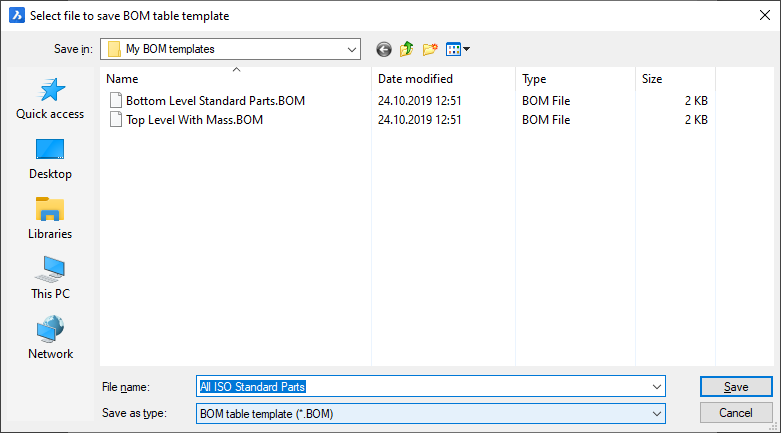
).Wyświetlone zostanie okno dialogowe wyboru nazwy i lokalizacji pliku szablonu:
-
Określ nazwę i lokalizację pliku szablonu.
-
Kliknij przycisk Zapisz.
Eksportowanie bieżącej tabeli do CSV
-
(Opcjonalnie) Dostosuj właściwość Separator CSV tabeli.
-
Wybierz Eksportuj do CSV w menu głównym (
 ).
).Zostanie wyświetlone okno dialogowe wyboru nazwy i lokalizacji pliku CSV.

-
Określ nazwę i lokalizację pliku CSV.
-
Kliknij przycisk Zapisz.


 ).
).