


Tworzenie płyt
Polecenia
MBWYCIĄGNIJ, POLIBRYŁA
Uwaga:
Polecenie MBWYCIĄGNIJ umożliwia wyciągnięcie zamkniętego elementu 2D, takiego jak polilinie, okręgi, elipsy, oraz wyciągnięcie wykrytej obwiedni, zamkniętej ścianami i/lub elementami 2D.
Polecenie POLIBRYŁA umożliwia tworzenie dachów spadzistych.
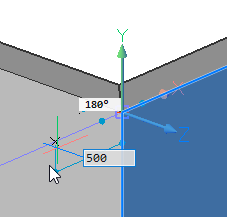
Tworzenie płyt stropowych między ścianami
Upewnij się, że:
- Opcja Włącz wykrywanie granic zmiennej systemowej SELECTIONMODES jest włączona.
- Dolne ściany otaczających ścian znajdują się w płaszczyźnie XY bieżącego układu współrzędnych.
W razie potrzeby przesuń początek układu współrzędnych.
- Wymiary dynamiczne są włączone.
- Przesuń kursor wewnątrz otaczających ścian.
- Gdy obwiednia zostanie podświetlona, wybierz opcję Wyciągnięcie w grupie poleceń Model w Quad.
Płyta jest wyciągana dynamicznie.
- Wykonaj jedną z następujących czynności:
- Wpisz grubość płyty w polu wymiarowania dynamicznego.
- Wybierz punkt.
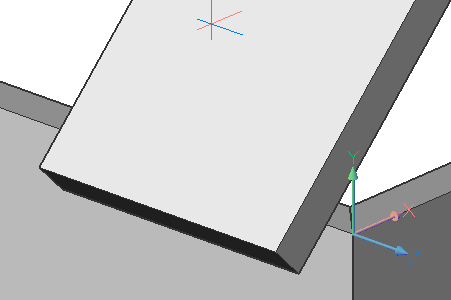
Tworzenie połaci dachowej spadzistej
Upewnij się, że:
- Dynamiczny LUW jest włączony.
- Wymiary dynamiczne (DYN) jest włączone; zaleca się ustawienie opcji Śledzenie wymiarów dynamicznych zmiennej systemowej DYNMODE.
- Funkcja Entity Snap Tracking (STRACK) jest włączona.
- Przyciąganie jednostki punktu końcowego jest włączone.
- Uruchom polecenie POLIBRYŁA.
Zostanie wyświetlony monit: Punkt początkowy lub [Wysokość/Szerokość/Wyrównanie/Element/Oddzielne bryły/Dynamiczne] <Entity>:
- Przesuń kursor na zewnętrzną powierzchnię ściany, która jest prostopadła do połaci dachowej, którą chcesz utworzyć.
- Gdy twarz zostanie podświetlona, naciśnij Shift, aby zablokować dynamiczny LUW.
- Wykonaj jedną z następujących czynności:
Aby utworzyć dach na górnej krawędzi ściany, chwyć do zewnętrznego górnego narożnika ściany.
Aby utworzyć okap dachu (okap):- Przesuń kursor nad zewnętrzny górny narożnik ściany, aby wymagać śledzenia punktu przyciągania.
- Kiedy mały czerwony krzyżyk wskazuje, że punkt śledzenia został osiągnięty, przesuń kursor na zewnątrz i wpisz odległość zwisu w polu wprowadzania dynamicznego.
- Naciśnij TAB, aby uaktywnić pole Kąt, a następnie wpisz kąt nachylenia i ponownie naciśnij TAB, aby przejść do pola Odległość.
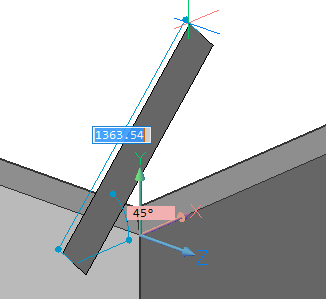
- Określ wysokość połaci dachowej, a następnie naciśnij dwukrotnie Enter: pierwszy Enter tworzy obrys połaci dachowej, a drugi Enter przerywa tworzenie drugiej bryły.
Połać dachowa jest wytłaczana dynamicznie.
- Określ punkt, aby zdefiniować długość wyciągnięcia.
- Powtórz poprzednie kroki, aby utworzyć więcej połaci dachowych.
- Użyj polecenia CONNECTWITHNEAREST, aby połączyć ściany z połaciami dachowymi.