Editing polylines
Use the edit polyline segments tools in the Quad or use the PEDITEXT command to:
- Add a vertex.
- Add multiple vertices
- Add vertices at the start or end.
- Modify the bulge factor of a segment.
- Add or remove a bulge.
- Stretch a vertex or a segment.
- Delete multiple vertices or segments.
- Delete a segment or a vertex.
Use the PEDIT command to:
- Convert an entity into a polyline.
- Fit a curve to a polyline.
- Taper a polyline uniformly along its length.
- Reverse the direction of a polyline.
Edit a polyline in the Properties panel to:
- Open or close a polyline.
- Apply a uniform width to a polyline.
- Change the width of a polyline segment.
- Set the linetype mode (PLINEGEN system variable).
Use grips editing to:
- Move a vertex.
- Move a segment.
- Remove a vertex.
Using the edit polyline segments tools in the Quad
- Place the cursor over the segment you want to edit without selecting the polyline.
The entire polyline is highlighted.
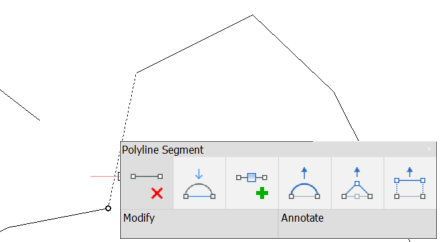
- Choose one option from the Modify section of the Quad.Note: If you press Ctrl key, only the segment under the cursor is highlighted and one of its vertices is marked with a dot.
The editing tools, similar to the options of the PEDITEXT command, are available in the Quad:
 Add vertex: adds a vertex to the segment under the cursor.
 Add vertex at end: adds as a new vertex at the end of the polyline.
This option is only available if the cursor is on one of the endpoints of a polyline.
 Add Multiple vertices: adds multiple vertices
 Add bulge: adds the bulge of the segment under the cursor.
 Remove bulge: removes the bulge of the segment under the cursor.
 Remove segment: deletes the segment under the cursor or the highlighted vertex.
 Remove Multiple segments: deletes the segments under the cursor or the highlighted vertex.
 Stretch segment: moves the segment under the cursor.
 Stretch vertex: moves the vertex closest to the cursor.
- Select a tool, then follow the instructions in the Command line.
How to remove a vertex using Quad
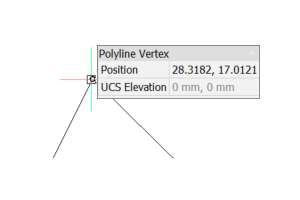
- Place the cursor over a segment and hold down the Ctrl key to highlight it.
- Activate the vertex by moving the cursor near the desired end of the segment. A dot will mark the active vertex.
- Click the Remove segment button in the Quad.
How to edit a vertex using Grips
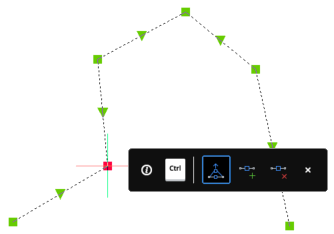
- Start or End vertex
-
- Select a start or end vertex grip. It will be marked with red.
- When the Hotkey Assistant is enabled, you can cycle through stretching, adding, and removing vertex by pressing the Ctrl key.
- Middle vertex
-
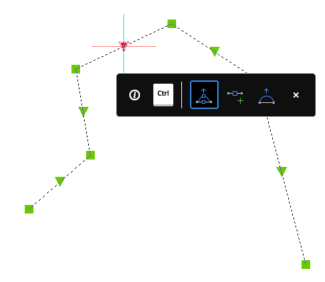
- Select the middle vertex grip. It will be marked with red.
- When the Hotkey Assistant is enabled, you can cycle through stretching, adding vertex, and adding or removing bulge by pressing the Ctrl key.
Launching the PEDIT command

Do one of the following:
- Double-click a polyline.
- Click the Edit Polyline tool in the Modify menu.
- Click the Edit Polyline tool on the Modify toolbar.
Converting an entity into a polyline
- Launch the PEDIT command.
- Select the entity.
You are prompted: The selected entity is not a polyline. Turn it into one? [Yes-turn into polyline/No-leave as is] <Yes-turn into polyline>:
- Press Enter or right-click.
You are prompted: Edit polyline [Edit vertices/Close/Decurve/Fit/Join/Linetype mode/Reverse direction/Spline/Taper/Width/Undo] <eXit>:
- Choose an option or right-click to stop.
Fitting a curve to a polyline
- Launch the PEDIT command.
- Select the polyline.
- Do one of the following:
- Choose the Fit option.
- Choose the Spline option.
- Press Enter or right-click to conclude the PEDIT command.
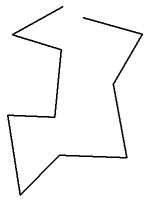
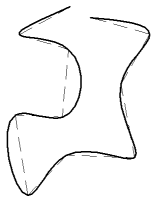
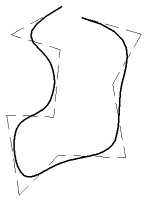
Original polyline After applying Fit After applying Spline
- Use the Decurve option to restore the original polyline.
- The SPLINESEGS (Spline Segments) system variable controls the number of segments (lines or arcs) to be generated for spline-fit polylines.
Tapering a polyline uniformly along its length
- Launch the PEDIT command.
- Select the polyline.
- Choose the Taper option.
You are prompted: Enter new starting polyline width <current width>:
- Type a value.
You are prompted: Enter new ending polyline width <current width>:
- Type a value.
The polyline is tapered.
- Press Enter or right-click to conclude the PEDIT command.
Reversing the direction of a polyline
- Launch the PEDIT command.
- Select the polyline.
- Choose the Reverse direction option.
The direction is reversed.
- Press Enter or right-click to conclude the PEDIT command.
Opening or closing a polyline
- Select the polyline.
- Select the Closed property under Misc in the Properties panel.
- Choose No or Yes.
Or
- Double-click the polyline.
- Type C to close, or O to open.
Applying a uniform width to a polyline
- Select the polyline.
- Select the Global width property under Geometry in the Properties panel.
- Type the desired width.
Changing the width of a polyline segment
- Select the polyline.
- Select the Vertex property under Geometry in the Properties panel.
An X mark is displayed at the start vertex of the polyline.
- Click the arrow keys at the right hand side of the vertex property field to set the X marker at the start vertex of the segment you want to change the width of.
- Select the Start width property and type the desired width.
- Select the End width property and type the desired width.
Setting the linetype mode
The Linetype generation mode (PLINEGEN system variable) controls how a dashed linetype is applied to a multi-segment polyline. When disabled, dashed linetypes are applied per segment: start/end with a dash at each vertex.

PLINEGEN On (left) and Off (right)
- Select the polyline.
- Select the Linetype generation property under Misc in the Properties panel.
- Select disabled or enabled.

