Szablony dla wygenerowanych rysunków
Informacje
BricsCAD® BIM zawiera szereg szablonów umożliwiających dostosowanie wygenerowanych rysunków. Szablony te są przechowywane w folderze Support w następującej ścieżce:
C:\Users\%username%\AppData\Roaming\Bricsys\BricsCAD\V24x64\en_US\Support\Bim\Sections
Folder AppData jest domyślnie folderem ukrytym, może być konieczne uprzednie odkrycie folderów. Dostęp do tej ścieżki można również uzyskać za pomocą polecenia FOLDERPOMOCNICZY.
Aby zrozumieć, jak to działa, musisz wiedzieć, w jaki sposób BricsCAD® tworzyć warstwy, kreskowania, znaczniki i bloki.
Zrozumienie utworzonych warstw
- Otwórz szablon milimetrowy BIM-mm.dwt i zapisz rysunek.
- Narysuj dwa pudełka o wymiarach 500x500x400, jedno trochę za drugim.
- Umieść pierwsze pudełko na warstwie Warstwa1 (o kolorze warstwy zielonym), a drugie pudełko na warstwie Warstwa2 (o kolorze warstwy czerwonym).
- Utwórz przekrój BIM, wyrównany z przednią powierzchnią pierwszego zielonego pudełka i przecinającą go pośrodku, ale nie przecinającą drugiego, czerwonego pudełka .
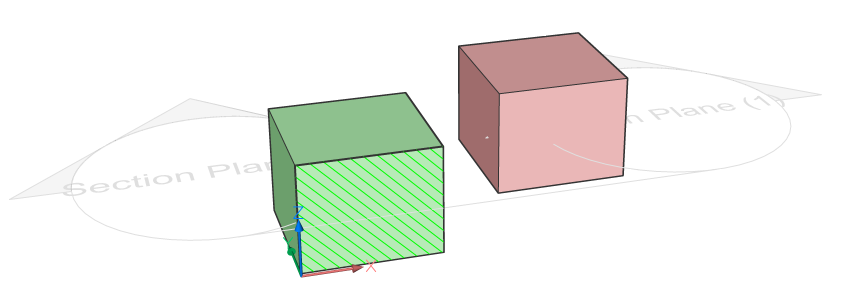
- Wygeneruj i otwórz rysunek przekroju.

- Spójrz na panel Warstw: utworzono trzy grupy warstw: Tło, Granica i Wypełnienie.
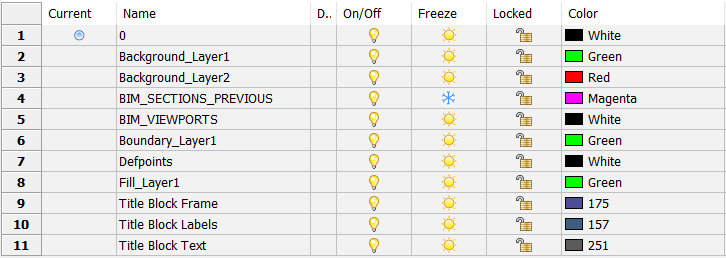
- Wygenerowane warstwy dla zielonej bryły to:
- Boundary_Layer1: granica przekroju przez pole.
- Fill_Layer1: kreskowanie przekroju.
- Background_Warstwa1: pokazuje podobiekty (np. wierzchołki brył), które nie są podzielone.
- Wszystkie warstwy dziedziczą kolor warstwy Warstwa1.
- Ponieważ czerwona bryła nie jest podzielona przekrojem, tworzona jest tylko warstwa Background_Warstwa2. Dziedziczy ona kolor warstwy Warstwa2.
- Przeciągnij kompozycję Cavity Wall, Brick z panelu Kompozycji na zielone pole.Uwaga: Ustaw zmienną systemową LEVELOFDETAIL na 1 lub 2, aby wyświetlić materiały warstwowe.Uwaga: Kompozycja zawsze ma priorytet, gdy jest przypisana do bryły umieszczonej na kolorowej warstwie. Oznacza to, że priorytet mają kolory ustawione domyślnie dla warstw kompozycji, a nie kolor przypisany do warstwy bryły.
- Kliknij dwukrotnie kompozycję Cavity Wall, Brick w panelu Kompozycji.
Ta kompozycja składa się z 4 warstw, każda z własnego materiału. Materiał fizyczny jest powiązany ze wzorem kreskowania używanym w rzutach i przekrojach pięter. Dla elewacji określony jest inny wzór.
- Przypisz kompozycję Beton, zbrojony do czerwonego pudełka.
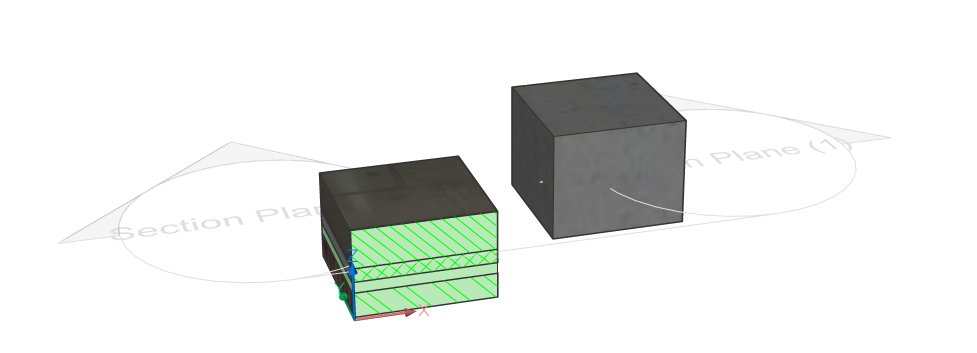
- Zaktualizuj i otwórz przekrój.

- Przejdź do swoich warstw i wykorzystaj polecenie Usuń, aby usunąć nieużywane warstwy.
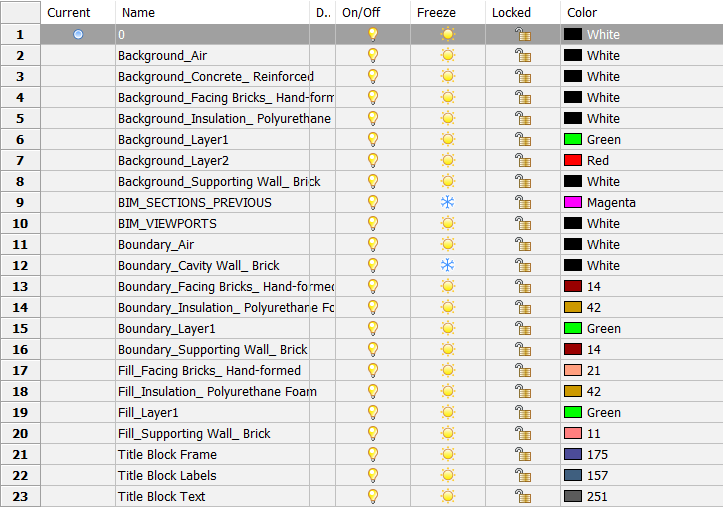
Ponownie zobaczysz trzy kategorie (Background, Boundary i Fill). Teraz druga część nazwy warstwy to nazwa fizycznego materiału użytego w bryle, zamiast nazwy warstwy pudełka:
- Background_Facing Bricks_Hand-formed, Background_Insulation_Polyurethane Foam i Background_Supporting Wall_Brick.
- Boundary_Facing Bricks_Hand-formed, Boundary_Insulation_Polyurethane Foam i Boundary_Supporting Wall_Brick.
- Fill_Facing Bricks_Hand-formed, Fill_Insulation_Polyurethane Foam i Fill_Supporting Wall_Brick.
- Ustaw właściwość Generuj wypełnienie elewacji przekroju na WŁ, aby dodać kreskowanie elewacji.
- Zaktualizuj przekrój.
- Obrys drugiego pudełka jest teraz kreskowany i dodano warstwę Elevation_Concrete_Reinforced.
Zrozumienie warstw BRX_2D
Te symbole 2D zastąpią rzeczywistą sekcję bryły 3D okna lub drzwi lub zostaną dodane do sekcji bryły 3D, w zależności od ich warstwy:
- Symbole na warstwie z przedrostkiem "BRX_2D_" lub " BRX_2D+_" zostaną dodane do bloku przekroju:
- bez przetwarzania przez analityczne usuwanie ukrytej linii (HLR), gdy płaszczyzna przekroju przecina komponenty.
Nie jest możliwe, aby ta geometria była zasłonięta przez inną geometrię. Np. masz stół i krzesła. Oba mają symbol 2D, ale stół znajduje się poniżej płaszczyzny przekroju, a krzesła są przez nią przecięte (oparcie jest wyżej niż stół). W takim przypadku nie jest możliwe, aby blat stołu (BRX_2D_ stołu) zasłaniał części krzeseł pod spodem.
- po przejściu przez procedurę analitycznego usuwania ukrytej linii (HLR), gdy płaszczyzna przekroju nie przecina komponentów.
- bez przetwarzania przez analityczne usuwanie ukrytej linii (HLR), gdy płaszczyzna przekroju przecina komponenty.
- Symbole na warstwie z przedrostkiem "BIM_2D_SECT_" lub "BIM_2D_SECT+_ " zostaną dodane tylko wtedy, gdy płaszczyzna przekroju przetnie komponenty. Cała geometria przechodzi przez procedurę analitycznego usuwania ukrytych linii (HLR). Może być użyty do uzyskania innej reprezentacji komponentu, gdy jest on pocięty, np. dla schodów.
- Symbole na warstwie z prefiksem BIM_2D_BACK_ lub BIM_2D_BACK+_ zawsze będą dodawane, a cała geometria przechodzi przez analityczną procedurę usuwania ukrytych linii (HLR). Umożliwia to rozwiązanie problemu stół-krzesło wspomnianego powyżej.
- Nazwa warstw symboli
- z +: symbol 2D zostanie dodany do sekcji bryłowej 3D komponentu.
- bez +: symbole 2D zastąpią rzeczywistą sekcję 3D komponentu.
Dodawanie elementów 2D
- Otwórz szablon milimetrowy BIM-mm.dwt i zapisz rysunek.
- Przeciągnij komponent Regał meblowy na rysunek. Komponent można znaleźć w kategorii Elementy wyposażenia w panelu Biblioteka (polecenie BIBLIOTEKAOTWÓRZ).
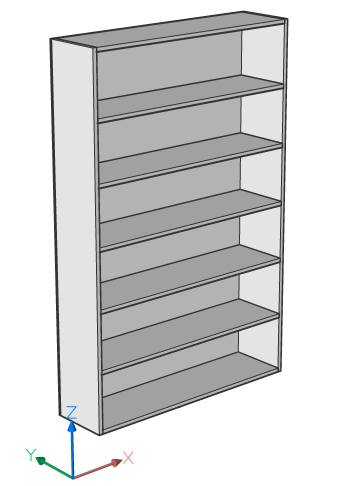
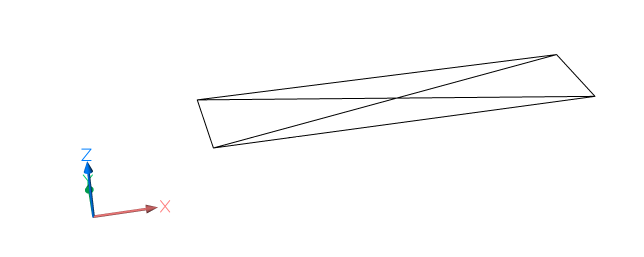
- Jeśli teraz pokażesz i wyizolujesz warstwę BRX_2D_Symbols, zobaczysz symbol narysowany w punkcie wstawiania półki.
- Pokaż ponownie wszystkie warstwy (polecenie WARODIZO) i utwórz sekcję przez półkę z książkami.
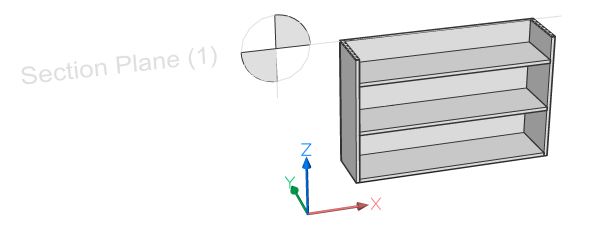
- Wygeneruj i otwórz rysunek Plany.

- Zobaczysz (jeśli włączona jest warstwa Boundary_BRX_2D_Symbols), że na planie rysowany jest tylko symbol, a nie rzeczywisty przekrój. Dzieje się tak, ponieważ ten komponent miał dołączony symbol 2D na warstwie BRX_2D.
- Teraz wróć do swojego modelu 3D i otwórz kopię półki z książkami.
- Ukryj sam regał i upewnij się, że warstwa BRX_2D_Symbols jest włączona.
- Usuń jedną z linii (krzyża).
- (Opcjonalnie) Narysuj dodatkowe linie 2D na warstwie BRX_2D_Symbols.
- Zapisz rysunek.
- Wróć do oryginalnego modelu 3D i wpisz BMWSTAW w wierszu poleceń i przejdź do ścieżki pliku, w którym właśnie zapisałeś nowy regał na książki. Kliknij OK i wybierz punkt wstawienia regału.
- Zregeneruj przekrój i otwórz go. W razie potrzeby poszerz rzutnię, przeciągając istniejącą rzutnię.

- Na drugim regale wyświetlany jest dostosowany symbol.
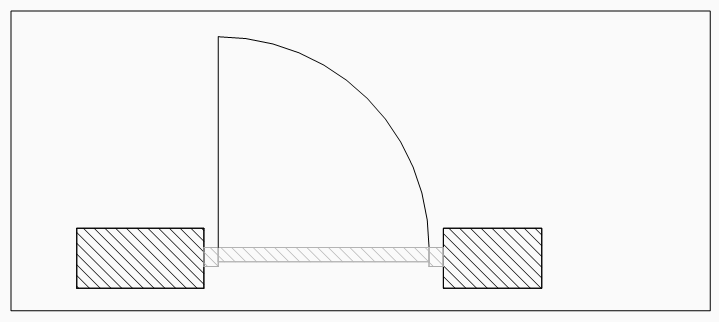
- Narysuj ścianę w modelu 3D i wstaw do niej drzwi Door Ext Plain.
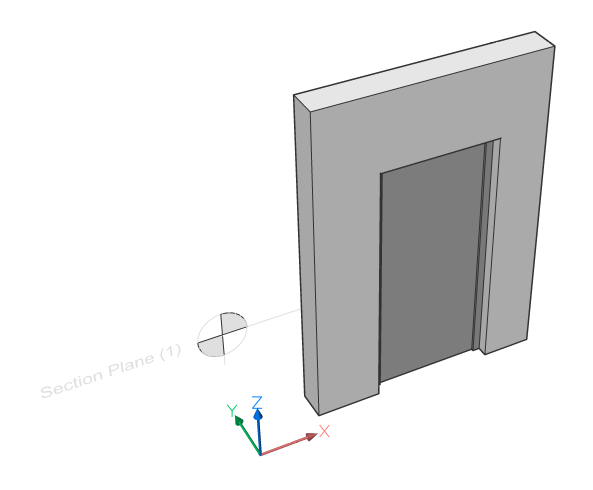
- Powtórz kroki od 3 do 5, ale teraz użyj warstwy BRX_2D+_Swing zamiast warstwy BRX_2D_Symbols.
- Wygenerowany rzut wyświetla symbol otwarcia drzwi oraz sam przekrój drzwi. Warstwa BRX_2D+ komponentu umożliwia wyświetlenie rzeczywistego przekroju wraz z symbolem.
- Symbole na warstwie z prefiksem BRX_2D_ zostaną użyte do zastąpienia geometrii wynikającej z rzeczywistego przekroju.
- Symbole na warstwie z prefiksem BRX_2D+_ zostaną dodane do wyniku przekroju. Tylko te elementy 2D, które znajdują się w płaszczyźnie równoległej do płaszczyzny przekroju.
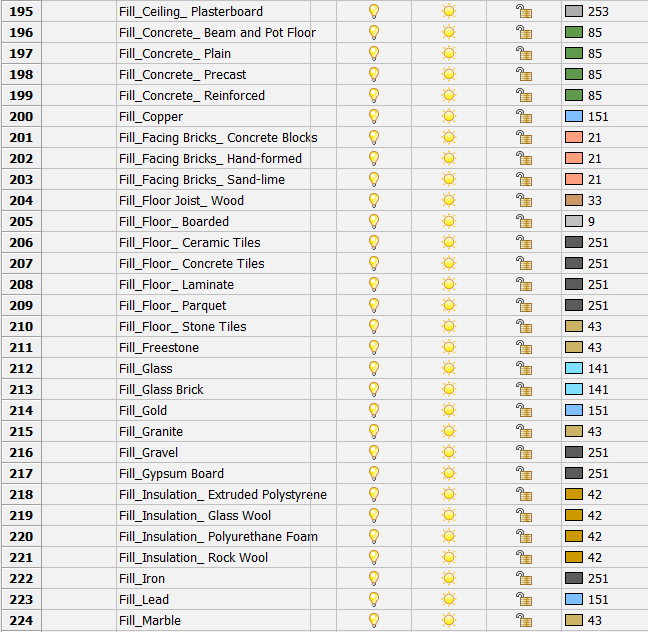
Dostosowywanie kolorów i grubości linii wzorów i linii kreskowania
- W powyższej procedurze Zrozumienie tworzonych warstw można zobaczyć, że dla obiektów bez kompozycji kolory i grubości linii warstw Fill_, Background_ i Boundary_ są kopiowane z właściwości warstw w modelu 3D.
- Jednak w przypadku obiektów z kompozycją domyślne kolory są ustawiane przez szablon znaleziony po wpisaniu polecenia FOLDERPOMOCNICZY i przejściu do Bim/Sections/_SectionSettings.dwg.
- Otwórz ten rysunek.
- Przejdź do panelu Warstwy, gdzie znajdziesz listę wszystkich możliwych warstw, które można utworzyć dla każdego materiału obecnego w bibliotece materiałów. Wszystkie mają kolor i grubość linii. Zmiana koloru lub grubości linii i zapisanie pliku spowoduje zmianę domyślnego koloru/grubości linii dla tej warstwy w przyszłych generowanych rysunkach. Możesz w pełni dostosować wygląd rysunku dla każdego rodzaju linii (Wypełnienia, Tła, Granicy lub Elewacji) dla każdego materiału.
Dostosowywanie wzorów kreskowania
- Otwórz rysunek wykonany w procedurze 'Zrozumienie utworzonych warstw'.
- Otwórz panel Kompozycje.
- Kliknij dwukrotnie kompozycję Cavity Wall, Brick.
- W procedurze Zrozumienie tworzonych warstw stwierdzono, że można tutaj zmienić wzory kreskowania materiałów. Sposób, w jaki musisz to zrobić, zostanie przedstawiony w kolejnych krokach.
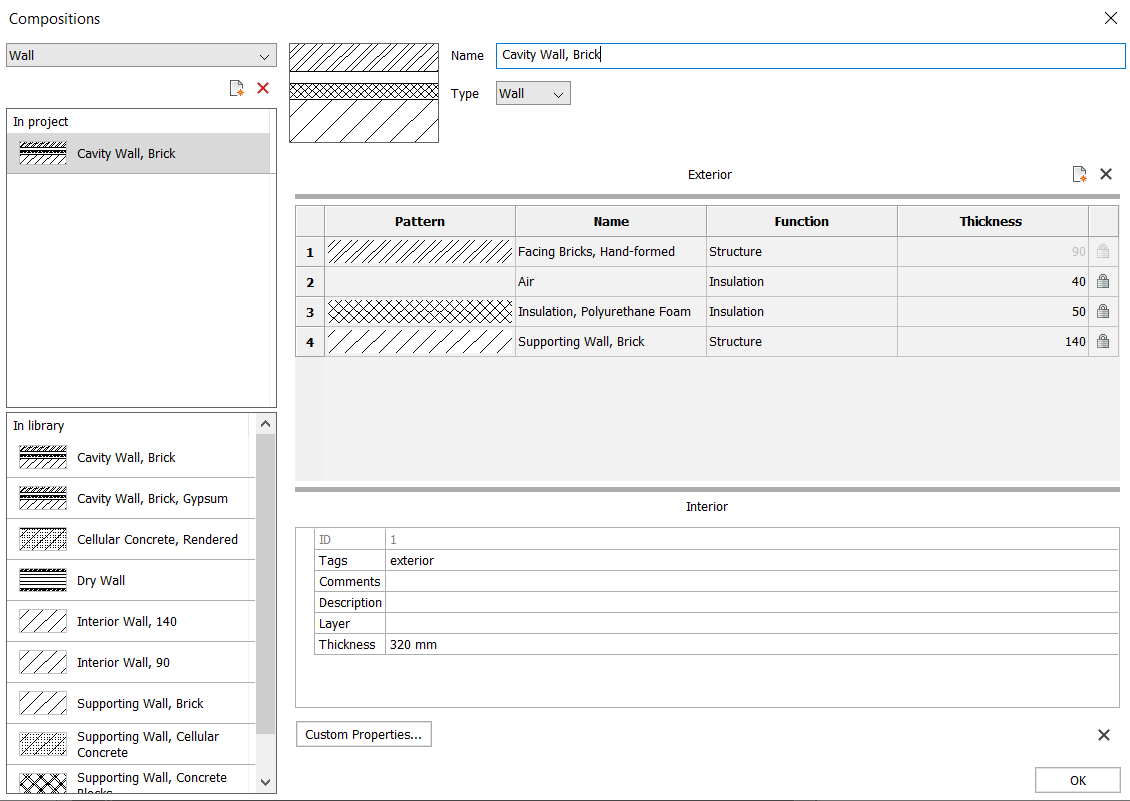
- Kliknij dwukrotnie rząd Facing Bricks, Hand-formed. W oknie dialogowym Materiały Fizyczne pojawi się materiał Facing Bricks, Hand-formed. Do tego okna dialogowego można było przejść, wpisując polecenie BLMATERIAŁY, a następnie wybierając materiał Facing Bricks, Hand-formed.
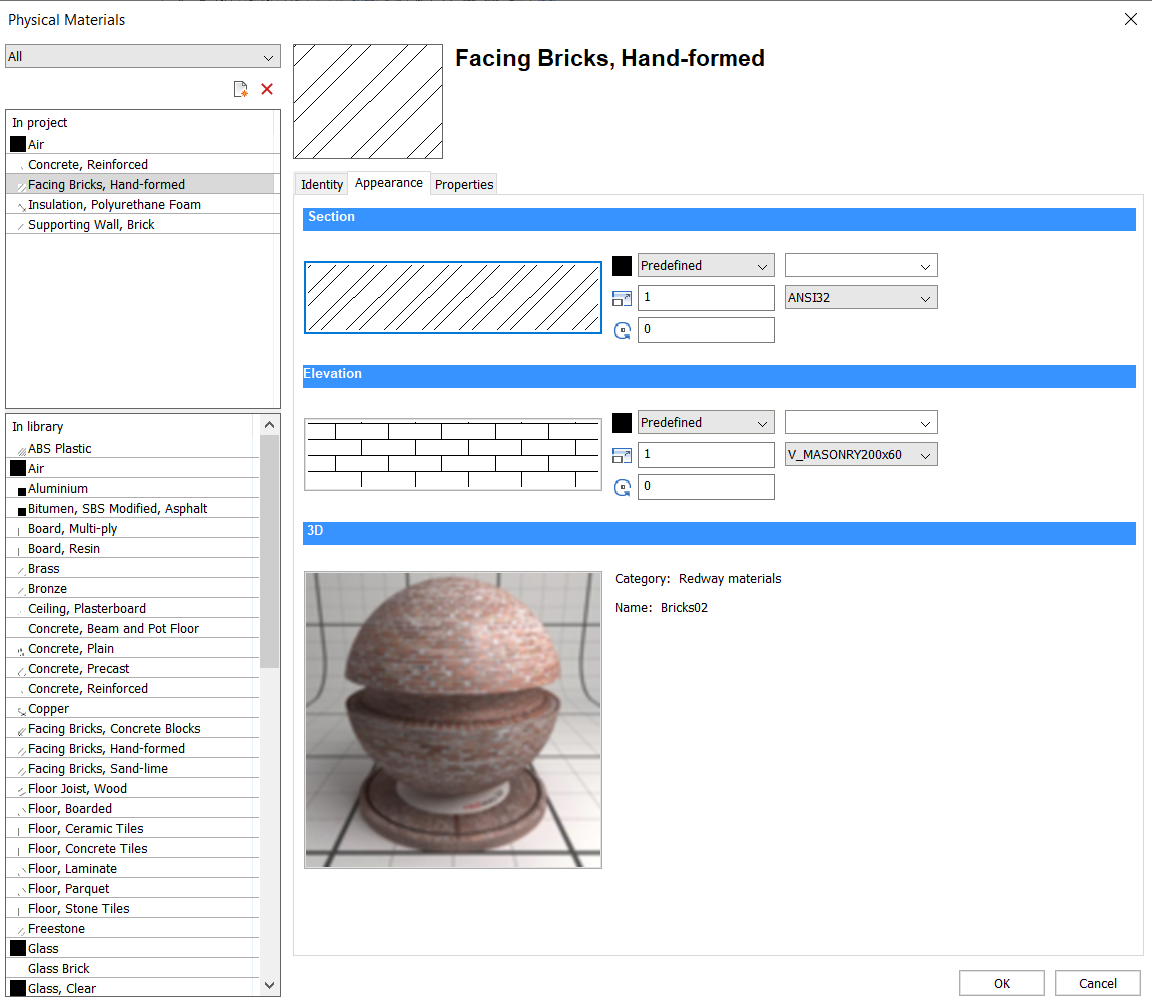
- Przejdź do zakładki Wygląd.
- Pod tytułem Przekrój kliknij dwukrotnie wzór kreskowania.
- Wybierz nową standardową reprezentację kreskowania sekcji dla tego konkretnego materiału. W każdej kompozycji z tym materiałem zostanie zastosowana ta sama reprezentacja kreskowania.
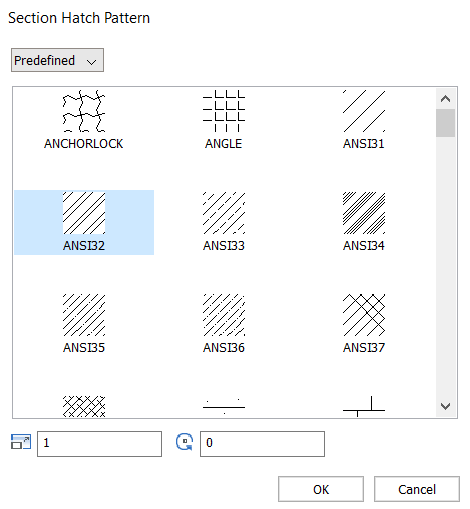
- Jeśli chcesz zmienić wygląd kreskowania elewacji, możesz to zrobić, klikając dwukrotnie wzór kreskowania pod tytułem Elewacja. Do określenia kreskowania elewacji zostanie użyty najbardziej widoczny zewnętrzny materiał kompozycji.
- Należy pamiętać, że reprezentacja tych kreskowań nie zostanie skopiowana do nowych rysunków, ponieważ okno dialogowe Materiały Fizyczne nie jest szablonem, ale raczej sposobem na zdefiniowanie reprezentacji na konkretnym rysunku.
Jeśli chcesz przechowywać te informacje, zaleca się uruchomienie biblioteki kompozycji. Najlepszym sposobem na to jest wykonanie rysunku, w którym do małych kostek przymocujesz kompozycje, które chcesz przechowywać. Upewnij się, że każda kompozycja ma odpowiedni wygląd kreskowania, przechodząc przez proces opisany powyżej.
- Po zakończeniu wpisz BIMPROJEKTINFO w wierszu poleceń. Pojawi się okno dialogowe Informacje o projekcie BIM.
- W zakładce Baza danych projektów zmień wartość bazy danych z Wstawione na Zewnętrzny. Zostaniesz poproszony o zapisanie bazy danych na komputerze i nadanie jej nazwy, na przykład CompositionsTemplate.bsyslib.
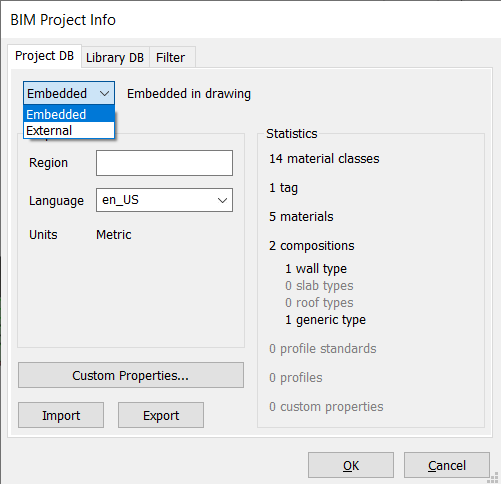
- Aby użyć tej bazy danych (BD Projektu) w nowym rysunku, zmień wartość bazy danych z Wstawione na Zewnętrzny, a następnie wybierz utworzony plik BSYSLIB.
Dostosowywanie znaczników według typu jednostki dla wszystkich rysunków przekrojów
- Utwórz dane źródłowe dla typu elementu BIM
- Dostosuj bloki znaczników
- Edytuj dane źródłowe, aby dostosować Tagi BIM dla wszystkich rysunków przekrojów
Aby zmienić tagi w bieżącym rysunku, należy wykonać procedurę Dostosuj bloki tagów tylko dla bieżącego rysunku.
Dostosowywanie bloków objaśnień
- Pliki źródłowe różnych bloków objaśnień i modułu śledzenia sekcji znajdują się w podfolderze ..\Support\Bim\Sections folderu Roamable Root. Domyślnie jest to: C:\Użytkownicy\%username%\AppData\Roaming\Bricsys\BricsCAD\V24x64\pl_PL\Support\Bim\Sections. Dostęp do tego pliku można uzyskać, wpisując FOLDERPOMOCNICZY w wierszu poleceń i przechodząc do .
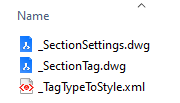
- Możesz edytować plik _SectionSettings.dwg, aby dostosować układ objaśnień i bloków śledzenia sekcji.
- Podczas generowania rysunku potrzebne bloki wywołań są tworzone z plików źródłowych bloków wywołań. Gdy przekrój BIM jest aktualizowany, wykorzystywane są istniejące bloki wywołań w rysunku docelowym (wpisz BEDYCJA, aby wybrać jeden do edycji).
Dostosowywanie szablonu zestawu arkuszy
- Szablony zestawów arkuszy są przechowywane w folderze C:\Użytkownicy\%username%\AppData\Local\Bricsys\BricsCAD\V24x64\pl_PL\Templates.
- Jeśli chcesz edytować istniejący szablon, masz dwie możliwości. Albo edytujesz go bezpośrednio, albo tworzysz kopię.
- Aby edytować go bezpośrednio, możesz przejść do Otwórz pod ikoną BricsCAD, wybrać .dwt z rozwijanej listy Typów pliku i wybrać plik, który chcesz edytować. Następnie można wprowadzić modyfikacje i zapisać plik.
- Aby wykonać kopię, kliknij dwukrotnie plik DWT, który chcesz skopiować. Otworzy się nowy plik DWG z tym szablonem. Wprowadź zmiany i zapisz plik jako .dwt. Zapisz go w folderze szablonów, aby łatwo użyć skopiowanego szablonu w nowym rysunku.
- Jeśli chcesz zacząć od zera, korzystając z kreatora, wykonaj procedurę Tworzenie rysunku przy użyciu kreatora. Po utworzeniu i zmodyfikowaniu pliku DWG zapisz go jako plik DWT w folderze szablonów zestawu arkuszy.
- Jeśli szablon DWT został zapisany w folderze szablonów zestawu arkuszy, pojawi się on po użyciu Nowego Kreatora w celu otwarcia nowego rysunku. Można go wybrać jako szablon do tworzenia wygenerowanych rysunków w ustawieniach arkusza Przeglądarki Projektu.
- Co możesz przechowywać w szablonie?Blok tytułowy szablonu z właściwościami zestawu arkuszy można utworzyć, postępując zgodnie z procedurą Używanie właściwości zestawu arkuszy w bloku tytułowym. Zrób to dla każdego Arkusza w swoim szablonie. Możesz również przechowywać następujące rzeczy, używając ich w pliku DWT:
- Warstwy
- Kolory
- Rodzaje linii:
- Wzory kreskowań
- Bloki
- Style tekstu
- Style Wymiarowania
- Ustawienia strony

