Tworzenie atrybutów użytkownika dla punktów programu Civil
Tworzenie atrybutu zdefiniowanego przez użytkownika
- Uruchom polecenie CIVILATRYBUTYPUNKTU.
- Wybierz punkty na rysunku, do których chcesz dodać atrybut użytkownika.
- Wybierz opcję Dodaj atrybut w wierszu polecenia.
- Wprowadź klucz atrybutu (nazwę atrybutu).
- Wprowadź wartość atrybutu.
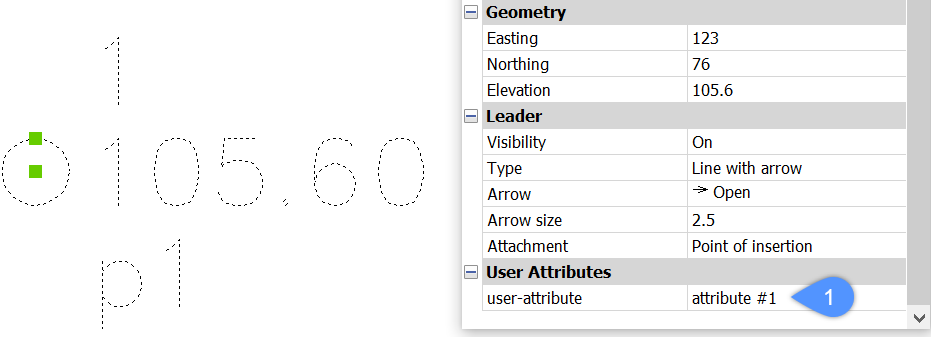
Uwaga: Nowy atrybut użytkownika jest wymieniony w panelu Właściwości punktu programu Civil (1). W tym miejscu można również edytować wartość atrybutu.
Wyświetlanie atrybutu użytkownika na wybranych punktach Civil na rysunku
W tej sekcji opisano procedurę dodawania nowego atrybutu użytkownika (nazwa atrybutu: atrybut-użytkownika) do istniejącego bloku Etykieta punktu Civil. W ten sam sposób można dodać atrybut użytkownika do nowego bloku etykiety użytkownika.
Uwaga: Etapy tworzenia zdefiniowanego przez użytkownika stylu etykiety lub edytowania istniejącego stylu zostały opisane w artykule Praca z symbolami i etykietami. Zawartość Edytora stylów etykiet została opisana w artykule Edytor stylów etykiet oknie dialogowym.
Aby dodać atrybut zdefiniowany przez użytkownika do wybranych punktów programu Civil, należy:
- Przejdź do panelu programu Civil Explorer i wybierz kartę Ustawienia.
- W obszarze Punkty programu Civil rozwiń Style etykiet i wybierz styl, który chcesz edytować. Kliknij styl prawym przyciskiem myszy i wybierz opcję Edytuj .
- W oknie dialogowym Edytor stylów etykiet przejdź do zakładki Komponenty i wybierz przycisk Edytuj, aby otworzyć okno dialogowe Edytor zawartości tekstowej.
- W oknie dialogowym Edytor zawartości tekstowej wybierz przycisk Dodaj właściwość . Wybierz właściwość, którą chcesz dodać, a następnie wybierz OK.
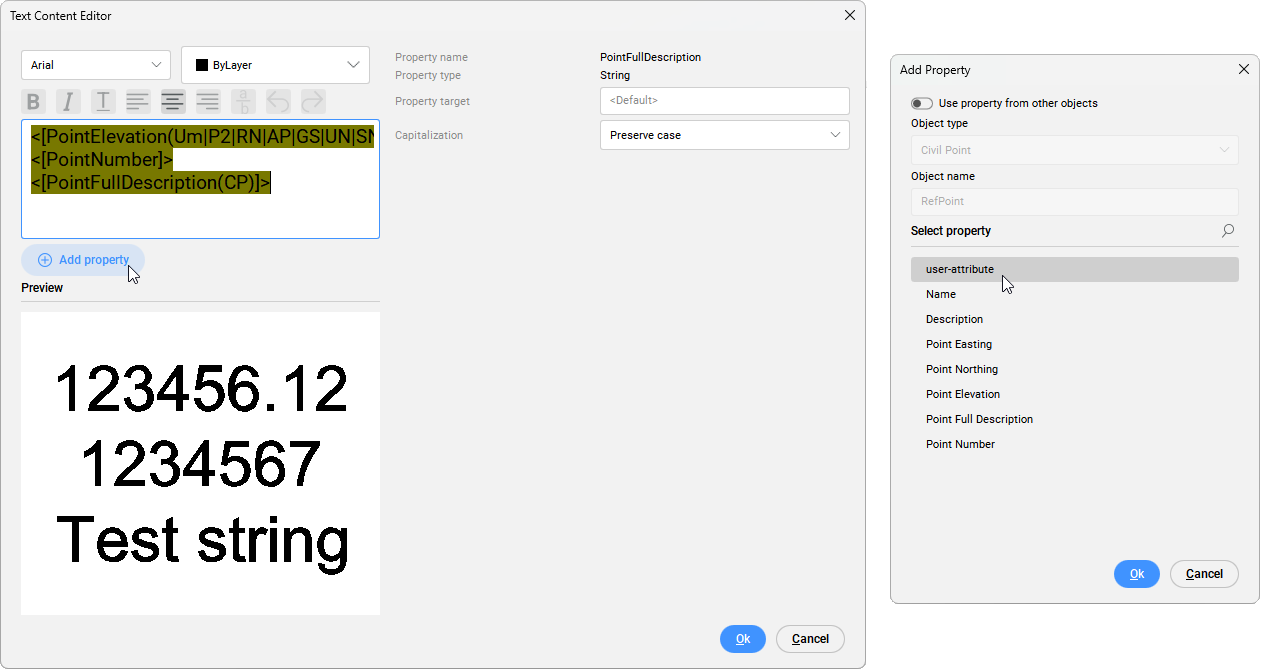 Uwaga: W oknie dialogowym Dodaj właściwości można wybrać właściwości punktu Civil, a także użyć właściwości z innego obiektu (Powierzchnia, Wyrównanie poziome i Wyrównanie pionowe). Aby uzyskać więcej informacji, zobacz artykuł Edytor zawartości tekstowej oknie dialogowym.
Wyświetlanie właściwości z innych obiektów Civil w punktach programu Civil
- W oknie dialogowym Dodaj właściwości włącz opcję Użyj właściwości z innych obiektów .
- Wybierz typ obiektu Civil.
- Wpisz nazwę obiektu.
- Wybierz właściwość wybranego obiektu Civil, która ma być wyświetlana w etykietach Punkty programu Civil.
- Kliknij przycisk OK w oknie dialogowym Dodaj właściwości.

- Kliknij przycisk Ok w oknie dialogowym Edytor zawartości tekstowej.
- Kliknij przycisk OK w oknie dialogowym Edytor stylów etykiet.
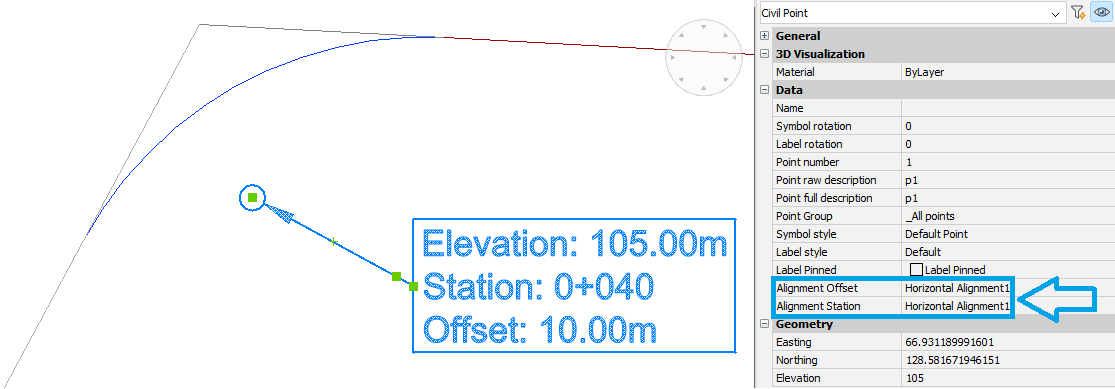
- Wybierz opcję Punkty programu Civil na rysunku i otwórz panel Właściwości.
- W panelu Właściwości wybierz odpowiednie obiekty programu Civil, aby odczytać wartości właściwości i wyświetlić je w stylu Etykieta punktu programu Civil.
Poniższy przykład przedstawia wyświetlanie Pikiety i Odsunięcia punktu Civil z linii trasowania o nazwie Pozioma linia trasowania1.