BIMCREATEDETAIL command
Creates a 3D detail and saves it in the Details library.

Icon: 
Method
Launch the command to open the Create Detail command context panel that allows you to define a BIM 3D detail in three steps.
Note: The options within the Command line reflect the options found in the command context panel.
You can choose to create:
- A basic detail - can be saved to the Project and can be referenced in the model space.
- An advanced detail - can be saved to the Project or in the Library and can be propagated in the model space.
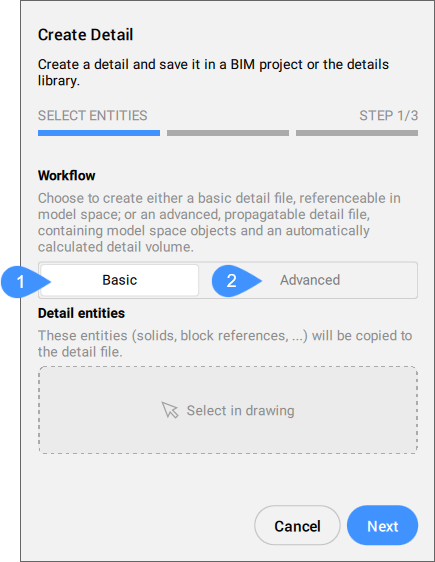
- Basic
- Advanced
Basic
Creates a basic detail file with the selected entities in the BIM project, by simply specifying a detail name and a detail file name.
Note: Use the BIMADDDETAILREFS command to add references of the basic detail to the model.
The detail DWG file:
- Will be saved to the Project's files (the Details folder).
- Will be listed in the tab under the Details folder, marked as a basic detail
 (right-click its name to access the options in the context menu).
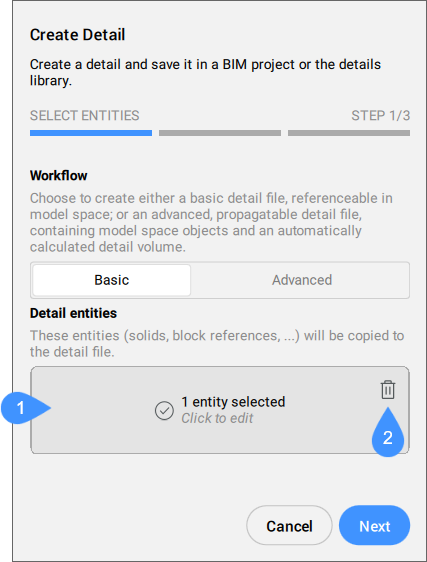
- Select in drawing
- Clear selection
- Select in drawing
- Click this area to start the selection process. Press Enter to confirm the selection. Click again to edit the selection.
- Clear selection
- Click the recycle bin icon to clear the selection.
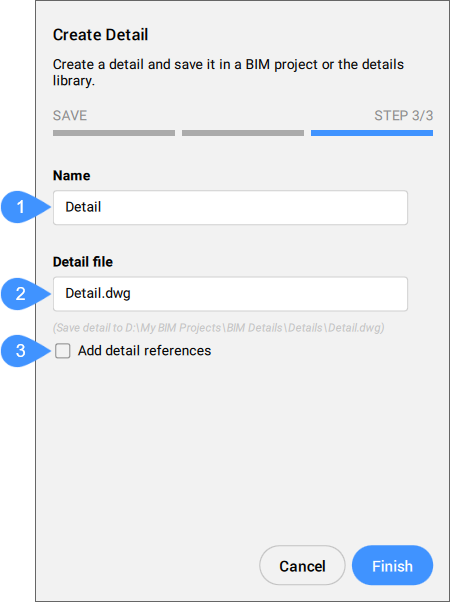
- Name
- Detail file
- Add detail references
- Name
- Allows you to enter the name of the detail to be created. This name will be used when tagging the detail on sheets.
- Detail file
- Allows you to enter a detail DWG file name.
- Add detail references
- When checked, after saving the detail, BIMADDDETAILREFS is automatically launched, and the detail name will be passed via Command line argument to create a link between the master model and the detail file. So you can immediately start converting solids to volumes, or create volumes from (sub)entities extents.
Advanced
Creates a detail file that contains the necessary information (model space objects and an automatically calculated detail volume) to propagate the detail in the model.
Note: Use the BIMPROPAGATE command to propagate the advanced detail in the model.
The detail DWG file:
- Can be saved to the Project's files (the Details folder) or to the library (the Details panel).
- Will be listed in the tab under the Details folder (if saved to the Project's files), marked as an advanced detail
 (right-click its name to access the options in the context menu).
STEP 1/3 allows you to select the detail type (Bounded or Extrudable), the Reference solids and the Detail entities.
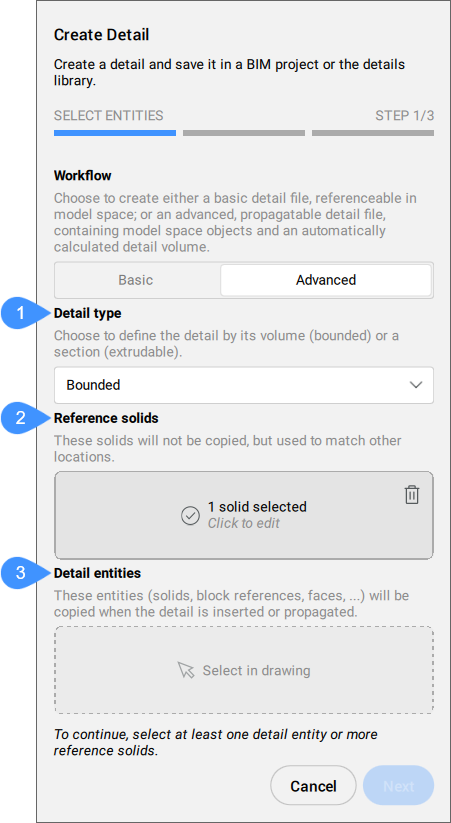
- Detail type
- Reference solids
- Detail entities
- Detail type
- Allows you to choose the type of detail to create.
- Reference solids
- Allows you to select the solids that define the situation where the detail should be applied. These solids will not be copied, but used to match other locations. At least one reference solid must be selected in order to continue to the next step.
- Detail entities
- You can optionally select entities to add more detail in relation to the selected reference solid (solids). These entities (solids, block references, faces...) will be copied when the detail is inserted or propagated.
STEP 2/3 allows you to set the Detail volume inflation.
Note: While on this step, set the optimal view for the detail in the model space. This view will be saved as the detail's thumbnail.
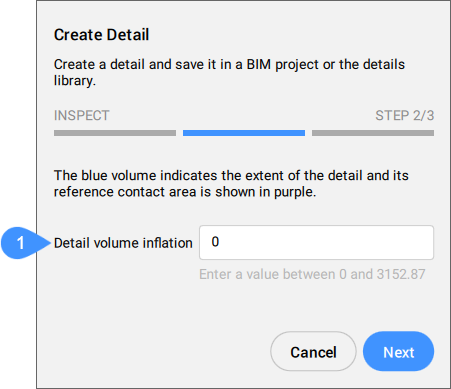
- Detail volume inflation
- Detail volume inflation
- Expands the sensitive zone of the detail to include similar solids which are not connected yet in the model. The edges of the initially detected detail volume are moved outward by the specified factor.
STEP 3/3 allows you to select where to save the detail. The panel displays the settings corresponding to the selected location.
- Save detail to
- Allows you to choose where to save the detail.
-
- Library
- Saves the detail to the library. The detail can be accessed through the Details panel.
-
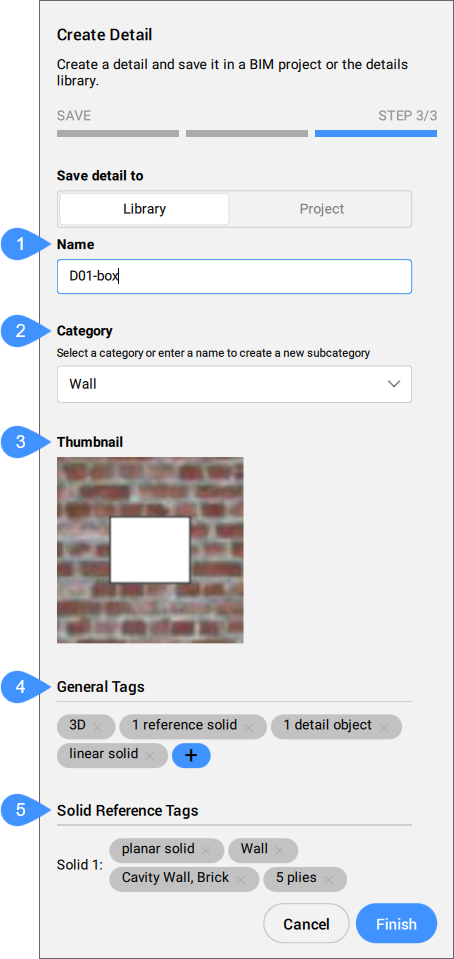
- Name
- Category
- Thumbnail
- General Tags
- Solid Reference Tags
- Name
- Allows you to enter the name of the detail to be created. This name will be used when tagging the detail on sheets.
- Category
- Allows you to select a category or enter a name to create a subcategory.
- Thumbnail
- Displays the detail thumbnail created based on the current view.
- General Tags
- Displays the general tags, automatically and manually defined.
- Solid Reference Tags
- Displays the automatically defined solid reference tags.
You can remove tags by clicking the corresponding X button.
-
- Project
- Saves the detail to the BIM Project's files. The detail can be found in the Details folder.
-

- Name
- Detail file
- Insert detail reference
- Name
- Allows you to enter the name of the detail to be created. This name will be used when tagging the detail on sheets.
- Detail file
- Allows you to enter a detail DWG file name.
- Insert detail reference
- When checked, replaces the entities selected in the model for the detail creation with a detail reference.