-HATCH command
Fills closed 2D areas with repeating patterns or solid colors.

Alias: -BH, -B
Note: 3D entities cannot be hatched.
Method
There are two methods to apply a hatch pattern:
- Specify internal point.
- Select entities.
Note: Entities which are not visible in the current viewport when the command is launched cannot be selected. Partly visible entities can, however, be selected.
Options within the command
- hatch Properties
- Allows to specify a hatch pattern.
- ? to list patterns
- Lists the names of all hatch patterns. Press F2 to see the list in the prompt history window.
- Solid fill
- Specifies a solid-color filled hatch.
- User defined
- Allows you to customize the hatch pattern.
- Set Angle for lines
- Specify the angle for the pattern lines.
- Space between standard pattern lines
- Specify the space between the hatch lines.
- Cross-hatch area?
- Toggles between Yes and No. If Yes, the pattern is repeated at 90 degrees to the original.
- Gradient
- Allows to specify a gradient pattern.
- Enter a gradient name
- Allows you to specify a gradient pattern name.
- Enter an angle for the gradient
- Allows to specify an angle for the gradient fill.
- Center the gradient?
- Toggles between Yes or No.
- ? to list patterns
- Lists the names of all gradient patterns. Press F2 to see the list in the prompt history window.
- Single color
- Specifies a new gradient color and tint.
- Enter a shade or tint value
- Specifies a number between 0 and 1 (0 = dark, 1 = light).
- Two color
- Specifies two new gradient colors.
- Truecolor
- Allows you to specify the true color for the layers in selected viewports, by entering the values for Red, Green, and Blue.
- COlorbook
- Opens a color book by entering its name and allows you to specify a color name from the loaded color book.Note: The COLORBOOKPATH system variable specifies the folder(s) in which BricsCAD® should look for color book files.
- Select entities
- Allows you to selects the entities that make up the hatching boundary to constrain the extent of the pattern.
- Remove boundaries
- Removes the boundary for the selected entities.
- Advanced options
- Allows you to set advanced options for the hatch.
- Boundary set
- Specifies the entities to consider while creating boundaries.
- Retain boundary
- Determines whether the temporary boundary is retained after the command ends.
- Island detection
- Toggles whether islands are hatched over or not. Islands represent interior boundaries.
- Specify style
- Specifies how islands are treated.
- Nested
- Alternating islands are hatched, beginning with the outermost one.
- Outer
- Only the outermost region is hatched. Interior islands are not hatched.
- Ignore
- Islands are ignored and hatched over.
- set Associativity
- Toggles whether hatches are associative, so they do update/not update their geometry alongside the boundaries.
- boundary Tolerance
- Specifies the largest gap the program ignores when hatching a boundary that is not fully closed.Note: A value of 0 means that no gaps in the boundary are tolerated by the program.
- separate Hatches
- Specifies to create separate hatches for each closed area or a single hatch entity for all.
- Draw order
- Specifies whether the hatch pattern appears visually above/below overlapping entities or its boundary.
- Origin
- Specifies a new value for the hatch origin.
- ANnotative
- Sets the annotative property for the hatch. It applies the current annotative scale, defined by CANNOSCALE system variable.
- Layer
- Specifies the layer on which the hatch should be placed.
- Transparency
- Specifies a value between 0 and 90 for the transparency.Note: A value of 0 means fully opaque. The transparency level is limited to 90% to avoid confusion with layers that are frozen or turned off.
- ByLayer
- Applies the value of the transparency property of the layer on which the hatch resides.
- ByBlock
- The transparency value is controlled by block.
- Use current
- Applies the current transparency value as defined by the CETRANSPARENCY system variable.Note: The transparency value for new hatches is saved by the HPTRANSPARENCY system variable.
- Undo
- Removes selected boundaries from the selection.
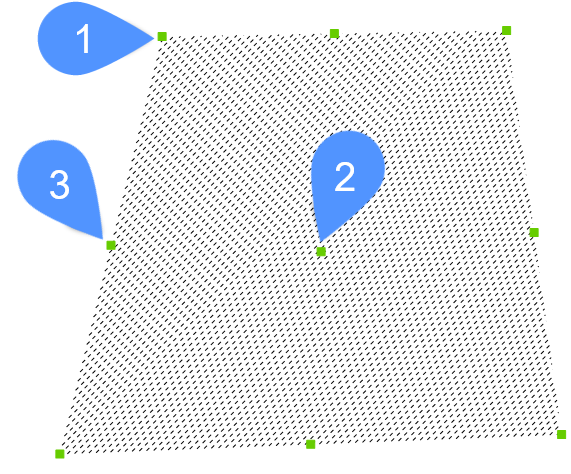
Note: Hatches can be edited directly through grips.

- Drag the central grip (2) to move the hatch.
- Drag the vertex (1) or a midpoint grip (3) to change the hatch boundary.

