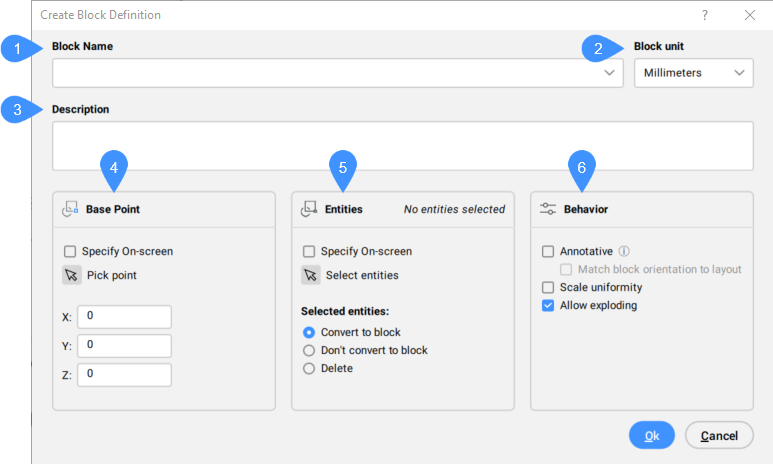
Create Block Definition dialog box
The Create Block Definition dialog box allows you to create a new block definition.

- Block Name
- Block unit
- Description
- Base Point
- Entities
- Behavior
Block Name
Specifies the name of the block.
Block unit
Scales the block correctly when the block definition is inserted in a drawing whose units are different from the drawing in which the block was created. More specifically, in which the INSUNITS variable differs.
Description
Provides a description of the block (optional).
Base Point
Modifies the properties of the base point of the block definition. At this point, the block is inserted with the INSERT command.
- Specify On-screen
- Allows you to define the base point in the model space after you click the OK button, if the box is ticked.
- Pick point
- Allows you to pick a point in the drawing for the block's base point. You can also enter the X,Y,Z coordinates in the drawing.
- X/Y/Z
- Defines the coordinates where the block should be inserted. The Z coordinate is usually optional.
Entities
Selects the entities that make up the block.
- Specify On-screen
-
Allows you to select the entities in the model space after you click OK, if the box is ticked.
Note: Optionally, include Reference Curves in the selection, which allows to automatically align a block during insertion.
- Select entities
- Selects one or more entities in the drawing.
- Selected entities
- Defines how the entities are turned into a block.
- Convert to block
- Selected entities are converted to a block. This is the default option.
- Don't convert to block
- Selected entities are retained as entities, and the block definition is created in the drawing.
- Delete
- Selected entities are deleted after the block definition is created.
Note: The Convert to block option is the most efficient one.
Behavior
- Annotative
-
Sets the annotative property of the block. This type of block should be created when the annotation scale in model or paper space is 1:1. By being annotative, the block automatically scales itself according to the current annotation scale factor.
Choose whether you want the block to follow annotative scaling:- On: the block will scale itself to whatever annotative scale is in effect. The Scale Uniformly option is grayed out (unavailable).
- Off: the block follows the scale factor you give the block during the INSERT command.
- Scale uniformly
-
Determines if blocks can be scaled non-uniformly. This option is not available to annotatively-scaled blocks.
- On: X, Y, and Z scale factors of blocks are the same. This prevents blocks from being distorted.
- Off: blocks can be inserted with different X, Y, and Z scale factors. This is useful for objects that can have different dimensions, such as differently sized table tops.
- Allow exploding
-
Determines if users can explode the block after it is inserted. When a block is exploded, it loses its block status, and the individual entities can be edited.
Tip: To edit the entities of an unexploded block, use the BEDIT command.- On: blocks can be exploded after being inserted, using the EXPLODE command.
- Off: blocks cannot be exploded. You can change this property with the EXPBLOCKS command, Blocks section.

