Tagi BIM
Pliki źródłowe
- _SectionTag.dwg: zawiera bloki znaczników i style multiodnośnika.
- _TagTypeToStyle.xml: łączy typ obiektów BIM ze stylem multiodnośnika.
Oba pliki można znaleźć w folderze:
C:\Users\%username%\AppData\Roaming\Bricsys\BricsCAD\V26x64\en_US\Support\Bim\Sections
Ręczne przypisywanie tagów BIM
Opcja Ręcznie polecenia BIMTAG pozwala wybrać element BIM, dla którego ma zostać utworzony tag BIM.
Więcej informacji na temat tej opcji można znaleźć w artykule referencyjnym polecenia BIMTAG.

Ręcznie utwórz tag BIM
- Otwórz rysunek przekroju, dla którego chcesz utworzyć znaczniki BIM.Uwaga: Aby uzyskać więcej informacji na temat generowania rysunków przekrojów, przeczytaj najpierw artykuł Generowanie rysunków BIM.
- W przypadku braku wyboru, wybierz Tag z Quad lub wpisz BIMTAG, a następnie R w wierszu poleceń, aby wybrać opcję ręczną.
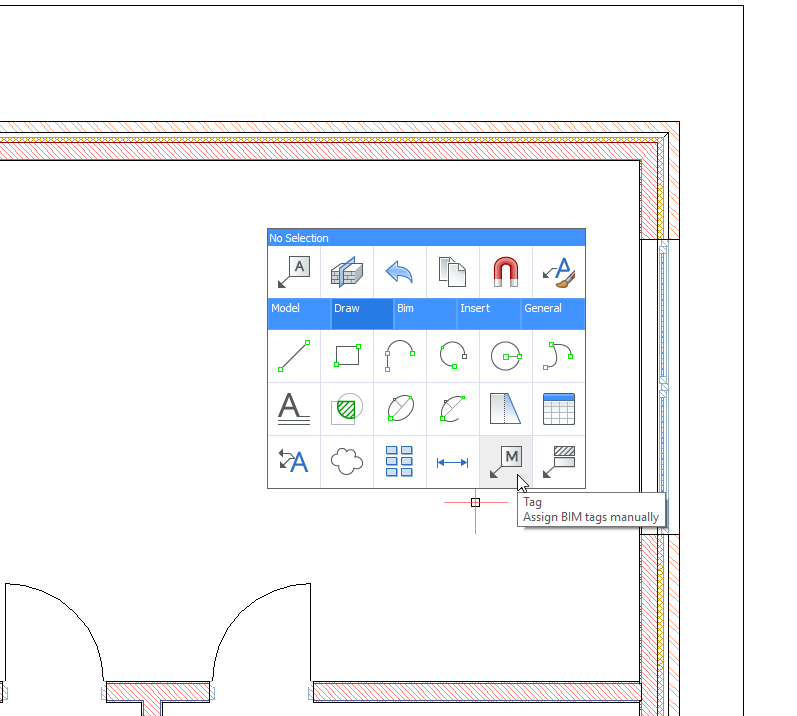
Zostanie wyświetlony monit: Wybierz punkt na przekroju elementu BIM [Auto/Aktualny styl multiodnośników/Zmień typ tagu]:
- Wybierz punkt na linii przekroju elementu BIM lub kliknij wewnątrz jego granicy, aby wygenerować dla niego znacznik. Pojawi się znacznik. Jeśli wybrany punkt jest współdzielony między wieloma jednostkami BIM, użyj klawisza Ctrl, aby przełączać się między różnymi możliwymi znacznikami.
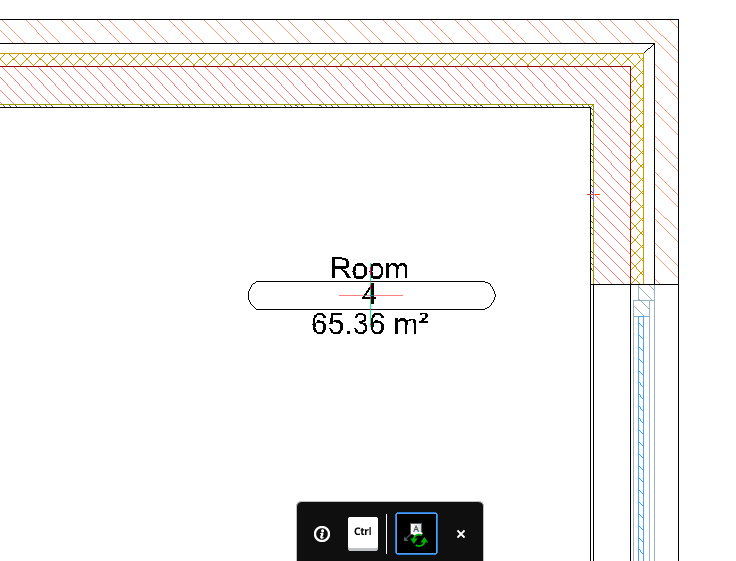
Zostanie wyświetlony monit: Umieść tag [Następny element]:
- Przesuń kursor, aby dostosować pozycję znacznika i kliknij lewym przyciskiem myszy, aby go umieścić.
Zostanie wyświetlony monit: Wybierz punkt na przekroju elementu BIM [Auto/Aktualny styl multiodnośników/Zmień typ tagu]:
- Powtórz kroki 3 i 4 dla wszystkich podmiotów, które chcesz oznaczyć. Jeśli nie potrzebujesz więcej znaczników, naciśnij klawisz Esc lub Enter, aby zakończyć polecenie. Jeśli chcesz oznaczyć wszystkie elementy, możesz użyć polecenia BIMTAG Wybierz wszystkie obiekty.
Te same kroki można zastosować do oznaczenia płyty podłogowej lub dachu.
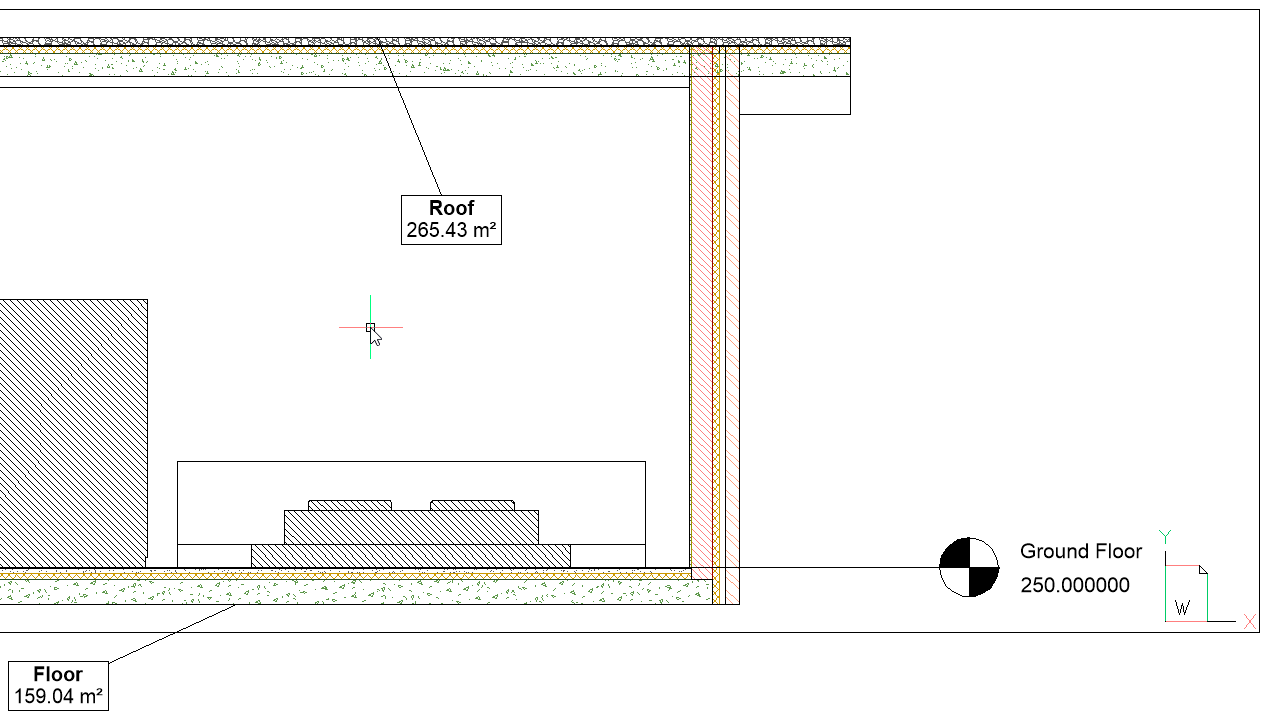
Automatyczne przypisywanie tagów BIM

Więcej informacji na temat tej opcji można znaleźć w artykule referencyjnym polecenia BIMTAG.
- Otwórz rysunek przekroju, dla którego chcesz utworzyć znaczniki BIM.
- Wybierz rzutnię zawierającą sekcję, do której chcesz dodać znaczniki BIM.
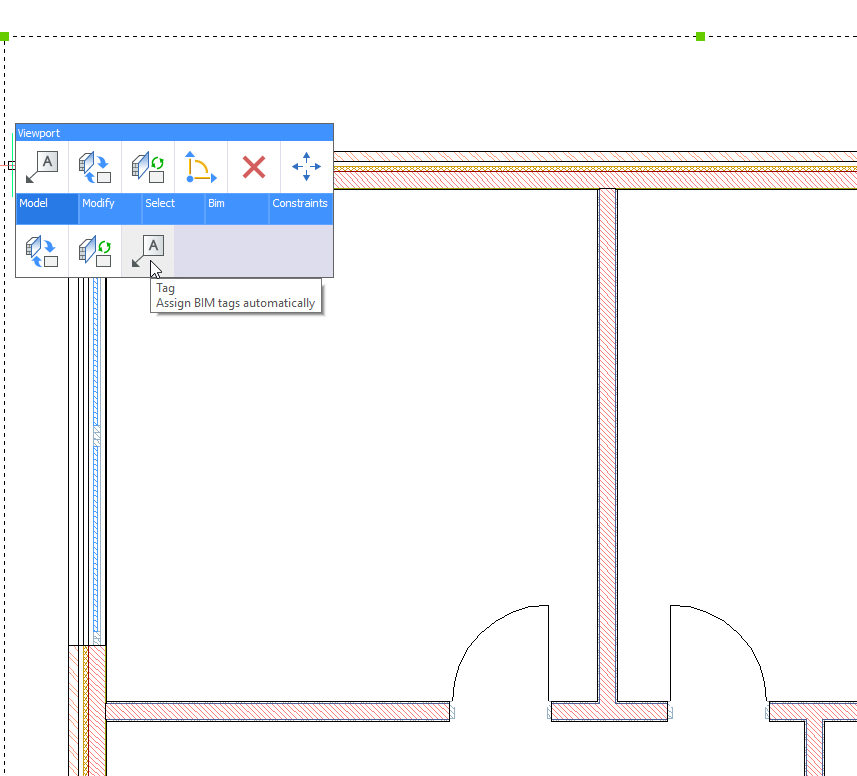
- Wybierz Przypisuje etykiety BIM automatycznie. z Quad lub wpisz BIMTAG w wierszu poleceń.
Ponieważ wskaźniki przekroju, wskaźniki kondygnacji i objaśnienia siatki są generowane automatycznie podczas aktualizacji przekroju, oznacza to, że znaczniki zostały już przypisane do przekroju:
Tagi zostały już przypisane do przekroju. Wybierz opcję aktualizacji [Aktualizuj istniejące/aktualizuj istniejące i dodaj nowe/Zregeneruj wszystko]: <Zregeneruj wszystko>Dzięki opcji Zaktualizuj istniejące i dodaj nowe, znaczniki BIM zostały automatycznie wygenerowane dla każdej z jednostek BIM w rzutni.
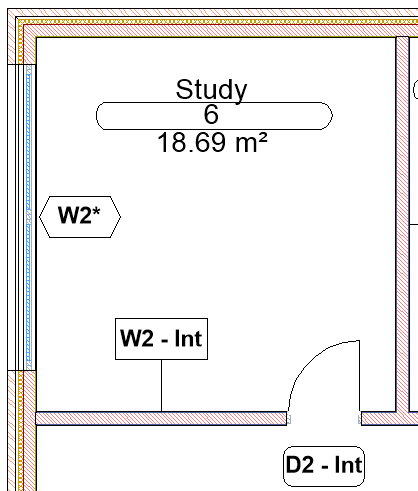
Zostanie wyświetlony monit: Wybierz rzutnię przekroju BIM [Ręcznie/Selekcja sześcianem/Opcje wyboru (?)]:
- Jeśli chcesz automatycznie utworzyć znaczniki BIM w innej rzutni na arkuszu, wybierz tę rzutnię. Jeśli nie potrzebujesz żadnych dodatkowych znaczników BIM, naciśnij Esc, aby zakończyć polecenie.
Tworzenie tagów z polami
- Otwórz rysunek przekroju, dla którego chcesz utworzyć znaczniki BIM.
- Użyj polecenia MULTIODN, aby utworzyć znacznik.Uwaga: Jeśli komponenty nakładają się na siebie, mogą pojawić się błędy. Aby tego uniknąć, należy wybrać krawędzie obiektu, który ma zostać oznaczony. W przeciwnym razie polecenie nadaje priorytet komponentowi znajdującemu się poniżej.
- Wybierz opcję Pole w oknie Formatowanie tekstu.
- W oknie dialogowym Pole przejdź do .
- W polu Kategoria Właściwości wybierz opcję BIM. Wybierz opcję Nazwa w polu Właściwości.
- Nazwa wybranego elementu jest wyświetlana w polu Nazwa.Uwaga: Jeśli chcesz zmienić wyświetlaną nazwę, musisz zmienić nazwę komponentu.
- Naciśnij przycisk OK, aby zamknąć okno dialogowe Pole i okno Formatowanie tekstu.
Tworzenie danych źródłowych dla typu jednostki BIM
Domyślnie istnieją już dane źródłowe dla następujących typów jednostek BIM: Adnotacja, Belka, Kolumna, Ściana osłonowa, Drzwi, Warstwy, Balustrada, Rampa, Dach, Pomieszczenie, Płyta, Schody, Ściana, Okno i Odniesienia do detali.
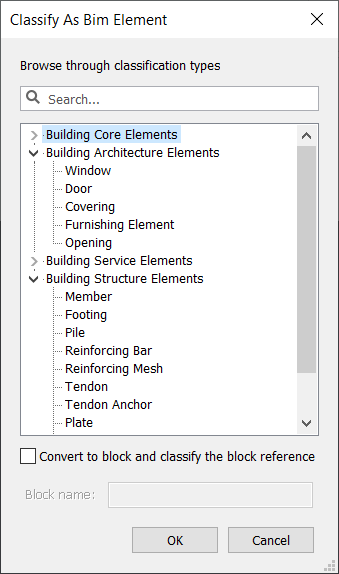
Dostępne typy jednostek BIM są wymienione w oknie dialogowym Klasyfikuj jako element BIM. Aby otworzyć to okno dialogowe, wybierz opcję Inne polecenia BIMKLASYFIKUJ.
Utwórz blok tag i styl multiodnośnika
- Wpisz FOLDERPOMOCNICZY w wierszu poleceń i naciśnij Enter.
- Po otwarciu folderu przejdź do folderu i otwórz plik _SectionTag.dwg.
- Uruchom polecenie EXPBLOCKS.
Zostanie wyświetlone okno dialogowe Eksplorator rysowania / Bloki.
- Wybierz blok _AnnotationTag (lub inny istniejący blok, którego chcesz użyć jako szablonu).
- Kliknij prawym przyciskiem myszy i wybierz Kopiuj z menu kontekstowego.
- Kliknij prawym przyciskiem myszy i wybierz Wklej z menu kontekstowego.
- Kliknij Kopiuj, ale zachowaj obie opcje w oknie dialogowym Kopiuj/Wklej.
- Zmień nazwę skopiowanego bloku na _MemberTag.
- Wybierz opcję Style Multiodnośnika w oknie dialogowym Eksplorator rysunków.
- Kliknij przycisk narzędzia Nowy (
 ).
).Zostanie wyświetlone okno dialogowe Nowy Styl Multiodnośnika:
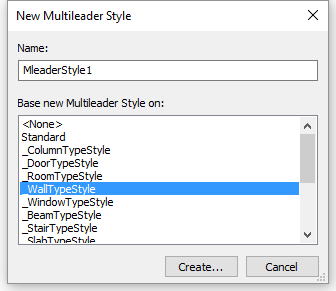
- W polu Nazwa wpisz _MemberTypeStyle.
- Wybierz styl źródłowy z listy Baza Stylu Multiodnośnika nowego na:.
- Kliknij przycisk Utwórz....
- (Opcjonalnie) Edytuj właściwości Odnośnik.
- Kliknij kartę Zawartość.
- W sekcji Opcje bloków kliknij przycisk Lista bloków źródłowych i wybierz _MemberTag z listy.
- Zamknij okno dialogowe Eksplorator rysunków.
- Zapisz _SectionTag.dwg.
Powiązanie typu podmiotu z jego stylem multiodnośnika
- Wpisz FOLDERPOMOCNICZY w wierszu poleceń, a następnie przejdź do sekcji i otwórz plik _TagTypeToStyle.xml.
Użyj edytora tekstu ASCII, na przykład Notatnika.
- Dodaj następujące elementy tuż przed </TagTypeToStyle>:
<tag type="BIM_MEMBER"> <style name="_MemberTypeStyle" autoPlacement="true" autoRotation="true" offset="1" /> </tag> - Zapisz plik.Należy pamiętać, że ten styl ma trzy opcje:
- autoPlacement = "true" sprawi, że tagi będą generowane automatycznie podczas korzystania z opcji Auto BIMTAG. Jeśli ta opcja jest ustawiona na false, ten typ tagu nie będzie generowany automatycznie (nadal można generować te tagi ręcznie).
- autoRotation = "true" spowoduje obrócenie tagu wzdłuż głównej osi oznaczonej jednostki. Jeśli opcja ma wartość false, znacznik zostanie umieszczony poziomo.
- odsuń spowoduje odsunięcie znaczników prostopadle do głównej osi oznaczonej jednostki.
Dostosowywanie bloków tagów
- Jednostki układu Linework, stałe teksty itp.
- Atrybuty Właściwości jednostki BIM.
Dostosuj bloki znaczników tylko dla bieżącego rysunku
- Na rysunku przekroju, dla którego chcesz dostosować znaczniki BIM, wpisz MODNSTYL w wierszu poleceń. Eksplorator rysunków otworzy się w zakładce Style Multiodnośnika.
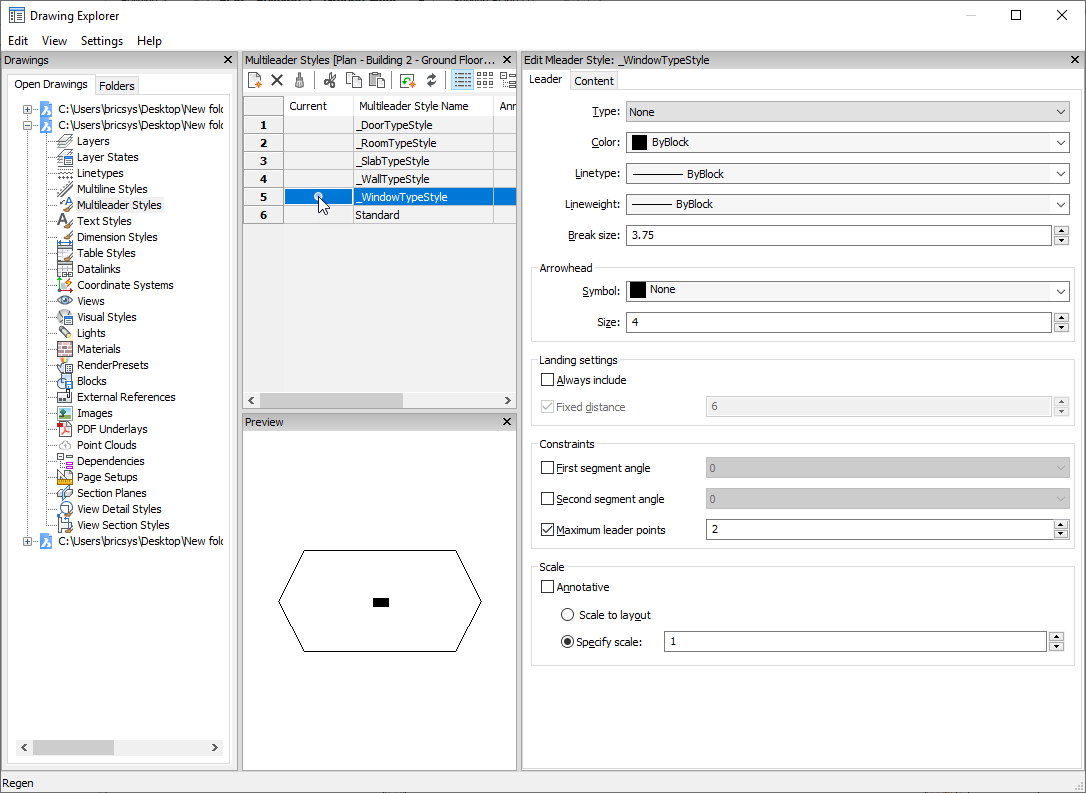
Każdy tag BIM jest multiodnośnikiem. Styl multiodnośnikiem zależy od typu oznaczanego elementu BIM. Wszystkie style multiodnośnika na rysunku są wymienione w Eksploratorze rysunków.
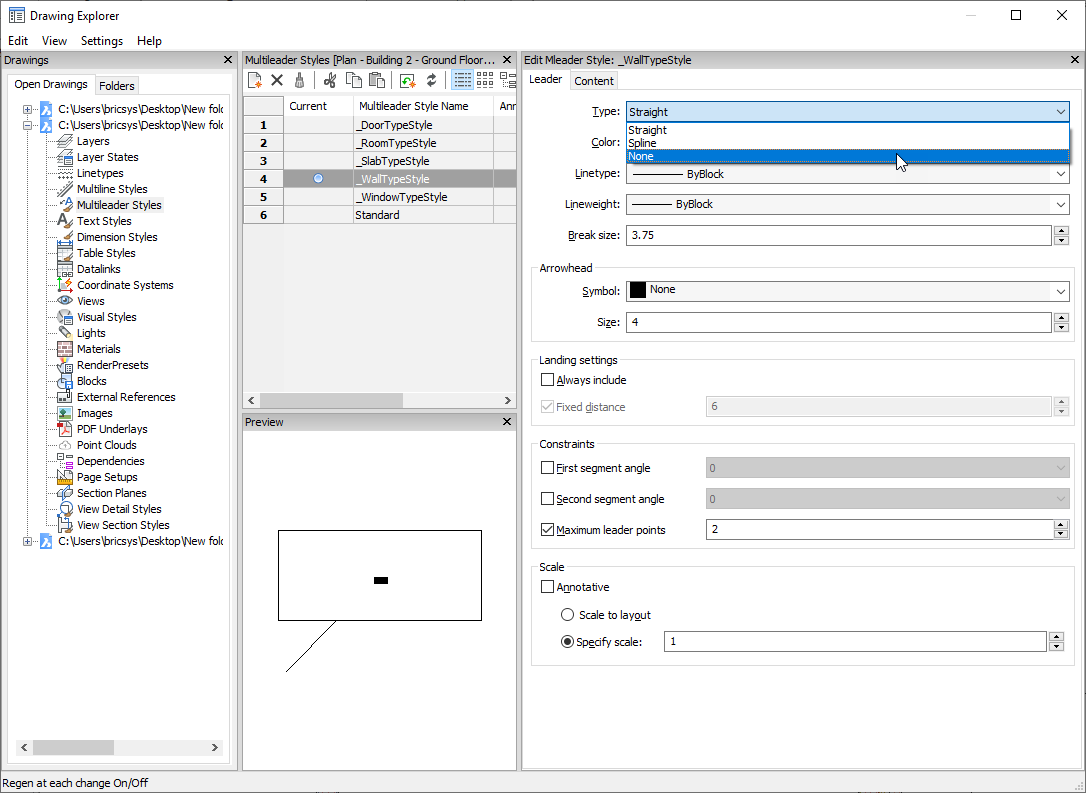
- Wybierz _WallTypeStyle z listy, aby zobaczyć podgląd tagu. Tutaj można zmienić styl znacznika.
- Zmień Typ Odnośnika z Prosty na Brak. Teraz nie będzie linii łączącej znacznik z elementem ściany.
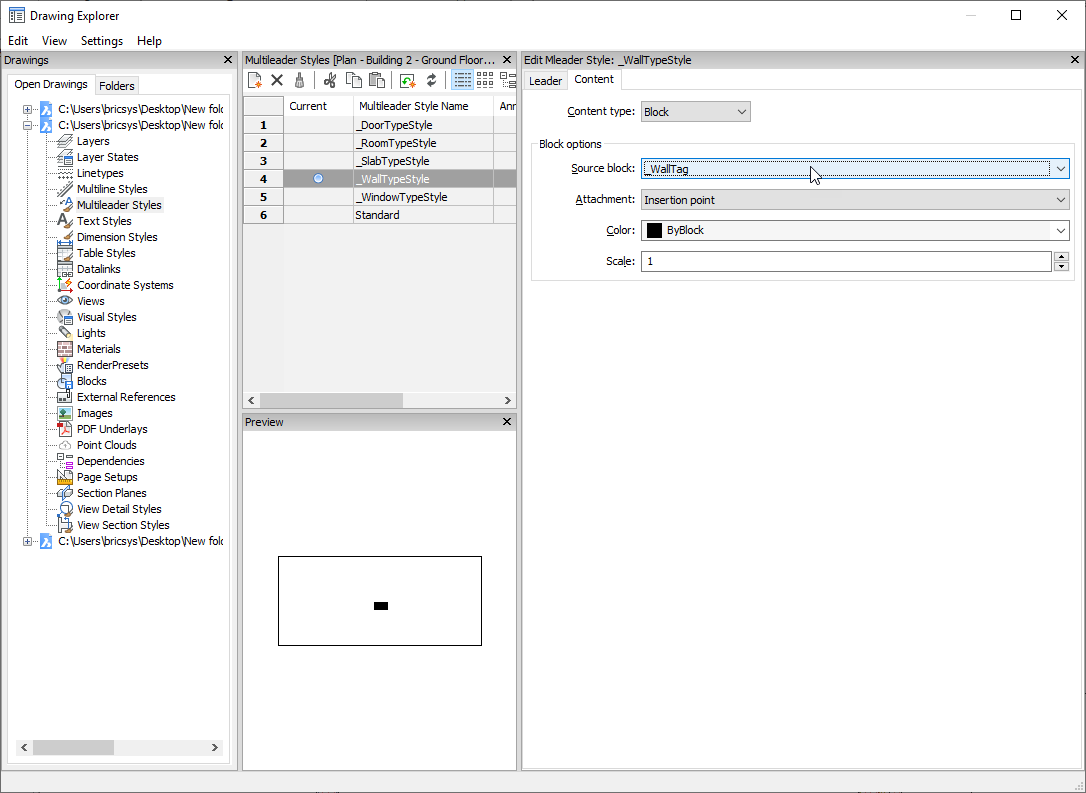
- Na karcie Zawartość Blok Źródłowy nosi nazwę _WallTag. Zapamiętaj to i zamknij Eksplorator Rysunku.
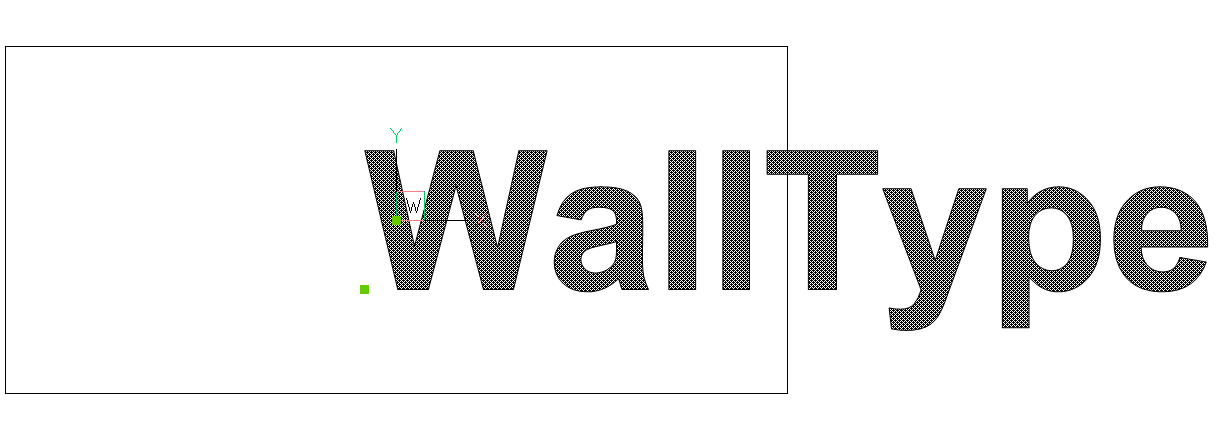
- W wierszu poleceń wpisz BEDYCJA i wybierz _WallTag z listy. Kliknij przycisk OK.
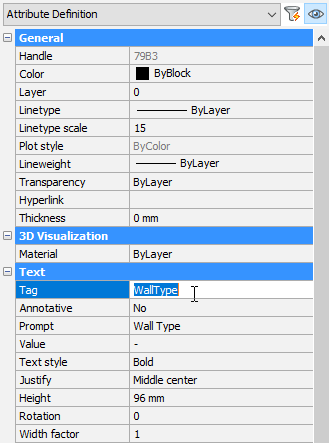
- Wybierz tekst WallType i wartość Tag w panelu Właściwości.
- Zamień WallType na Kompozycja i naciśnij ENTER (zobacz następną procedurę, aby poznać składnię innych typów właściwości). Zostanie wyświetlony tekst atrybutu Kompozycja.
- Najedź kursorem na ten atrybut i wybierz opcję Kopiuj z menu Quad. Wybierz punkt bazowy, aby wkleić skopiowany atrybut poniżej bieżącego.
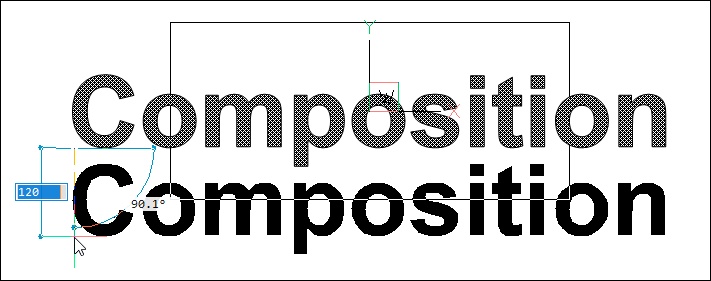
- Wybierz skopiowany atrybut i zamień Kompozycja na Ilość/Grubość w polu Tag w panelu Właściowści.
- Usuń prostokąt.
Dwa atrybuty zostaną wyświetlone jak na poniższej ilustracji:

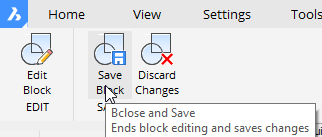
- Wybierz ikonę Zapisz blok na karcie Edytor bloków na wstążce lub wpisz BCLOSE w wierszu poleceń i wybierz opcję Zapisz.
Wyświetlona zostanie rzutnia przekroju.
- Podświetl rzutnię i wybierz opcję Przypisz tagi BIM automatycznie z okna Quad.
Zostanie wyświetlony monit: Tagi zostały już przypisane do przekroju. Wybierz opcję aktualizacji [Aktualizuj istniejące/aktualizuj istniejące i dodaj nowe/Zregeneruj wszystko]: <Zregeneruj wszystko>
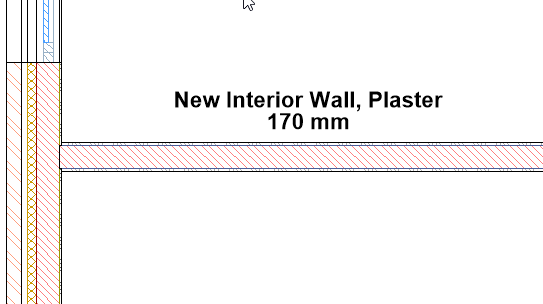
- Naciśnij klawisz Enter, aby zaakceptować domyślną opcję Regeneruj wszystko. Tagi ścienne zostaną zregenerowane z nowym stylem.
Edycja danych źródłowych w celu dostosowania znaczników BIM dla wszystkich rysunków przekrojów
- Po otwarciu dowolnego rysunku wpisz FOLDERPOMOCNICZY w wierszu poleceń. Naciśnij Enter.
- Po otwarciu przejdź do strony i otwórz plik _SectionTag.dwg.
- Uruchom polecenie BEDYCJA.
- Wybierz blok znaczników, który chcesz edytować, a następnie kliknij przycisk OK.
- Dodaj atrybuty przy użyciu następującej składni, w polu Tag, w panelu Właściwości:
Typ właściwości Składnia Przykłady BIM <nazwa właściwości> Nazwa
ograniczanie pomieszczenia
Parametry parametry / <nazwa_parametru> parametry/w
parametry/grubość ramy
Ogólne ogólne/<nazwa właściwości> ogólne/warstwa
ogólne/Skala Linii
Masa masa/<nazwa właściwości>
mass/<nazwa właściwości>:<pod>
masa/powierzchnia
masa/wysokość guw: minimum
GEOmetria geometria/<nazwa właściwości>
geometria/<nazwa właściwości>:<pod>
geometria/pozycja
geometria/wysokość guw:maksymalna
Ilość ilość/<nazwa właściwości> ilość/długość
ilość/powierzchnia netto
IFC <zestaw właściwości ifc> / <właściwość ifc> ściana ogólna /nośna
typ oszklenia drzwi/warstwy szkła
Zdefiniowany przez użytkownika <etykieta zestawu właściwości> / <etykieta właściwości> ściany zewnętrzne / cena System klasyfikacji <etykieta system klasyfikacji>
<etykieta kodu klasyfikacji>
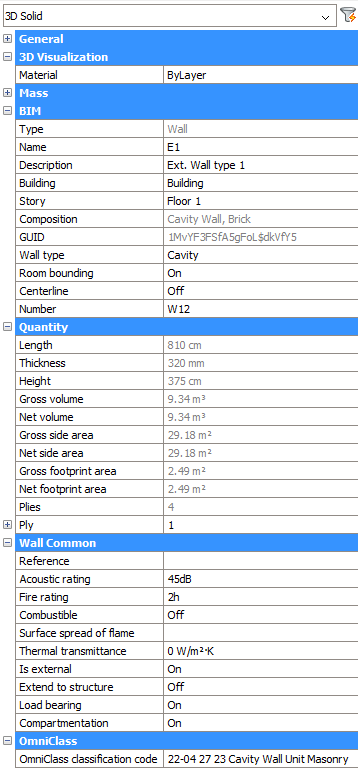
kod klasyfikacji omniclass/omniclass Uwaga: Aby dowiedzieć się, które właściwości są dostępne dla określonego typu jednostki BIM, wybierz jednostkę w modelu i otwórz panel Właściwości.Na poniższym obrazku wymieniono właściwości obiektu BIM Ściana.
Kliknij przycisk +, aby rozwinąć węzeł typu właściwości.
- Dla każdego nowego atrybutu wykonaj następujące czynności:
- Skopiuj istniejący atrybut lub utwórz nowy atrybut (polecenie ATRDEF).
- Wybierz nowy atrybut.Uwaga: Nie klikaj dwukrotnie atrybutu. Okno dialogowe Edytuj definicję atrybutu nie akceptuje spacji w polu Znacznik.
- W panelu Właściwości wpisz odniesienie do właściwości w polu Znacznik (zobacz składnię w powyższej tabeli).
- (Opcjonalnie ) Zdefiniuj właściwości tekstu (Styl tekstu, Justowanie, Wysokość, ...) w panelu Właściwości.
- (Opcjonalnie) Dodaj linię i stały tekst.
- Na pasku narzędzi Edycja bloku kliknij ikonę Zapisz, aby zakończyć polecenie BEDYCJA, lub wpisz BZAMKNIJ w wierszu poleceń, opcja Zapisz.
Definicje w bloku znaczników Wynikowy tag 
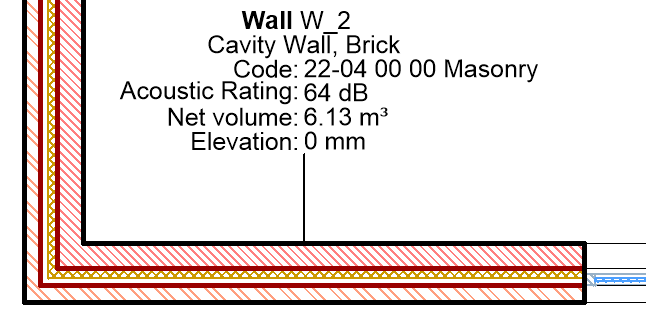
Blok _WallTag Znacznik ścienny w przekroju planu 
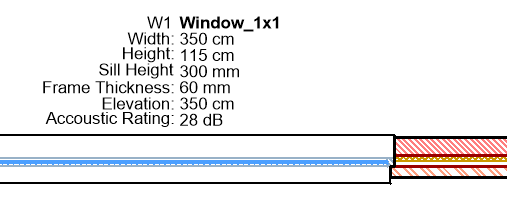
Blok WindowTag Znacznik okna w przekroju planu
Przypisywanie tagów kompozycji
Znaczniki kompozycji umożliwiają oznaczenie ściany lub elementu płyty w celu określenia jego kompozycji. Te znaczniki BIM są listą materiałów warstwowych, które składają się na dany element.

Tworzenie tagów kompozycji
- Otwórz rysunek przekroju, dla którego chcesz utworzyć znaczniki kompozycji.
- Wybierz opcję Przypisz znaczniki kompozycji z listy Quad.
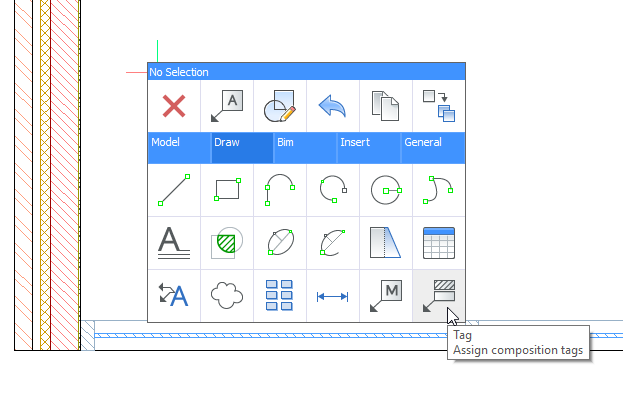
Lub wpisz BIMTAG w wierszu poleceń, a następnie wykonaj jedną z poniższych czynności:
- Wpisz M+Enter dla opcji Ręcznie, następnie T+Enter dla zmiany typu znacznika, a następnie O+Enter dla opcji kOmpozycja.
- Kliknij opcje w wierszu poleceń.
- Kliknij opcje w menu podpowiedzi.
- Zostanie wyświetlony monit: Wybierz punkt na przekroju elementu BIM [Auto/Aktualny styl multiodnośników/Zmień typ tagu]:
Wybierz punkt na elemencie BIM, aby wygenerować dla niego znacznik. Pojawi się znacznik. Jeśli wybrany punkt jest współdzielony między wieloma jednostkami BIM, można użyć klawisza Ctrl, aby przełączać się między różnymi możliwymi znacznikami kompozycji.
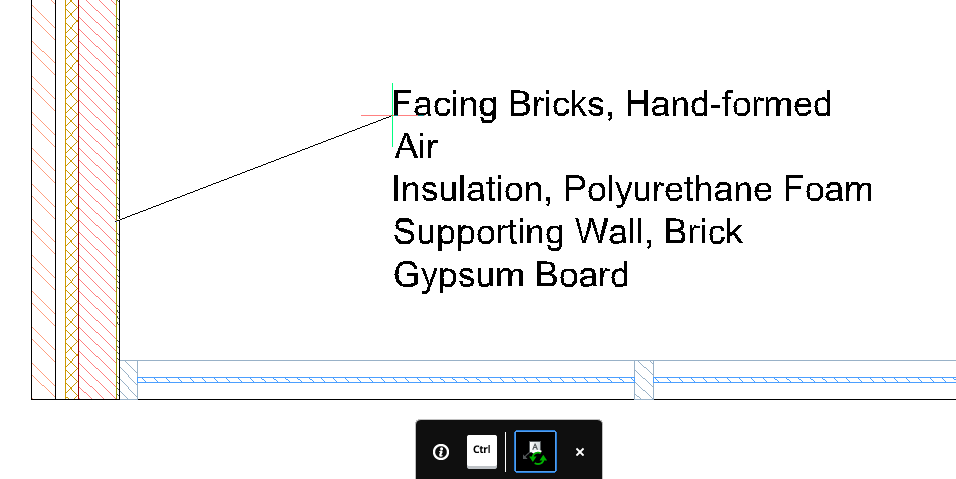
Zostanie wyświetlony monit: Umieść tag [Następny element]:
- Aby dostosować położenie tagu, przesuń kursor i kliknij lewym przyciskiem myszy.
Zostanie wyświetlony monit: Wybierz punkt na przekroju elementu BIM [Auto/Aktualny styl multiodnośników/Zmień typ tagu]:
- Powtórz kroki 3 i 4 dla wszystkich podmiotów, które mają zostać oznaczone. Jeśli nie potrzebujesz więcej znaczników, naciśnij Esc lub Enter, aby zakończyć polecenie.

